
December 4, 2009
Mark’s OSCR – 12-04-09
Hi everybody!
It’s been a while since I submitted an update on my OSCR. A ton of things have happened since I started.
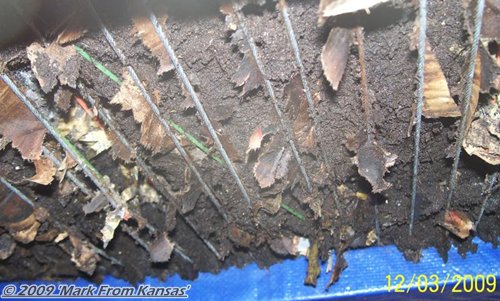
On 11/21/09 I Added 3 pounds of vegetable scraps and 5 pounds of CG and left it uncovered. There have been some major breaches of the newspaper on the harvest chamber cables. What is odd is that about one inch of the finished VC has fallen along with some worms as I expected but, it leaves a 2 inch void in between the cables and the VC.
I suspect that the paper, manure, and leaves have created a layer of bulk that is suspending the VC from falling down into the harvest chamber. I have 6 bins containing moist manure in the harvest chamber to catch the VC, cocoons, and worms.
Tonight the bin has had cold spots – low 60s. The weather outside has been mild and I plugged the heater 3 days ago. I left the food uncovered to try out my gnat/fly experiment, if the temperature doesn’t climb back to at least 66 degrees in the morning; I am going to scrap the experiment and cover with mulched leaves.
My gnat / fly experiment was to attract gnats and flies to see if the horse manure would repel these pests. My other goal was to help Bentley eradicate these insects from the face of the Earth and have them added to the extinct species list.
EDITOR’S NOTE: Hahahahahaha!
Honestly, I have never really had gnats in any of my outdoor bins and still only a few showed up but, a lot of people do have problems with them. I got a few gnats hoping I would fit in with gnat issues. A dozen gnats do not mean an infestation.
Darn my luck!
Please keep sending your question and comments.
Mark

Some vermicompost harvested from the OSCR

‘Mark from Kansas’ is an avid vermicomposter from…well…Kansas, and contributing author here at Red Worm Composting. When he is not tending to his OSCR worm bin, Mark also enjoys spending time with his wife Letty (who also doubles as his trusty vermicomposting assistant) and picking petunias (ok, Bentley just made that last bit up).
**For Even More Worm Fun, Sign Up for the RWC E-mail List!**
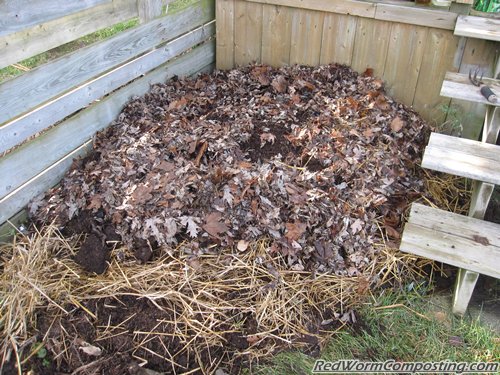
Winter Cat Litter Composting Bed

Heaped up with straw, fall leaves and compostable cat litter waste, this worm bed should be relatively easy to keep warm this winter!
Back at the beginning of November I wrote about my fall clean-up efforts, and promised to provide you with an update on my outdoor cat litter composting experiment. As some of you will recall, I filled up one of my backyard composters with compostable cat litter, along with peat moss and other compostable materials, and then basically left it to sit (once the level was nearing the top of the bin). In my last update (WAY back in August) I reported on my pleasant, and unexpected, discovery of a thriving Red Worm population in the bottom of the bin. I had been holding off from actually stocking the system with worms simply because I assumed the habitat in the bin would still be inhospitable for them. Yet another example of how Red Worms NEVER cease to amaze me! (have another prime example of this coming up in another post, by the way!).
Given the fact that this ‘regular’ backyard composter is totally unprotected, I knew that something would need to be done in order to make sure that the resident worm population survived the winter (although, have I mentioned that Red Worms tend to surprise me from time to time? haha! One winter I had a population survive unprotected in this exact same bin). I settled on the idea of spreading out the contents of the bin on one of my (non-food-crop) garden beds, then simply covering it with a layer of straw. Recently, I have decided to take things one step further.
What follows is a series of photos and captions documenting the process. I will also add some final thoughts afterwards, along with links to previous cat litter composting blog posts.
**WARNING** – Some photos show cat turds – viewer discretion is advised (don’t scroll down if this sort of thing bothers you). Also, be aware that cat litter composting warrants some caution, and should generally only be attempted by those with previous composting experience. Any dog or cat waste composting systems should dedicated to those waste materials alone (i.e. don’t toss them in your ‘regular’ compost bins), and should not be set up near any water sources. Cat litter shouldn’t be handled at all by pregnant women or young children.
Ok, you’ve been warned – you may now proceed!
😉

I was surprised by the success of the cat litter composting in one of my backyard bins this past summer (especially given the fact that a substantial population of worms became established without any assistance from me), but definitely didn’t want to let the contents freeze solid over the winter

Contents of the cat litter composting bin, spread out on one of my garden beds (one not used for food crops, in case you are curious) then moistened.

Covered with a first layer of straw – originally planned as my only layer of winter protection.

Material from my backyard bin – I figured this bed was as good a spot to add some as any. This is actually what got me to start thinking about upgrading the bed to a full-fledged winter composting system.
Before adding more compostable cat litter I wanted to make sure there was a bit of a buffer zone, so I added some fall leaves.

Multiple bags of cat litter waste were then added.

First layer of cat litter was covered with straw, then new litter deposits were added. First I lay down leaves, then brown paper, then the litter waste.

Each of these additional litter deposits was then covered with more leaves

Finally, everything was covered with a thick layer of straw. I will eventually add a couple of tarps, but I want to allow the system to ‘air out’ for a while first.
As alluded to in the last caption, I’ve been somewhat worried about adding tarps over the system too soon – the last thing I want to do is kill off my worms with excess ammonia gas. Most of the litter waste that was added to this bed (apart from the material from the composter, laid down as the first layer) has been sitting in bags, so it certainly hasn’t been given a good opportunity to age and off-gas any ammonia.
What’s really cool is that we ended up getting a huge downpour the evening/night after I set up this bed. This should REALLY help since it will not only moisten everything nicely, but it will also likely help to make the cat litter wastes a little more worm friendly. I am still going to leave the tarps off for now – and for the next few weeks will likely only use them if I know we are going to receive a heavy snowfall.
As far as adding new waste materials goes, I plan to only add a relatively small amount at a time from here on out, and I will make sure to create a bit of a buffer zone (using fall leaves I still have left over) around each deposit. I will also likely add some cat litter waste to the original backyard composter (some excess has already been added there) – since it has been totally cleaned out I won’t need to worry about a new worm population becoming established. It will basically just serve as a holding bin until warmer weather arrives in 3-4 months.
Anyway – it should be really interesting to see how this progresses! One thing is for sure – by the time spring rolls around this bed should be absolutely LOADED with fat Red Worms!
Previous Cat Litter Composting Posts
Cat Litter Vermicomposting
Cat Litter Composting – Update
Cat Litter Composting – 12-02-08
Cat Litter Composting – 01-05-09
Cat Litter Composting – 08-07-09