
July 2010
Jack Chambers on PBS

I recently received an email from Courtenay Vanderbilt, who is helping to spread the word about an upcoming show featuring one of RWC’s “Worm Friends”, Jack Chambers (be sure to check out the Interviews Page, where you will find my five-part interview with him – assuming you don’t know Jack! LoL, sorry I couldn’t resist!).
Jack will be featured in an episode of the show called “Growing a Greener World”, which will air on July 31st on PBS. If it doesn’t happen to air in your area, you can watch the episode online on August 1st on the Growing a Greener World website.
I was pleasantly surprised to also see some other familiar faces when I visited the GGW website! Patti “Garden Girl” Moreno has been an online pal for a few years now, ever since I wrote some blog posts (on another website) about her fantastic Garden Girl videos – she has certainly come a long way since then! I don’t know “Joe Gardener” (Joe Lamp’l) quite as well, but I have had some friendly exchanges with him in the past. Very nice guy (as is Jack Chambers! In fact, this is just generally a really nice group of people! Watch the show!!! haha)!
This sounds really cool, and I’ll be writing a note for myself so I don’t miss it!
8)
Wooden Stacking Bin – The Return!

Recently, I decided to dust off (quite literally) my old wooden stacking worm bin and get it set up and ready for some worm composting action once again. I’ll be honest – I am NOT a huge fan of stacking systems, for a number of reasons, but when it comes down to it I really haven’t tested them out as much as I should. Lots of people have ’em (and love ’em), so I do receive questions about their use on a fairly regular basis. Wooden systems are certainly a different kettle of fish than plastic systems, but a lot of the same (stacking system) principles apply.
So what are my plans, you ask?
Of course, I need to add some “twists” here – I can’t simply set it up in a totally normal manner. That would be too easy!
😆
I’m not going to do anything completely off the wall, but there are a couple of things I want to test out with this project. For starters, I have decided to keep this bin outside for as long as the weather cooperates (i.e. until it gets too cold). I have plenty of outdoor systems – and now actually prefer to do most of my vermicomposting outside, but I still tend to keep all my smaller “worm bins” indoors. I’ll be interested to see how well the system performs, and what sorts of issues/differences I might end up encountering.
Secondly, I aim to ONLY add shredded cardboard and coffee grounds (with filters). I’ve never tried a solely coffee grounds (as food) system, and a number of people have asked if this is possible recently – so I thought it might be fun to test it out!
Setting up the bin was very straightforward. I started with multiple layers of newsprint laid down over the screen bottom of the first tray.

Next, I added some shredded (drink tray) cardboard, along with some frozen coffee grounds I’d been saving up for a number of days.

I then simply added more cardboard over top and put on the lid.

Notice I didn’t add any of the other trays initially? (hint hint)
I think one of the most common misconceptions among new vermicomposters with stacking systems is this idea of setting the entire thing up all at once – perhaps this is something the manufacturers suggest doing? I have no clue – but what I DO know is that in order to fully take advantage of the principles of “flow-through” (aka “continuous flow) vermicomposting, we are much better off starting at the bottom and working our way up.
As for the worms…
I will likely wait until at least next week before adding the Red Worms (even if I had lots of Euros on hand, I wouldn’t use them in a stacking system since they definitely tend to prefer a deeper bed). I want the system to be well-aged, and to contain a sufficient quantity of grounds by the time I get started. As far as initial quantities of worms go, I will more than likely add the equivalent of a single bag of “Red Worm Culture” (a product I sell up here in Canada) – which might be the equivalent of 500 worms or so.
I have a sneaking suspicion that keeping the system nice and moist is going to be my biggest challenge. I haven’t had much luck with coffee grounds in well-ventilated systems before – so it will be interesting to see if I can somehow overcome this hurdle.
Anyway – that’s it, that’s all! Should be fun!
8)
Sun Chips Bag-07-28-10

Back at the beginning of May (i.e. nearly three months ago) I buried a “compostable” Sun Chips bag in my big wooden worm bin (see “Sun Chip Bag Vermicomposting“). I wasn’t really sure what to expect, but I guess I DID at least expect to see some decomposition within a few months!
😆
I was recently digging around in the lower reaches of my bin (after much of the material had been removed for worm harvesting) when I happened upon the bright orange package. It looked almost exactly the same as it did when I unearthed it the first time, back at the end of May (see “Sun Chips Bag-05-21-10“). The only real difference seemed to be a greater tendency for the bag to tear.
So yeah – basically, it looks as though a Sun Chips bag could potentially last for many months (maybe years) in a mesophilic (moderate temperature) composting system. Kinda makes me wish I had a hot pile to toss it into. Now I’m curious to know if it even lives up to the claims on the package!
I ended up tossing the bag in one of my regular backyard composters just for the sake of getting it out of my sight! (haha)
Don’t be surprised if you see some future updates many months/years from now, when I once again find the bag completely intact!
😆
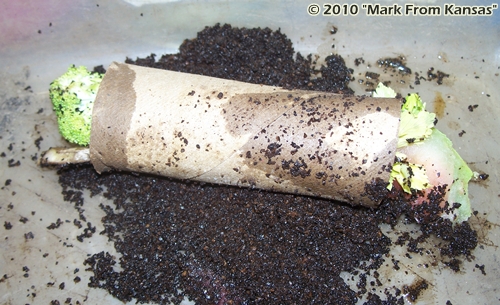
Mark’s “Worm Burrito”
My interest in letting people share images with their comments (see my recent “Adding Images to Comments“) was in large part due to an email I received from our good pal “Mark from Kansas” the other day. He took it upon himself to create his own worm composting culinary masterpiece – in effect, tossing his hat in the ring with me and Larry (if you are wondering what on earth I am talking about, please read these posts: “Worm Composting Pizza?“, “Vermicomposting Pancakes“). Here is what he wrote:
I call it:
The Worm Burrito
“A nice brown paper toilet paper tube, stuffed with malodorous potato peelings, nose watering water melons, with bad broccoli and stinky celery all served on a bed of used coffee grounds”.
There, top that!
Mark
😆
I LOVE it! Unlike Larry and I, Mark clearly put some serious effort into the overall presentation of his vermi-feast (I think the technical term is “plating”) – so he definitely gets points for that! It remains to be seen what the worms think, but hopefully Mark will keep us posted!
Anyway – apart from wanting to share that with everyone, Mark also thought all the worm recipes flying around these days might inspire others to try their hands at becoming vermi-chefs. And THAT, my friends, is a big part of why I want people to be able to share images on the site!
SO, it’s time to get creative and see what tasty treats you can come up with for your wiggling friends! Next, snap a pic of your dish and attach it to your comment (again, you can learn how to do so >>here<<). Who knows - perhaps we can even make a contest out of this! Thanks again to Mark (and of course Larry) for the inspiration!
Adding Images to Comments
I recently decided that it would be cool if I could allow people to share images with their comments. This functionality is not built in to WordPress (my website platform) so I searched for a plugin that might do the trick. I THINK I have found one that will work!
Those who leave comments regularly should be more than familiar with this section of each blog post (where comments are left):

NOW, when you go to the comment section you should see a spot where you are invited to add your images (I have circled this in red above).

When you click on the link, a small pop-up window (see image over to the right) will appear where you can add the URL (aka the web address) of your image. I’m sure for some people, this is where things will get confusing!
If you DO happen to have your own website, and/or know how to upload images to your own online pages, they you should have no trouble adding your images to comments.
If, on the other hand you don’t have your own webspace, and/or just generally feel like this is all “Greek” to you – my recommendation is to use one of the online file sharing websites. An easy one to use for sharing images (among other things) is called Tiny Pic – http://tinypic.com/
When you visit this site you should see the following section where you can upload your images (the red arrows are mine):

First you will need to find the image you want on your computer. I find that putting it up on your computer “desktop” area (ie the virtual one – not your actual desktop! haha) can help when it comes to locating it. Next, make sure it is “Image” that is selected, not one of the other options. Lastly, you will simply leave the “Resize” section at the “Default” setting. Image size IS important (more on that in a minute), but I think that if you try using one of the suggested settings, your image MAY end up distorted (I might play around with this a bit to see what happens).
Getting back to image size – it would be very helpful if you keep your images to 500 pixels or less so as not to throw everything out of whack on my site (or at least on that particular post). All my full width images (in posts and pages) are 500 px or slightly less. If I went much more than that, the images would end up outside the boundaries and create a “broken” appearance (for lack of a more technical term). Images straight off of your digital camera will almost certainly be WAY too big (especially these days with all the MEGA mega-pixel cameras out there! haha)
If you don’t have a photo editing program of some sort which allows you to modify the width of your pic, I highly recommend something called Photoscape (http://www.photoscape.org). I use it for virtually ALL my photo manipulation (even though I own Photoshop), and absolutely LOVE it! Best of all, it is totally free!
One other thing to quickly mention about Tiny Pic (and other file sharing sites) – please keep in mind that all images you upload to these sites are then basically in their database of images, and can be found and used by other people. SO, I recommend using images you don’t mind sharing and/or adding some sort of watermark to your pics to indicate copyright/ownership etc.
I have a sneaking suspicion that it may take some time before many of you are really comfortable with the process of adding images, but hopefully the new feature will eventually serve to add a new dimension to the site! I know I definitely look forward to seeing your pics!
8)
Of course, if you have any questions etc, please don’t hesitate to leave them here.
***UPDATE***
As you will see below, I just discovered that it is very easy to share any images you have posted on the Vermicomposters forum (if you are not a member, I HIGHLY recommend you become one). Just make sure that when you find your image in your photo gallery that you click on it before using the URL. You need to end up on a blank screen with ONLY the image visible – NOT the Vermicomposters page where the photo is posted. Otherwise it won’t work. Hopefully that makes sense!
Again, it IS still important that your images be 500 px or less though (to determine the size, you should be able to right click, then select “view image info” or perhaps “properties” to find out).
“Weeds” in my Vermicompost!!

A rebel squash(?) plant seems keen to take over one of my flower beds
One of the “disadvantages” of vermicomposting, vs regular thermophilic (hot) composting is that the process does not kill off any of the seeds present in the waste materials being processed, so you can end up with a fair number of seedlings popping up in your garden (or even in your worm bin) as a result.
As someone who has tried germinating ALL manner of seeds over the years, and who partially enjoys “growing stuff” just for the sake of seeing more vibrant green foliage in my yard, I think this kind of adds to the fun – ESPECIALLY when the plant in question is some type of crop plant.
Don’t get me wrong here – I’ve certainly pulled my fair share of unwanted tomato seedlings (and of course, oodles of actual weeds). All I’m getting at here is that it CAN be enjoyable to let some of these plants grow – especially when you are not 100% sure what they are!
Some of you may recall my posts about the “watermelon plants” I had growing in one of my beds a couple of years ago. Sure, I ended up feeling a little disappointed once I realized they were buttercup squash (DOH!), but it was still fun watching them grow!
This year when I noticed a few squash-family plants springing to life in my beds I decided to welcome them with open arms! OK, so maybe I was going to yank the one in the flower bed (first pic) initially, but I figured it would just peter out on its own. Thus, when I saw that it was continuing to grow (and actually thrive), I developed a new-found respect for it – and decided to actually nurture it in an effort to see what would happen. This particular flower bed received (early in the spring) a LARGE quantity of old vermicompost from the old winter worm bed we set up at my dad’s place about a year and a half ago. My dad had some butternut squash growing in the bed last summer (and I’m pretty sure most if not all the squash fruit were left on the plants), so there is a reasonable chance that this is what I’ve got growing as well.
In the windrow bed running alongside my row of corn, there are two squash family plants, and one of them is doing REALLY well (the hot, sunny, rainy weather probably doesn’t hurt)! I hope at least one of these turns out to be a cantaloupe – you would think I’d have one of these pop up at some point. I’ve certainly added enough of the seeds to my worm beds over the past few years. I’ve never grown a cantaloupe plant before, and the fruit is certainly a big hit in our household, so my fingers are crossed. Anyway – I guess we shall see!


The crop plants I HAVE actually been yanking like normal weeds this year are potatoes. I basically let them grow in wherever they wanted last year, and just ended up disappointed with the results. They take up a fair amount of room (or at least room that could be used by a more desirable plant), and are so readily (and cheaply) available at the grocery store, I just figured I’d much rather grow more tomatoes instead!
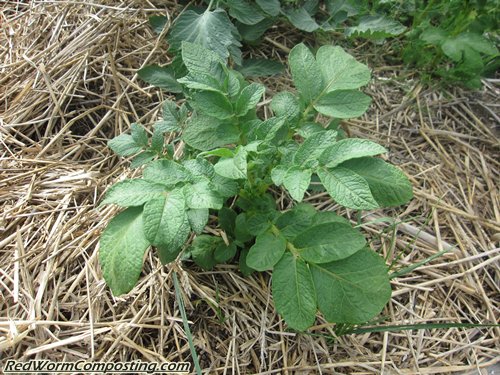
Yanking these potato plants sure makes you realize how much like weeds they really are sometimes! haha
Unless you dig all those tubers out, you can end up pulling plants all summer long! Oh well – at least they are not as annoying as those prickly thistle weeds!
8)
Anyway – I will certainly keep everyone posted!
I am curious to find out if others have these sorts of unexpected plants coming up in your gardens, and if so, whether or not you are letting them grow – please leave a comment if you’d like to share.
Four Worm Update-07-22-10

It’s amazing how time flies when you are having fun! Almost exactly one month ago (nice to see my vermi-reminder-clock is still working! haha) from today I posted an update on my “Four Worm Reproduction Experiment – Part Deux“. As you may recall, it had been a LOOOOOOOOONG time since I’d even opened up the bin (literally months), and it wasn’t too surprising that I found lots of sloppy, but fairly well processed material (along with lots of worms) inside.
I decided to add a bunch of shredded cardboard at that time to see if I could remedy the stinky anaerobic conditions in the bottom of the bin. My eventual aim was (and is) to do some sort of tally to see how far the worm population has come since the humble beginnings (with four immature worms all alone in a big ol’ BOM 6000).
When I checked on the bin this week I was happy to see that the cardboard had indeed soaked up quite a lot of moisture, but I must say that conditions were still pretty sloppy! As such, and also due to the fact that I have other plans for this BOM 6000 bin (stay tuned!), I decided to dump everything into one of my open worm sorting tubs. I’ll be honest – the smell that wafted up when I did this was much closer to “stinky sewer” than it was to “rich & earthy”!
This was yet another reminder of the fact that I did not take good care of this system. On a side note – I should mention though, that you can DEFINITELY get away with totally ignoring your worms for months on end much more easily than you can simply letting conditions get sloppy and anaerobic while you continue to add food waste regularly! Keep that in mind!

In an effort to prevent everything from drying out TOO quickly (and to provide the worms with some cover) I added a layer of coco coir and a layer of shredded cardboard (mostly consisting of old TP rolls, I might add – haha) over top.

Now, I will simply let everything sit! I have little doubt that all “sloppy” conditions will disappear fairly quickly with the contents spread out in this shallow (and completely open) tub. Once the worms have worked the material some more and it has a drier consistency I will think again about the prospect of conducting my tally!
I’ll keep everyone posted!
8)