
July 26, 2010
Mark’s “Worm Burrito”
My interest in letting people share images with their comments (see my recent “Adding Images to Comments“) was in large part due to an email I received from our good pal “Mark from Kansas” the other day. He took it upon himself to create his own worm composting culinary masterpiece – in effect, tossing his hat in the ring with me and Larry (if you are wondering what on earth I am talking about, please read these posts: “Worm Composting Pizza?“, “Vermicomposting Pancakes“). Here is what he wrote:
I call it:
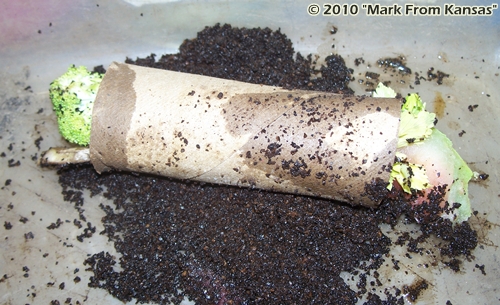
The Worm Burrito
“A nice brown paper toilet paper tube, stuffed with malodorous potato peelings, nose watering water melons, with bad broccoli and stinky celery all served on a bed of used coffee grounds”.
There, top that!
Mark
😆
I LOVE it! Unlike Larry and I, Mark clearly put some serious effort into the overall presentation of his vermi-feast (I think the technical term is “plating”) – so he definitely gets points for that! It remains to be seen what the worms think, but hopefully Mark will keep us posted!
Anyway – apart from wanting to share that with everyone, Mark also thought all the worm recipes flying around these days might inspire others to try their hands at becoming vermi-chefs. And THAT, my friends, is a big part of why I want people to be able to share images on the site!
SO, it’s time to get creative and see what tasty treats you can come up with for your wiggling friends! Next, snap a pic of your dish and attach it to your comment (again, you can learn how to do so >>here<<). Who knows - perhaps we can even make a contest out of this! Thanks again to Mark (and of course Larry) for the inspiration!
**For Even More Worm Fun, Sign Up for the RWC E-mail List!**Adding Images to Comments
I recently decided that it would be cool if I could allow people to share images with their comments. This functionality is not built in to WordPress (my website platform) so I searched for a plugin that might do the trick. I THINK I have found one that will work!
Those who leave comments regularly should be more than familiar with this section of each blog post (where comments are left):

NOW, when you go to the comment section you should see a spot where you are invited to add your images (I have circled this in red above).

When you click on the link, a small pop-up window (see image over to the right) will appear where you can add the URL (aka the web address) of your image. I’m sure for some people, this is where things will get confusing!
If you DO happen to have your own website, and/or know how to upload images to your own online pages, they you should have no trouble adding your images to comments.
If, on the other hand you don’t have your own webspace, and/or just generally feel like this is all “Greek” to you – my recommendation is to use one of the online file sharing websites. An easy one to use for sharing images (among other things) is called Tiny Pic – http://tinypic.com/
When you visit this site you should see the following section where you can upload your images (the red arrows are mine):

First you will need to find the image you want on your computer. I find that putting it up on your computer “desktop” area (ie the virtual one – not your actual desktop! haha) can help when it comes to locating it. Next, make sure it is “Image” that is selected, not one of the other options. Lastly, you will simply leave the “Resize” section at the “Default” setting. Image size IS important (more on that in a minute), but I think that if you try using one of the suggested settings, your image MAY end up distorted (I might play around with this a bit to see what happens).
Getting back to image size – it would be very helpful if you keep your images to 500 pixels or less so as not to throw everything out of whack on my site (or at least on that particular post). All my full width images (in posts and pages) are 500 px or slightly less. If I went much more than that, the images would end up outside the boundaries and create a “broken” appearance (for lack of a more technical term). Images straight off of your digital camera will almost certainly be WAY too big (especially these days with all the MEGA mega-pixel cameras out there! haha)
If you don’t have a photo editing program of some sort which allows you to modify the width of your pic, I highly recommend something called Photoscape (http://www.photoscape.org). I use it for virtually ALL my photo manipulation (even though I own Photoshop), and absolutely LOVE it! Best of all, it is totally free!
One other thing to quickly mention about Tiny Pic (and other file sharing sites) – please keep in mind that all images you upload to these sites are then basically in their database of images, and can be found and used by other people. SO, I recommend using images you don’t mind sharing and/or adding some sort of watermark to your pics to indicate copyright/ownership etc.
I have a sneaking suspicion that it may take some time before many of you are really comfortable with the process of adding images, but hopefully the new feature will eventually serve to add a new dimension to the site! I know I definitely look forward to seeing your pics!
8)
Of course, if you have any questions etc, please don’t hesitate to leave them here.
***UPDATE***
As you will see below, I just discovered that it is very easy to share any images you have posted on the Vermicomposters forum (if you are not a member, I HIGHLY recommend you become one). Just make sure that when you find your image in your photo gallery that you click on it before using the URL. You need to end up on a blank screen with ONLY the image visible – NOT the Vermicomposters page where the photo is posted. Otherwise it won’t work. Hopefully that makes sense!
Again, it IS still important that your images be 500 px or less though (to determine the size, you should be able to right click, then select “view image info” or perhaps “properties” to find out).