

Two of the key worm requirements I emphasize in my vermicomposting training are: 1) oxygen (aka “aeration”), and 2) darkness. So I’m sure for many of you, the idea of using a clear ziploc bag as a “worm bin” will seem questionable right off the bat.
On that note, let me start with a warning to newer vermicomposters…
Using any form of clear, plastic (or glass for that matter) container – especially one with poor air flow – as a worm bin is NOT usually recommended. Please keep in mind I’ve been doing this for a long time (17 years as I type this) and am very familiar with the nuances of the process…Aside from that, I don’t mind “messing up” every now and again, so long as it serves as a learning experience for me and my readers (that’s my story and I’m sticking to it – lol)!
With all that out of the way, let me tell you about my fun new experiment! Haha
If you are on the e-mail list, you may be aware of the fact that I have plans to try and raise Black Soldier Fly Larvae (BSFL) indoors. I won’t get into all the details about that here (will save for another post), but the long and the short of it is that due to the warm-temperature-requirements of these critters, I’ve been playing around with a 15 W seedling heating mat to see if I can get smaller systems warm enough to meet BSFL requirements (in case you are curious – YES, I can). I’ve also been setting up little decomposition test systems in ziploc bags to see if I can get some fungus gnat (and similar critter) cultures going…so that I can (hopefully) culture Steinernema feltiae nematodes (yet another project I don’t recommend for newcomers!).
Anywho…
Seeing how the decomposition process unfolds in these little plastic bags (open to allow for oxygenation) it has made me wonder if a bigger one could work as a small worm bin of sorts. On the plus side, these bags are inexpensive, lightweight, easy to tuck away (ideally in a dark location), excellent for moisture retention – and it’s always fun when you can sort of see what’s happening inside!
Air flow is of course one concern, but I’m pretty sure it won’t be an issue as long as I keep the “zipper” open and add plenty of bulky bedding. As far as darkness goes, my basement is pretty dark as it is, and there should be enough dark space inside the systems to keep the worms happy. I also have some other ideas for how to store the bags (eg keeping a few of them in a larger, opaque cloth bag or bin).
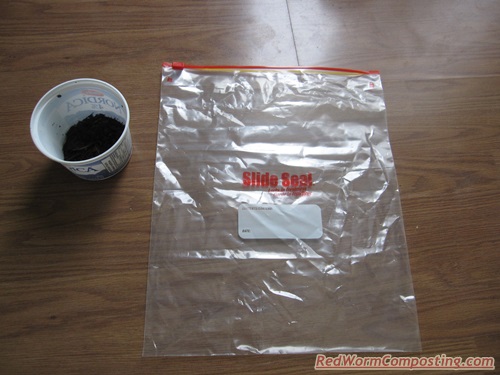
I am not sure of the exact volume of these particular bags – but it’s safe to say that I have never used a ziploc this large for food storage. You can see in the first image below how they compare in size to a typical cottage cheese container.
The first set-up step involved adding a thick layer of dry shredded corrugated cardboard down in the bottom of the bag. This should serve as a “false bottom” – helping to soak up excess liquid draining down, and providing separation between the decomposting food materials and bag bottom (would likely end up with a heap of anaerobic goo if I started with a layer of food wastes).

Then, I simply added alternating layers of kitchen scraps (mostly banana peels, apple cores and cantaloupe rinds), with a small sprinkling of “living material” (in this case, coarse vermicompost etc from another system).
I sprayed a little water in as I went, but most of the moisture will come from the decomposing food wastes (all cardboard was added dry).

I added the remainder of the living material over top of my uppermost food layer, and then finished with another thick layer of the shredded cardboard.


I closed the zipper most of the way and placed the bag on my heating mat (initially it was laying flat, like the picture, but I’ve since moved it to an upright position).

‘Phase I’ of this experiment will simply involve leaving the bag to sit on the heating mat for a while – until the wastes are decomposing nicely and all the bedding has been moistened. I may set up a few more similar systems soon, so as to have a handful of them “ready” for worms around the same time.
Once they are ready, the bags will come off the mat, I’ll likely add more bedding up top, and I will open the lid a bit more. Bags sitting on the heating mat have been getting up past 90 F, so it might be a bit too warm to keep an active vermicomposting system on.
I’d like to test both Reds and Euros in these bag systems – one idea I had was some sort of “Four Worm Reproduction Experiment” comparison between these two worms (each in their own bag).
Whatever the case may be, it should be interesting!
Do stay tuned – and share your thoughts below.
😎
Very interesting idea; when you mention “coarse” vermicopost, do you mean it prematurely harvested? I have some in my bin that is a little over a month old. Could I use some of it as my living material if i remove the worms?
Thanks
Hi Stephanie – I basically mean unscreened, dark, rich stuff (scientific term! haha). If I screened it, it would be nice vermicompost. But at this time of year having living material for indoor systems is more valuable for me than having vermicompost!
In case you (or others) are not aware, I wrote a report all about living material. You can access it here:
https://www.redwormcomposting.com/Living-Material.pdf
😎
You’ve put a be in my bonnet. I have bought 1 gallon Ziploc bags and am going to attempt the 4 worm experiment. #Frankensteinlives haha
Hahaha – that’s fantastic, Stephanie! Please keep me posted (and don’t forget to keep the lid open once the worms are in there)!
😎
So, what was the outcome of the experiement?
Funny you should ask this Patty. I was just looking at some of these today and deciding I really need to post some sort of update.The long and the short of it is that they were completely neglected – but it looks like there is (amazingly enough) still some activity in them.
This proves there’s no need to spend $$$ to start a “wormery”. A good way to teach kids about it and they can watch the development closely. The worms won’t be thrilled but they’ll survive, I hope.