

Early last month, I wrote (excitedly) about my recent discovery of “Straw Bale Gardening” (thanks to a presentation I watched during the Homegrown Food Summit). I made firm plans to try it out this season.
Not long after writing that post, I started “shopping” for local straw/hay bale sources, and even picked up 5 bales to get the ball rolling.
[ASIDE: You know you are a “city guy” when you imagine fitting 5-10 bales in a station wagon. The farm girl who helped me me load up laughed when I had to basically drop-kick the 5th bale, just to get it onto the front passenger seat, and the door closed! lol]
Then I smartened up a bit…
Last Thursday I had 30 bales of hay dropped off in my driveway ($5 a bale, delivered from nearly an hour away. I definitely feel lucky to live in an agricultural zone).
I was officially committed to my serious “hay bale gardens” project…and giddy with excitement as a result!
(My kids were also pretty excited about their new movable playground equipment! LoL)
Although most people seem to recommend straw over hay (I think largely due to the potential for weed seeds in the latter), I chose hay partially due to availability, and partially since it will likely offer more “food” value for the worms, and thus ultimately more nutritional value for the plants.
Me being me, I knew I couldn’t just set up some run-of-the-mill hay bale garden beds and call it a day, though. Nope…I had to come up with something better…much better!
I decided instead to create the ultimate worm-bed-bale-garden systems (Hot Tip – using the word “system” makes anything sound more impressive! lol).
As such, my first task was to clean out and excavate a couple of existing worm beds. The smaller of the two we’ll call the “railway tie bed” (RTB).

The other one was a much larger windrow.

As you can see (in two previous images), both beds were looking a little sad once all the snow had melted away this spring. Needless to say, the overhaul was definitely overdue!
The first thing I did was rake off all the loose debris (mostly dead plant remains from last gardening season) plus the old grass clippings I layered on last fall. These materials, along with the bulky upper layers of compost were used to create a windrow in another (hardly used) garden.


Next, it was time to harvest the usable vermicompost from the beds. On first glance it didn’t really look like all that much, but as I discovered there was actually a huge volume of beautiful, rich material down below.
I screened a lot of it, and dumped many full-wheelbarrows-worth on various other gardens.
(I also learned that a snow shovel can actually work really well as a vermicompost scoop! lol)


Once I started hitting the clay soil below, I switched into excavation mode in an effort to speed up the process.
(Keep in mind, all of this had been happening gradually over the course of quite a few weeks)

The one downside of “going big” with projects like this (at least when I’m involved – lol) is that everything invariably ends up delayed. In a “perfect world”, I would have had the beds (and bales) completely ready to go in time for the traditional yearly planting weekend (Victorial Day Long Weekend, towards the end of May up here in Southern Ontario). The one thing that has eased my guilty conscience is the fact that temperatures have remained fairly cool, with frost warnings being issued as recently as last week.
Nevertheless, I knew it was critical to at least get the ball rolling with my bales this week (even with the worm beds unfinished) – since they require a “composting” period before I can even plant in them.

Yesterday, I decided it was time to whip up some sort of nutrient-rich “tea” with which to prime my bales. Straw bale gardening advocate, Joel Karsten, recommends using water soluble inorganic fertilizer. Just the fact that worms are involved here eliminates that option (not to mention the fact that I’m trying to keep this as “natural” as possible).
I’ve been a bit stumped re: what I could use instead. I don’t know of a water-soluble, worm-friendly organic fertilizer – and my guess is it would be very expensive even if it did exist.
I recently found inexpensive “soy milk powder” (53% protein by weight) at a bulk goods store, and was very excited since it seemed like a good possibility. But when I shared this with Worm Farming Alliance members, and received multiple replies about GMOs, pesticides, and basically, the potential for soy to ruin the world as we know it (lol), I realized it might not have been the best choice after all.
Another (more eco-conscious) idea I had was to create some sort of “tea” using comfrey – a plant that essentially grows like a weed in my yard now. As I’ve written previously, comfrey is a well-known “dynamic accumulator” (aka “nutrient miner”) plant. Apart from the obvious nitrogen in those rich green leaves, the plant is reported to accumulate other important nutrients such as potassium, phosphorus, and calcium (among others) as well.

In that “perfect world” I mentioned earlier, I would have a giant industrial blender I could use to turn all my comfrey into gallons of beautiful green soup, but alas, the only option I have (that won’t land me in the doghouse) is a very small “Magic Bullet” knock-off. lol
So I limited myself to a relatively small batch of the leaves…

…which, once blended (with added water), left me with less than a gallon of comfrey concentrate. This I poured into a plastic garbage can full of water.
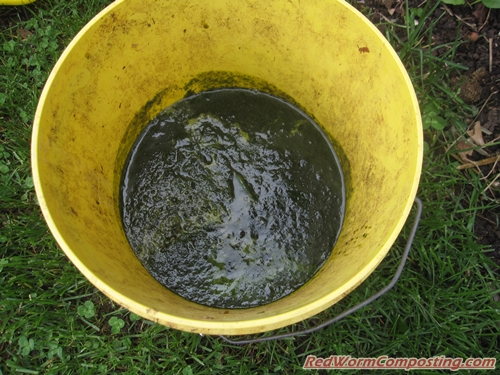
Just for (weird) kicks and giggles, I also blended up some rabbit pellets mixed with water and added this to my make-shift cauldron, along with a modest amount of the soy milk powder (while I won’t likely buy it again, I’m certainly not going to let it go to waste), some rock dust, and one or two other secret ingredients, before mixing up the brew really well.
I’m not going to claim I ended up with the ultimate worm-friendly liquid fertilizer for my bales – but I figured it was probably good enough to at least get the ball rolling (especially since the hay itself will have additional nitrogen etc, as touched on).

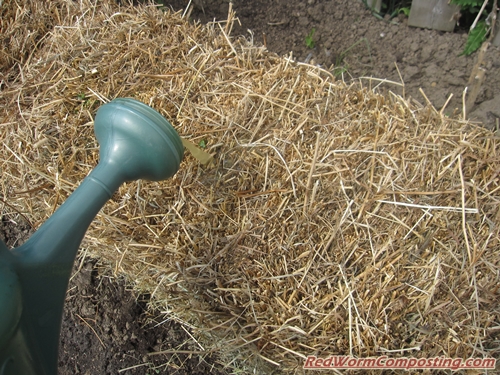
Next, I poured 1 watering-can-full of the concoction on each of 13 bales (as many as I could before I ran out).
Hindsight is of course 20/20, but I was kicking myself when I realized afterwards that I should have inoculated the bales with beneficial microbes at the same time.
I ended up going back and depositing a small amount of coarse vermicompost (some still had worms in it) on top of the same bales, and then lightly sprinkled again with regular water. We had some rain showers overnight, so that will help as well.
As you can see below, the railway tie bed is getting close to completion (at least as far as the excavation, straw-bale-placement process goes)…

…while the bigger bed still needs a lot of work!

Since the bales will operate as self-contained gardens, I don’t feel quite as rushed to get the actual worm beds totally finished (a process that will likely happen gradually over the next month or two), but I do feel some pressure to at least get the larger bed lined with “primed” bales. Hoping to have that job done by the end of the week.
Needless to say, there will be plenty more updates to come – and this is certainly a topic we’ll be looking at in even more detail during the upcoming (and unfortunately delayed, as I type this) Vermigardening Series!
Stay tuned!
😎
I had a bunch of questions but you covered them all as I read! Looks like a really nifty project Bentley. Love the colour of that finished vermicompost!
Frustration indeed. I was 80% towards the end before I found out how
you were going to use the hay bales!
Seems logical, but hay being what it is,
Isn’t it going to dry out really quickly
if you have anything like a warm summer B?
Or are you planning (high maint) Comfry
watering every 4th day?
Not sure I follow, Dave (re: the frustration). I posted a link right at the beginning for those who might have missed my original straw bale gardening post. I recommend you check out that post and that video.
The idea is that the inner zone basically composts, so it will end up holding plenty of water. Apart from that the plants can send their roots into the ground below, as well as the worm bed once it is set up. My hunch is that this will actually be a water-conserving gardening method.
As always, this is a fun experiment and we’ll see what happens.
🙂
OK, sorry, I missed the first one – I was waiting for the ‘how it works’
bit, hence the frustration.
I see what you mean with moisture from the inner region…
I wonder if the worms might migrate there?
Haha – no worries, Dave!
In my hurry to tell people about new projects, I often leave out key details readers might be wondering about.
And yes absolutely re: the worms – the reason I am excited about this method is that I already know how much Red Worms love wet straw/hay bales. I definitely think they will add to the process!
😎
Hi Bentley,
I’ve done a straw bale garden before and I found that it does dry out quickly. I noticed in the video it appeared he had perforated hose running across the top of the bales. I’m not sure if he kept those but I found I needed to water the bale about 5 minutes every night to keep it moist (used a timer) and allow the plants to soak up some water.
Granted I only had one bale and I live in MD which might be a bit warmer!
Thanks for the feedback, Newell.
It’s definitely going to be interesting. I am going to try and limit the number of plants I attempt to grow in each bale, and will also aim to keep the worm beds as wet as possible. These systems will serve as excellent water banks (will be able to soak up and hold a lot of water every time it rains), so you can be sure I’ll be out there doing my rain dance on a regular basis! lol
Couldn’t you just use compost tea with manure for good measure to start the ball rolling with the hay bales? Would it help to cover the wet bales with plastic?
Hi Bentley,
you said you wanted to inoculate your bales with beneficial nematodes. Have you found a way to produce your own nematodes?
Austin
Jeanne – manure tea would be perfect! I just don’t happen to have any manure right now. I wouldn’t cover the bales with plastic since air flow is important – but I guess if done loosely that could work!
—
Austin – it was actually beneficial microbes I mentioned. I still haven’t figured out how to effectively breed beneficial nematodes unfortunately. Basically I just wanted to get some of the same microbes that are in vermicomposting systems inside the bales.
😎
After 5 years of using hay bales, we find them to be water/moisture retentive. Great for drought or low rain conditions. No weeds in old, dusty hay which is cheaper here in our area. Hay eventually decomposes and is perfect for raised boxes. No weeds to speak of. A 3 x 16 hay bale box yielded over 110#’s of golden yukons last year. Other boxes produced all kinds of squash, beans, peas, kale and chard. We cook it 2 weeks before planting seeds or starts with pelletized urea, well watered and left to sit. When bales cool down, we plant. Soaker hoses from gravity fed rain collection for when moisture is needed (not often!). As we begin our sixth year, our boxes are just about full of decomposed plant matter! We started out with 2 bales on the ground and after success, enlarged to six boxes over 3 years. Wouldn’t grow veggies any other way. (Our friends, the snakes and toads happily keep bugs at bay.)
PS: Put bales in still tied. Place length of hay vertically from ground up. Do not untie and fluff hay. With our 3 x 16 boxes, a bale fits from side to side perfectly.
I found this about raising your own nematodes
http://msue.anr.msu.edu/news/rearing_nematodes_do_it_yourself_guide
http://www.cloudforest.com/cafe/forum/30705.html
Bentley,
Comfrey tea is a great place to start, but have you ever considered seed sprout teas? A plant like corn can be sprouted for a few days in some easy Diy sprouting cups. When the tail on the sprout is a bit larger than the seed they’re ready to be blended. Take the blended corn and strain it, then blend and strain a few times into a bucket to capture the runoff until “the milk” runoff stops being milky. Either add the corn chunks to your worm bins or feed to chickens. Corn is on par with coconut milk in terms of its cytokinin content. It’s also full of enzymes. We use it to jumpstart the process of organic decay when soil building. You may also look into alfalfa teas. Alfalfa contains a chemical called triacontanol, a fatty alcohol which makes plants grow as if on steroids, but also contains beneficial enzymes (proteins). I’m sure you’re no stranger to ACTs (aerated compost teas) using castings, as even these will gain some strength when combined with an sst.
And let’s not forget kelp meal tea. Kelp contains over 73 micro and macro nutrients and as long as you’re using Acadian kelp you’re getting all of the benefits plants require, that they otherwise would not get, as kelp meal is unique in its nutrient content.
Just a few friendly ideas! I very much enjoy your experiments. You changed my life many years ago when I was terminally ill and helped me find purpose. That was nearly a decade ago now and I’ve been gardening and teaching gardening ever since. Great men are rarely aware of the trees that grow from the seeds they plant, so thank you for inspiring all of us with your contagious passion for life, gardening and family!
~ poke
Freddi – thanks very much for sharing your experiences with bale gardening. I definitely want to try the bales in my raised bed box as well!
—-
Poke – I would be interesting to do a comparison between the sprout teas and the comfrey tea. Your comment about alfalfa makes me wonder how well bales of it would work as the actual garden beds.
With kelp I would wonder about sodium levels – might be too high for the worms.
As for “changing your life”, I must say that I am honored to have played a role. That’s so awesome, and keeps me reminded of why I’m doing what I’m doing! You definitely made my day – so thank YOU!
🙂
G’day Bentley
I’ve been vermicomposting in a small way for about 15 years but have ramped it up this year as I’m providing demonstration worm systems at the local community garden.
Your article on combining worms with hay bale gardening makes so much sense! I love the concept and it should work well to enliven a concrete slab that will be ripped up one day and also to extend the confined growing area in our terraced garden.
One thing I’d like to clarify is the preparation of the bales: my understanding is that the bales need to be primed with a nitrogen rich solution to trigger the hot composting stage. I’m planning to use a combination of coffee grounds and horse manure mixed into a solution for this. When the bales cool down after a week or so, it will be time to place worm-rich vermicompost on top of the bales as well as inbetween the bales where gaps can be left. It will also be time to provide rich and varied food for both the worms and the composting microbes. I’ll be blending a mix of cafe juice pulp, potash (to neutralise the citrus pulp). leafy greens and washed seaweed to make up a feed solution. Does this make sense to you?
It’s winter down here in Ausrralia so it’s a good time to be getting ready for spring planting …
Thanks for your inspiration!
Austin – very sorry for the (accidental) delay approving your comment! Thanks a lot for those links. I attempted to do something similar with fruit fly larvae and the larvae of a larger fly species but didn’t have much luck. I like the idea of using the wax worms (in your first link). I may try that the next time I have some parasitic nematodes!
I’m not at all concerned about gnats etc in the hay bales though since these are outdoor systems – but the nematodes definitely come in handy when I have a bad gnat infestation indoors!
—–
Colin – thanks for sharing your thoughts! Yep, the idea is that you are supposed to let the bales basically compost for a little while. Mine got hot for a short period of time – perhaps not as long as they are supposed to – but since I am getting the worms involved I think I’ll be just fine.
Your feed solution sounds great (as long as the seaweed doesn’t have too much salt in it – worms are very sensitive to it).
Thanks Bentley. One more question: I pick up about 80 kg of coffee grounds each week and am keen to add as much as possible to my feed mix of juice pulp, salad scraps, seaweed and aged mulch. Would 25 to 30% of coffee grounds by weight be ok do you reckon?
Hi Colin
Are you going to create basically the same sort of bale beds as the ones I made? If so how big will they (or it) be? I think I could manage 80 kg of grounds per week no problem with the beds I currently have, but I have a lot of bed space available.
25-30% grounds sounds pretty good – and make sure it get’s spread around, not concentrated in any one spot, especially during the early stages of filling the bed (when you can end up stimulating overheating of entire bed).
Thanks again Bentley. I currently have around 15 square metres of open worm beds and am in the process of setting up 34 Lucerne/alphalpha bales for vermigardening. I’ve been collecting about 80 kg of juice pulp and salad scraps per week and mixing them with about 40 kg of aged mulch to form a feed mix. Based on your advice, I should be able to add 40 to 50 kg of coffee grounds each week. Worm numbers are increasing rapidly and I may need to source more cafe organics in the future to optimise conditions, though I am planning to use my bountiful supply of worms to assist others in getting started. The long-term aim is to productively use 95% of the cafe organics in our coastal resort town – totalling maybe 25 tonne per year – which has largely been getting trucked to landfill!
By the way, I recently purchased your Easy Vermicomposting discourses and found them to be gold! Good for confirming what I’m doing well plus lots of ideas of how I can do it better. Great value!
Thanks again!