
May 26, 2011
Kid’s Camp Vermicomposting
Back at the end of April I received an email from Robert Bishop, the property manager for YMCA Camp Greenville, a “resident camp” (open year round – for summer camps and various educational programs) in Greenville County, South Carolina. He was assigned the task of taking care of the camp’s rather neglected 3-compartment worm composting system, and was hoping to get some advice on how he might get it up and running again.
Seeing how enthusiastic Robert was about the project, and how cool the camp vermicomposting system is I decided to ask if he might be interested with sharing the project with us here. He was more than happy to do so, and it’s only been due to my busy schedule that I’ve taken so long to get the ball rolling here on the blog. I’ve started with his first installment, and one additional update (from May 8th) below. I hope to get a current status report from him fairly soon and will post that once it becomes available.
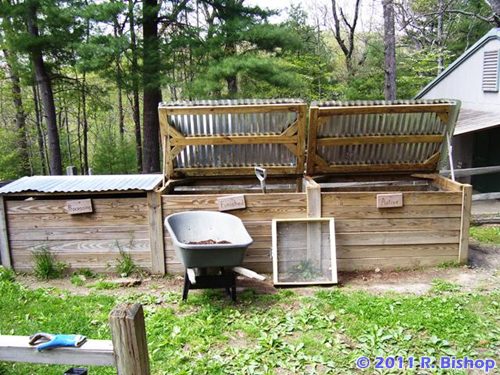
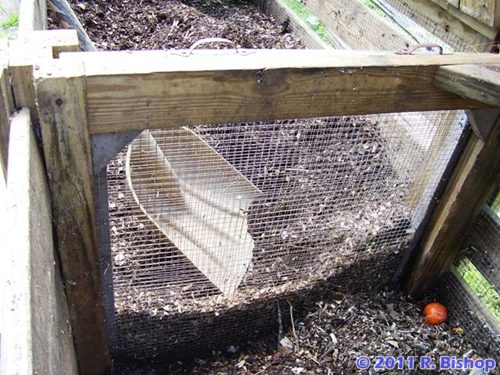
The bins: We have an outdoor 3-bay wooden composting setup. Each bay (bed) is approx. 4ft x 3ft x 4 feet deep. Each bay is separated by a removable frame that has 1/8″ hardware cloth, which allows for migration between each bay. The bin has removable fronts for cleaning/emptying, and each top is a hinged wooden frame with metal roofing attached. The back side of the compost bins are vented with 1/8″ hardware cloth at the top, middle, and bottom. The entire frame is set approx. 4″ into the earth, and has an open bottom for drainage. The bins are not insulated in any way, and are exposed to heat and cold extremes.
Current conditions: These beds have not been very well cared for, yet the worms I have found inside seem to be doing well despite their living conditions. I am going to assume that these are newer hatchlings (I hope that is the proper term) that have emerged this spring. They appear to be around 1/2 to 1 inch long, and by rough estimate there are 600 – 700 worms in each of 2 active beds.
Bed #1 contains sticks, wood chips, pine needles, leaves, and a little bit of food that has been mostly composted. The bin is approx. 2/3 composted.
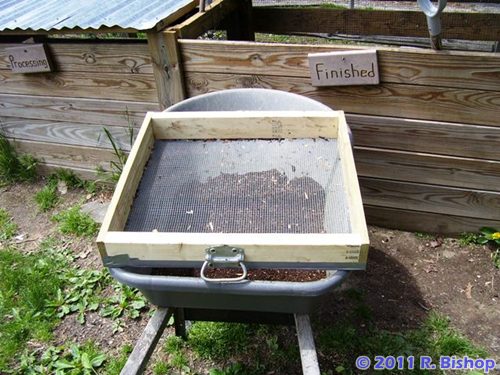
Bed #2 is filled with completed compost and a mixture of unprocessed wood chips. I have managed to screen out a medium sized wheelbarrow full of finished compost, and it appears to be very nice, clean, and rich with a wonderful, earthy aroma.
Bed #3 contains wood chips, sawdust, leaves, sticks, and some decomposing veggies. It appears that the bedding is approx. 1/3 composted.
My short-term goals: I feel that the best way to ensure success with these beds is to clean one side out, screen the finished compost and remove worms, and start over with fresh bedding and food. Once the new bedding has aged, I plan to screen out the other beds and transfer all of the worms into the new bed. Then I can begin to monitor the worms and get their environment under control, and eventually introduce new worms into the mix and get the composting under way. I have access to our dining hall scraps daily, and have a lot of cardboard and leaves/grass clippings to process. I will also have horse manure to add into the mix once our summer programming starts in late May.
**For Even More Worm Fun, Sign Up for the RWC E-mail List!**~ May 8th Update ~
Been a busy couple of weeks for the camp, but I have managed to put in some hours cleaning out the compost bins and re-doing the bedding. I have lined 2 of the beds with cardboard on the sides and bottom, and I used hand-shredded cardboard and grey egg crates mixed with decomposing leaves and pine needles,plus I mixed in some partially composted woodchips and plenty of water, and added in approx. 5 lbs of fresh vegetable scraps and crushed egg shells. I let this sit for about 6 days before adding in the worms and composted material they were in. Waited 3 days and then checked the beds…..the worms are thriving! I now have a very large colony of worms growing and eating, and have been adding 2-3 lbs of fresh vegetable and fruit scraps per day, alternating between 2 of the beds.