

Back in January (2018) I was doing some research for an eBook focused on the topic of worm castings.
As you might guess (based on the title of this post), my aim was to help people optimize the vermicomposting process and produce higher quality castings even more quickly.
I was making my way through back issues of (the now defunct) “Castings Call” periodical when I came across a single sentence that completely stopped me in my tracks!
| “A reasonable population of worms can turn a pile of waste into vermicompost in 7 to 10 days.” |
I re-read the sentence. I scribbled it down. I underlined it.
I didn’t know if I should be excited or upset.
7-10 days?! Seriously?

The reason the quote had the impact it did was because it came from the mouth of none other than Dr. Clive Edwards – easily the most well-known, highly-acclaimed vermicomposting researcher in the world for many years.
Here was a man with more than 300 academic papers to his name saying something that made the (quite controversial) “14 Day Castings” method suddenly seem…well, almost conservative!
Questions started bubbling to the surface…
What kind of “worms” was he referring to?
What is a “reasonable population” of these worms?*
What kinds of “waste”?
How much waste equals a “pile”?
Would it be high quality, stabilized “vermicompost” you would end up with?
What likely “rattled” me the most about Dr. Edward’s comment is that it seemed to be a direct contradiction to other statements he has made about the required time period for the vermicomposting process. We’ll come back to this a little later.
*NOTE: During the writing of this blog post I ended up going back to the original article where Dr. Edwards quote was shared (Bogdanov, 1998) – I realized he had actually added a very important additional comment relating to the quantity of worms that should be used. This will also be discussed in more detail a little later.
I felt myself getting yanked down the proverbial “rabbit hole” (or maybe it was actually an anecic earthworm burrow – haha), and the more I pondered these and other questions, the more I wanted to dig even deeper into the topic.
One thing was for sure – the little eBook I originally had planned just wasn’t going to cut it anymore. I decided this needed to be a much more in-depth exploration.
Today, I want to provide you with an overview of where I am headed with this project.
What’s In a Name?

The name “Better Castings, Faster” came from the VermBin Series tagline, “Turn More Waste into Better Castings, Faster“. I liked the trimmed-down version since it was short, to the point, and offered a solid promise to all those interested in reading the (originally planned) eBook.
With the expansion of the project, I was a little unsure about using it, however. It seemed somewhat “over the top” for what is intended to be an honest, hype-free exploration of the topic of worm castings. But, after giving it some more thought, I decided it was still a good fit.
The field of worm castings production and marketing is one that has been plagued for many years by the shenanighans of misguided individuals, and no small number of downright hucksters – so any hype you might pick up from the name should be considered a bit of a jab at that crowd (yep – sarcastic hype! haha).
On the other hand (and much more important), my big underlying goal remains the same – helping people produce higher quality worm castings, more quickly!
Let’s now look in more detail at each part of the name…
What is “Better“?
One of the major challenges the vermicomposting industry has faced (likely resulting in many people in other fields taking us less seriously) is that there are no set-in-stone standards for what can be called “castings”, and what defines the “quality” of these materials. So “better” is always going to be at least somewhat subjective.
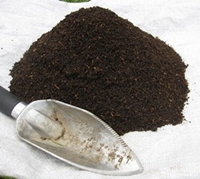
Generally speaking, good quality worm castings will be relatively dark (important to note that the color will be largely influenced by the parent materials, however), uniformly-textured – often granular – material with a rich earthy smell, and a diverse population of beneficial microorganisms. Usually, the parent materials should have gone through an intensive vermicomposting period of at least 30-60 days (but yes, there might be some exceptions to this rule!) – plus some form of “curing” stage for the castings themselves. In some cases (eg when there is risk of pathogens), a “pre-composting” phase – often in the 1-2 week range – is also very important.
And then there are various lab analyses we can perform, such as micro/macro nutrient content and microbial assessment (yet another murky and debated subject), to help us decide if our castings are “good quality”.
All that being said, what’s funny is we can (and often do) bicker about the parameters used to determine what should be considered “real”, or “high quality” castings until we are blue in the face – but at the end of the day, it really just comes down to ONE thing…does the material boost plant growth (and overall health)?
| “I tell vermicomposters to simply grow a few plants and let them tell you the difference between materials. It is cheap, relatively fast, and frankly more important than a lab sheet (after all, the end goal is to grow nice plants).”
~ Tom Herlihy, Founder of Worm Power |
My safer/simpler answer would be that “better” simply means a higher quality material than the average vermicomposter (especially new vermicomposters) tend to produce. A quick mention of what castings shouldn’t be (but often end up being) may be beneficial at this point.
A Few Things Castings Shouldn’t Be:
- Wet and sludgy
- Foul smelling
- Full of unprocessed materials
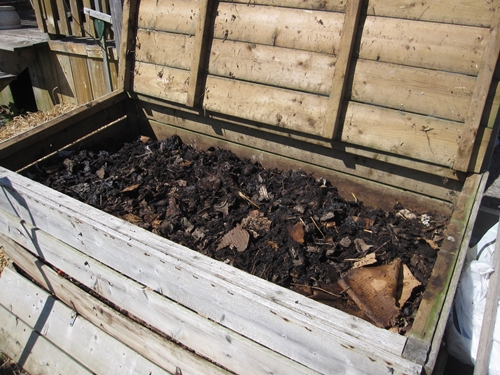
So yeah, what you see in this picture below (the type of stuff that is often found in the bottom of enclosed plastic bin systems) is NOT what we are after!
😉

What Exactly are “Castings” (and How are they Different from “Vermicompost”)?
The “castings” vs “vermicompost” debate has raged on for a long time. Technically, “castings” refers to the fecal nuggets (official science jargon!) that come out the rear end of an earthworm.
“Vermicompost”, on the other hand, is simply the end product of the vermicomposting process. This is a material that typically contains a high percentage of worm castings, along with various other materials that have not passed through the earthworm digestive tract – or that have, but resisted any further breakdown.
Bottom-line, “vermicompost” is the more technically-correct term, but a lot of the time it really just comes down to personal preference. Academics typically prefer “vermicompost” while the general public and worm farming professionals have tended to use “castings” (and this is almost always how the material is marketed).
I myself have tended to flip-flop over the years. As you might guess, I’m leaning towards “castings” these days. Let’s face it, “castings” is more potent (pun only slightly intended) – it’s a bit more of a fun, exciting, even “controversial” (ooohh!) term – so I am running with it. Please assume that when I use the term I am basically saying “vermicompost” (unless specifically discussing castings formation or some related topic).
At the end of the day, the key thing to keep in mind is that these are both just WORDS. Do not get too caught up in what they mean/imply etc. Regardless of what you call the stuff, it doesn’t refer to just ONE thing anyway. There are many different factors that have a major impact on the material you end up with – so don’t ever assume that your “castings” are exactly the same as that person’s “castings”, which are in turn the same as my “castings”.
And please don’t make claims about the “purity” of your castings either (eg. “99.9% Worm Castings”).
| “Just because something looks to the naked eye like perfect black coffee grounds does not make it pure castings. I have examined multiple materials with a simple hand lens every product making such claims and all have huge amounts of non fecal pellet material (small and black, but not fecal pellets which look like mouse poop)”
~ Tom Herlihy, Founder of Worm Power |
What is “Faster“?

The good news is that when you optimize the vermicomposting process with the intention of producing higher quality castings, you’ll more than likely speed up the process as well.
But once again we’re going to get bogged down in the uncertaintly that comes from not having a set of official standards in place. How long a time period is required in order to end up with a quality, stabilized product?
Clearly, it depends!
Earlier I mentioned that Dr. Edward’s (bombshell) comment seemed to fly in the face of other statements he has made about the time needed for the vermicomposting process to be “complete”.
When discussing what are arguably the most highly optimized, effective professional systems – continuous flow (aka “flow-through”) reactors – Dr. Edwards has suggested a range of 30-60 days (not including pre-composting or curing). For other “lower-tech” approaches – such as outdoor windrows – he has suggested durations that measure in months not days!
[NOTE: These statements can be found multiple times in Vermiculture Technology (see Edwards et al 2011 in References below), and in other publications]
Retreating back to my “safe and simple” stance (lol)…
When I say “faster” I mainly mean faster than the processing speeds that many home vermicomposters (especially newbies) are used to – not completion of the process within a specific (short) timeframe.
I want to make it clear that my goal is NOT to show people how cut their vermicomposting time down to 7 to 10 days. Better Castings, Faster is not intended to be the vermicomposting equivalent of “7 Minute Abs”.
😆
But it does make for an interesting discussion, doesn’t it?
The good news is that we will be exploring various factors that could be tweaked to (theoretically) make Dr. Edwards’ claim possible.
On that note, let’s now look at what I consider to be the 5 Major Factors of Influence when it comes to castings production. These are the KEY areas to zone in on if you want to optimize the process for improved quality and speed. Some of them may seem a bit strange (eg #1), but bear with me.
1) (YOU) The Vermicomposter
2) The Worms
3) The System (Man!)
4) The Materials
5) The Conditions
(YOU) The Vermicomposter

Naturally, when most of us think about vermicomposting, we think about worms, and wastes, and worm castings…and maybe big, healthy garden plants…but not people.
But when you think about it (a little more), WHO has the most influence over the vermicomposting process? Yep, that’s right – it’s YOU.
With great influence comes great responsibility.
So I WANT YOU…to take some time to ponder your responsibilities, and think about how you might be able to do your job (at least) a little bit better!
| “The most important part of any vermicomposting system is the manager, by far.”
~ Dr Scott Subler |
Let’s face it, the experience level of the managing vermicomposter is going to have a massive impact on the overall effectiveness of the process. Many a dedicated and dilligent newbie has still managed to kill off their worm population within days (often hours) of setting up their first system. Ironically, it can often come down to working “too hard” to try and make the worms “happy”.
We need what I like to refer to as “Knowlege/Experience Balance”.
Yes, you need to learn as much as you can about the topic of vermicomposting, but endless learning will only take you so far. You absolutely need to get your hands dirty and start racking up that firsthand experience as well. They say experience is the best teacher, and with a decent foundation of fundamentals in place I say “they” are definitely right.
So…
Step #1, before you even think about starting up a system (let alone adding worms to it) is to make sure you understand the bare bones fundamentals of vermicomposting. As pointed out in my recent 80/20 Vermicomposting post, this largely revolves around learning the requirements of the composting worms and the hazards they need to avoid.
Step #2 – Get started!
Step #3 – Stay curious. Keep learning. Keep experimenting.
It’s as simple as that.
There are some traits, personality types that tend to lend themselves well to one’s ability to become a top notch vermicomposting system “manager” – what Dr. Clive Edwards has referred to as having “worm fingers”.
Patience – not only is it a virtue, but it is one of the most important skills needed to be an effective vermicomposter. It’s kind of funny when you think about it – but the more patient you are, the greater the chance you have of achieving “faster” vermicomposting.
Reminds me of the Navy Seal saying, “Slow is Smooth, and Smooth is Fast”.
Take your time. Do it right.

A Deep Interest/Caring – most people who start vermicomposting are at least fairly interested in the concept. But just how interested (obsessed?) you are can have a major influence on how well you do with it.
The serious worm-heads that tend to be involved for many years – and do very well with it – are also often the “crazies” who refer to their worms as “kids” (and “grand kids”), express a deep “LOVE” for their worms, and even go so far as to say that vermicomposting is a legitimate form of “therapy”.
(And I completely agree with ALL these statements 100%, in case you are wondering – lol)
In all seriousness, when it comes down to it, simply having a keen interest in the worms and all the countless other critters in the vermicomposting ecosystem, can go a long way towards ensuring your success.
It is the people who rush into vermicomposting impulsively, then basically “phone it in” once they get bored or run off to the next thing, who tend to fail the fastest (although, as I know all too well – there can be perks associated with worm bin “neglect”, under the right circumstances).
The Worms
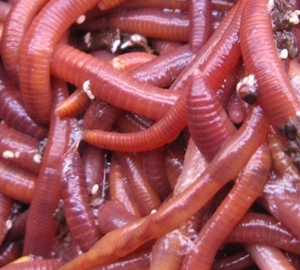
The type of worms you are working with, and the density of worms can have a major impact on the speed of the process and the properties of the finished product.
Worm Species – I don’t currently know of any research comparing the castings of different worms in terms of chemical/microbial make-up etc (i.e. research assessing the potential for different worms to produce “better” castings from a plant-growth standpoint) – but this is definitely something I want to look into further.
What I do know is that different species produce castings with different physical properties (eg African Nightcrawler castings tend to be larger and more granular than Red Worm castings, and they may even have different water-holding capacity).
Also the speed of castings production can potentially differ between worms. African Nightcrawlers and Blue Worms, when provided with their “ideal” conditions, are usually going to process wastes more quickly than Red Worms and European Nightcrawlers. In a study by Gajalakshmi et al. 2001 examining the potential of different worms for processing a mix of water hyacinth and cow manure, researchers found that ANCs were “by far the most efficient” in terms of castings production – even compared to Blue Worms. Unfortunately, neither Reds nor Euros were studied in this one.
But Sinha et al. 2002 compared ANCs, Blues and Red Worms and found that ANCs had “higher feeding, growth and biodegradation capacity” than the other worms (but the conditions played an important role).
Worm Density – As far as worm density goes, there are no hard and fast rules for how dense your worm population should be. Most people seem to want to push the envelope in this department, assuming that if they cram as many worms as they can into their systems they will get better/faster results. High worm densities under the right management can absolutely make a huge difference – I have seen reports of serious professionals attaining densities of 3 or 4 lb (and beyond) per square foot – but for the average vermicomposter (especially newcomers) even using silly rules like “1 lb of worms per sq foot” can lead to problems.
My recommendation is always to let your worms grow into your system. Not only will it likely save you a lot of money, but you’ll end up with just the “right” density of worms for the system and your current skill level. As you gain more skills/experience, and you’re able to tweak the conditions/materials you’ll likely see higher densities of worms and faster/better results.
(Finally) Getting Back to Dr. Edwards’ Quote…
As you may recall, one of my questions was “what is a ‘reasonable population of worms’?”. Well, as touched on earlier, I ended up going back and looking at the original source and I found an additional – very important – piece of information I had missed when first making my notes.
Dr. Edwards also said:
[t]he population density of worms would ideally consist of about 10% of the material by weight
Of course, this changes everything! Imagine a heap of worm-rich horse manure that weighs 2,000 lb (probably not a massive pile by any means). Now imagine that 10% of that mass (200 lb) was worms! That is a crazy amount of worms.
Again, please keep in mind that a set-up like this would require the management skills of a very serious worm farming professional!
—
Meeting Worm Needs – As touched on in the “YOU” section, knowledge/understanding about the worms you are working with (their requirements and hazards you need to avoid) is critically important. When you can provide the worms with “THRIVE” conditions/materials (a concept discussed in the recent 80/20 Vermicomposting post) this is obviously going to help them perform better.
On that note, let’s now look at…
The System (Man!)
Technically speaking, a worm composting “system” is all the key components (worms, materials, container etc) combined – even including the vermicomposter, as the Dr. Subler quote from earlier suggests. But for our purposes, let’s just assume I’m referring to the overall approach/strategy, and bin/bed (if applicable) being used.
Two broad categories of systems would “Continuous-Flow” (“Flow-Through” is a common synonym) and, well, everything else. To keep things simple – let’s just refer to these as “Standard Systems”.

Standard Systems – A standard system is one that is set up, receives inputs for a period of time, and is then eventually dumped out (and often started over again). The term “Batch System” might work here as well – but it implies that everything is added all at once at the start, and then nothing else is added until the finished material is harvested (which may sometimes be the case, but not usually).
Prime examples would be any sort of basic enclosed plastic tub or wooden box type of system – but there are many others as well.

Continuous-Flow Systems – These are systems that allow you to harvest finished material continuously – after an initial ‘priming’ period – for extended lengths of time. This concept is based on the natural tendency of composting worms to move upwards or sideways away from finished castings and towards newer food deposits, and the key difference (from the “Standard” approach) is that these systems offer a means of accessing/harvesting the mature castings.
Some examples include stacking tray systems, multi-compartment (horizontal) migration systems, single compartment flow-through systems, and “wedge” (“walking windrow”) systems.
It is well beyond the scope of this blog post to get into all the ins and outs of different worm composting systems, but I do want to leave you with some key take-aways here.
The type of system you choose to use can have a major impact on the effectiveness of your vermicomposting efforts – but this is mostly the result of the conditions (a topic we’ll look at a little later on) they support/hinder.
Let me say that (in a different way) again:
The system you use is only as effective/valuable as the conditions it helps to support!
Case in point – some “fancy”/expensive plastic stacking tray worm bins have very poor air flow and retain far too much moisture, so you can end up with sludgy, compressed material in the lower trays, lethargic worms that don’t migrate, and just generally a far less effective vermicomposting process. Put one of these bins outside in a hot sunny location, and you’ve got yourself a deadly “worm oven” as well.
On the flip side, while basic (enclosed) plastic tub systems are often considered among the least effective systems, you can easily “soup up” their performance by removing the lid and just using a thick layer of cover bedding (and/or a loose plastic bag).
Likely the most effective, and almost certainly the “easiest” system to use if you want to really focus on castings production is some form of single-compartment flow-through system. Something like a VermBin or an Urban Worm Bag would be examples that are well-suited for the average home vermicomposter, while larger flow-through beds tend to be to ‘goto’ systems for many of the people who are really serious about castings production (eg those selling castings).
Why do they work so well? In a nutshell – they help to provide the worms with the conditions they need to THRIVE (and help to mitigate the hazardous conditions that can impede or kill them).
The Materials
When I say “materials” I am referring to anything added to a vermicomposting system that can be broken down, consumed etc. Needless to say, the materials you choose to work with can have a massive impact on the results of your efforts.
Parent materials can influence:
– The time required for complete processing
– The nutrient profile of the finished castings
– The microbial make-up of the finished castings
…maybe even the nutritional value of food plants grown with the castings.
Let’s now explore some of these in a little more detail.
Processing Time – Different materials have different (often vastly different) levels of resistance. Among the more resistant are the carbon-rich materials we usually refer to as “bedding”. The typical recommendations I offer for new vermicomposters – and really anyone setting up a new system – include sentiments like “bedding is your friend”, and “there is no such thing as ‘too much’ bedding”. I still stand by this (erring on the side of “crazy amounts of” bedding) advice – especially if you are a newbie – BUT…I do want to make it clear that in order to achieve the fastest processing times, you will likely need to shift your focus towards a somewhat more food-centric approach.
Again – take your time! Wait until you have developed a good “feel” for the process and the needs of the worms before you go too crazy.
Slow is smooth. Smooth is fast!
😎

Apart from resistance, how degraded a material already is (when added as food/bedding) can have a major impact on processing speeds. Lets think about horse manure for a minute. Once upon a time is was (mostly) grass and hay. These get chewed up and digested via microbial action in the horse’s gut before being deposited as manure. This manure is then (ideally) mixed with some sort of bedding, heaped up and left to sit for weeks, maybe months before it is what many might consider the “ultimate” worm food/habitat material.
In a sense it is like a lot of the work has already been done for the worms (and us) – the aged manure is in effect a highly “optimized” food source that is much closer to becoming high quality castings than say a fresh stalk of broccoli.
On a related note…
WHAT materials you choose to use is hugely important, but HOW you handle/optimize these materials can also be critically important, for both speed and quality of output. Optimization is a key theme in my 80/20 Vermicomposting post (and overall philosophy) – and it is even more important when you want to produce “better castings, faster”.
There are a variety of ways to optimize materials for vermicomposting. Here are a handful of the most common approaches:
- Chopping/Shredding/Grinding
- Freezing/Thawing
- Mixing (including mixing with “Living Materials“)
- Aging/Pre-Composting
As the Dr. Edwards quote below (found in the “Low-Technology Vermicomposting Systems” chapter in Vermiculture Technology) suggests, just mixing different materials can be very helpful. This is especially true when working with kitchen and yard wastes. A prime example that comes to mind is that of vermicomposting coffee grounds. There was a period of time when I was collecting grounds from a local coffee shop, so I have extensive experience with trying to use only the grounds as a food source for worms. The long and the short of it is that it wasn’t easy at all – and it usually took a LONG time before it actually became appealing enough for the worms to move into it.
Mixing smaller amounts of grounds with other kitchen scraps (etc), on the other hand works far better!
| “Often, mixtures of several different wastes can be processed more readily than single types of wastes, are easier to maintain aerobically with an acceptable moisture content, and result in a better product.”
~ Dr Clive Edwards |
Nutrient Content of Finished Castings – The NPK and micronutrient profile of castings is NOT what makes them so “magical”. Let me be clear about that right off the bat. Nevertheless, it certainly doesn’t hurt when our castings have an abundance (and variety) of nutrients – especially when in both plant-available and slow-release forms (as is often the case in castings).
Castings made from a very wide range of parent materials have been analyzed for nutrient content and it’s clear that the nutrient profiles can vary a lot from one material to the next. Edwards (1988) examined castings made from separated cattle solids, separated pig solids, cattle solids on straw, pig solids on straw, duck solids on straw, and chicken solids on shavings. Mineral content (% dry wt) varied as follows: 2.2-3.0 N, 0.4-2.9 P, 1.7-2.5 K, and 1.2-9.5 Ca.
A study by Arancon et al. 2005, comparing the effects of 3 different types of castings (and two regular composts) on the growth of field-grown peppers, the researchers reported similar variation in nutrient profiles. Below are the N/P/K values for the castings made from the 3 different parent materials.
Food waste – 1.3/2.7/9.2
Cow manure – 1.9/4.7/1.4
Paper waste – 1.0/1.4/6.2
NOTE: As interesting as these numbers are, they definitely shouldn’t be considered perfectly representive of ALL “food waste”, “cow manure” and “paper waste” castings – only the ones used in this particular study. But if you compare enough of these numbers, you can likely find some patterns (eg. perhaps paper waste castings do tend to on the low end for N, and on the high end for K).
I don’t have specific sources on hand, but I know Dr. Edwards has suggested (multiple times) that pig solids comes just about as close to a “perfect” substrate for vermicomposting as you can get. He asserts that the resultant castings will typically be able to meet all the nutritional needs of the plants (which often isn’t the case with castings).
—

Something I am very interested in is the idea of “engineering” castings – based on parent material selection and additional supplementation – that are particularly well-suited for specific applications.
I’ve written before about my interest in “banana peels and comfrey” as worm foods in the past.
Comfrey is often reported to be a “dynamic accumulator” – it has a large taproot that extends down deep in the soil profile, apparently helping the plant to “mine” nutrients, which it then accumulations in its tissues. Banana peels can be rich in K and other nutrients.
So I’ve often wondered if it would be possible to custom-make high-nutrient castings by using nutrient-dense starting materials such as these – further augmenting with other additives like rock dust etc.
It seems plausible in theory, but so far I have not found a lot of academic research to support this idea (but I will definitely be digging a lot deeper to see what I can find).
Bottom-line…YES (absolutely), your choice of parent materials can have a major impact on the nutrient profile of the finished castings. But how much of an effect, and whether or not this is something we can consistently “engineer” based on the types of food mixes we create, is still not fully understood.
—
As for the effect of parent material on the microbial populations, and the nutrition-boosting (of food crops) potential of worm castings…while both very fascinating topics (and certainly areas I will be studying more), my level of expertise – or rather, lack thereof – motivates me to stay relatively quiet for now.

Microbiology – as weird as it may sound, having studied a lot of microbiology in university, along with a lot of reading relating to the microbiology of vermicomposting, I almost feel like the more I read, the more I realize how little I (and we all) really know!
This is yet another controversial topic, so I will choose my words carefully – but my advice for anyone interested in assessing castings based on basic microscopic examination is to (please) tread lightly. Be careful about what sorts of conclusions you reach about a material based solely on what you see through the lens.
I have very good friends (people I admire and respect a great deal) involved in microbial assessment work – and I mean no disrespect to any of them. Taking a look at the microbes (and micro-invertebrates) in these materials can be very helpful! Finding an abundance of specific groups of organisms can definitely be a “good” sign – just as finding absolutely no signs of life could be considered “bad”. And when materials are dominated by specific microbial groups (bacterial vs fungal, for example), there are likely some helpful predictions we can make as well.
Anyway – before I shove this foot any futher into my mouth (lol), I will leave it at that. Hopefully we can at least all agree that a lot more academic research in this area would be beneficial!
Boosting Nutrition in Food Plants – There has been some research suggesting that castings can have a positive impact on the nutritional value of food crops (Singh et al. 2008; Wang et al. 2010), and even some indication that this might be something we can influence based on our choice of parent materials (Weber, 2017), but I definitely need to do a lot more digging before I can provide any form or worthwhile commentary on the topic.
The Conditions
The term “conditions” refers to the environmental factors inside and outside of a vermicomposting system that can have an impact on the effectiveness of the process. There’s no doubt these factors can have a significant effect on the speed of vermicomposting. How much effect they have on quality of the end product isn’t quite as cut and dry.
The 3 KEY factors of importance are 1) Temperature, 2) Moisture, and 3) Oxygen. I tend to prefer lumping #2 and #3 together and referring to this as the “Aeration/Moisture Balance”, since they are usually very closely related (inversely proportional).
Unfavorable conditions can develop via other means as well – these are almost always linked to the types, and amounts, of food materials being added to the system. We will come back to this shortly.

Temperature – As discussed in my 80/20 Vermicomposting post, there can be a pretty huge difference (in terms of vermicomposting effectiveness) between simply keeping the composting worms alive, and having them actually thrive. The “sweet spot” for the most commonly-used composting worms tends to be somewhere in the range of 20 – 30 Celsius (68-86 F). Keep temperatures within this range and your worms should do well (assuming you are also managing other factors properly).
Let temperatures fall or rise below/above this range and you will see a drop in efficiency – potentially even death of the worms. The survival range for Red Worms and Euros tends to be in the 0-34 C (32-94 F) range, and more like 10-34 C (50-94 F) for Blues and African Nightcrawlers, just so you know.
One of the big challenges with temperature – especially when vermicomposting on a large scale – is that you’re not just dealing with ambient conditions. Microbial heating can often wreak havoc on an otherwise-optimized system. Pre-composting can help to get rid of a lot of this heating potential – and offers other benefits such as pathogen distruction, killing of weed seeds, and off-gassing of ammonia.

Aeration/Moisture Balance – Composting worms need plenty of moisture – but they also need plenty of oxygen (as do the aerobic microbes that help them process the wastes). In warm, wet environments with lots of rich organic matter, oxygen gets consumed incredibly fast. Excessive aeration, on the other hand, can quickly dry out a system – also greatly decreasing the effectiveness of the process.
SO, it can be a balancing act trying to keep both moisture and oxygen levels in the range that will help the worms thrive!
As I touched on earlier, the type of system you are using can have a very important role in helping to manage conditions such as moisture and oxygen levels. A big part of why continuous-flow systems tend to be so effective is because they have such excellent air flow – but like most other systems, if you are not able to control the surrounding environment (ideally by keeping the system in a climate-controlled building), you may find yourself battling endlessly with other environmental factors (eg heat, dry conditions). So assessment of your own particular situation ahead of time is an important part of the process as well.
The Aeration/Moisture balance is something that can absolutely have an impact on the quality of the end product. Excessively wet conditions will lead to poorly stabilized castings – and on the flip-side, if you allow the material to dry out too much you can kill off a lot of the beneficial microbes and lower the nutritional value as well.

Other Conditions – As touched on a minute ago, other challenging conditions can develop that don’t directly relate to temperature, moisture and oxygen levels (although most of these different factors will influence one another), and these usually can be linked directly to the system inputs.
When you add too much food (or at least poorly optimized food) at once these materials can become anaerobic, potentially producing metabolites that are harmful for the worms (eg alcohols and acids). Certain types of food that require special handling – eg fresh manures – can cause serious problems such as ammonia release, increased salt concentrations, and excess microbial heating, all of which have the potential to harm or kill the worms.
As we’ve discussed already, HOW you handle the foods before adding them can go a long way towards avoiding any of these sorts of hazardous conditions. Feeding in moderation tends to help as well (smaller amounts more often will almost always be better than large amounts less often – but the type of system, and what environmental factors you are dealing with will play an important role in this).
Wrapping Up
I knew this blog post was going to be fairly long – but just how long (and how long it took me to hit “publish”) caught be by surprise. If you made it all the way through (especially if you did so in one sitting) please accept my heartfelt thanks! I know how valuable time/attention is these days, so I greatly appreciate you investing some of yours in my work.
Hopefully you’ll walk away with a better understanding of how you can potentially produce higher quality castings in less time – and you (like me) will be motivated to dig even deeper into the overall topic of worm castings.
If you found this article interesting please make sure you are on the RWC e-mail list. You will gain access to other helpful resources and be able to stay up to date with what’s new and exciting here on the blog.
And as always, don’t hesitate to leave comments and questions below!
REFERENCES
Arancon, N.Q., Edwards, C.A., Bierman, P., Metzger, J.D., and C. Lucht. 2005. Effects of vermicomposts produced from cattle manure, food waste and paper waste on the growth and yield of peppers in the field. Pedobiologia 49(4): 297-306.
Bogdanov, P. 1998. Vermiculture in Waste Management: Biocycle’s West Coast Conference. Casting Call, 2(6): 1-3.
Edwards, C. 1988. Breakdown of animal, vegetable and industrial wastes by earthworms. In Earthworms in Waste and Environmental Management, eds C.A. Edwards and E.F. Neuhauser, 21-31. SPB Academic Publishing, the Hague, the Netherlands.
Edwards, C.A., Arancon, N.Q. and R. Sherman (Eds). 2011. Vermiculture Technology: Earthworms, Organic Wastes, and Environmental Management. CRC Press. Boca Raton, Fl.
Gajalakshmi, S., Ramasamy, E.V. and S.A. Abbasi. 2001. Potential of two epigeic and two anecic earthworm species in vermicomposting of water hyacinth. Bioresource Technology, 76(3): 177-181.
Singh, R., Sharma, R.R., Kumar, S., Gupta, R.K., and R.T. Patil. 2008. Vermicompost substitution influences growth, physiological disorders, fruit yield and quality of strawberry (Fragaria x ananassa Duch.). Bioresource Technology, 99(17): 8507-8511.
Sinha, R.K., Herat, S., Agarwal, S., Asadi, R. and E. Carretero. 2002. Vermiculture and waste management: study of action of earthworms Elsinia foetida, Eudrilus euginae and Perionyx excavatu on biodegradation of some community wastes in India and Australia. The Environmentalist, 22(3):261-268
Wang, D., Shi, Q., Wang, X., Wei, M., Hu, J., Liu, J., and F. Yang. 2010. Influence of cow manure vermicompost on the growth, metabolite contents, and antioxidant activities of Chinese cabbage (Brassica campestris ssp. chinensis). Biology and Fertility of Soils, 46(7): 689-696.
Weber, C.F. 2017. Broccoli Microgreens: A Mineral-Rich Crop That Can Diversify Food Systems. Frontiers in Nutrition, 4(7).
Well,congratulations Bentley, this article provides a wealth of information in a form that’s readily digestible. I’ve been collecting cafe organic wastes for three years and this article addresses most of the issues that have come up for me. If anyone is just getting into vermicomposting and feels drawn to gearing up to either process more organic waste or to produce more worm castings, I’d recommend that you read this article again and again. There’s so much sensible information and virtually no crap!
I do have one differing view however: the ideal vermicompost for me isn’t the black gold that is produced after drying and sifting; it’s the fresh, moist stuff with considerable amounts of organic material still in it. That’s when it’s at optimum vitality. It’s harvested about ten weeks after the first feed and disturbed as little as possible. Around 10% of the worm population and a considerable number of cocoons may still be in the vermicompost but this will make it a more attractive product and the resident worm productivity will quickly recover.
Thanks for your diligence Bentley in drawing all this research together.
Regards, Colin
the one thing that EVERY person writing about vermiculture misses out of their writings is “HOW LONG SHOULD WE KEEP OUR CASTINGS BEFORE USING THEM IN OUR SOIL/COMPOST AND HOW LONG BEFORE THEY LOSE THE VALUE WE DESIRE?” thank you for the most comprehensive article I have yet read and YES I have read it entirely.SUPERB but I will need to read it several times to fully understand the intended educational value,long is to too short a word for the work you must have undertaken to help us all improve our systems. THANK YOU !!!
Colin – thanks for chiming in, for your kind words, and for sharing your honest opinions! Interesting thoughts re: the best “finished” product. I think as always it’s one of those “it depends” types of situations. My very first “magical” experience with vermicompost happened after I scooped a bunch of dark stuff from the bottom of an early worm bin and used it when I was repotting a small philodendron plant. The boost in growth was nothing short of amazing.
Bottom-line, I definitely don’t disagree you can produce nice stuff without curing/drying – but at the same time, I would be hesitant to ever say that the unrefined vermicompost is always going to be the ideal/better version. Either way, this is definitely a really interesting topic (mental note to explore this more in course) – so thanks for bringing it up!
—
Paul – I really appreciate your feedback! And YES, that is a very important question as well. Like just about everything else, there is no single definitive answer, unfortunately. I asked Tom Herlihy what he thought about that (some time ago) and this is what he said:
“We have done efficacy studies in house (plant performance) and see no significant degradation in our materials for 2 years (shouldn’t ever have to keep longer we felt)”.
That’s pretty impressive! It may be (likely is) more potent when used closer to the time of harvest – but clearly sitting around doesn’t quickly degrade the quality. Just make sure it is protected from the elements!
Colin – Funny add-on to what I said. When I was going through my notes from the exchanges with Tom Herlihy (to find what he said about castings storage) I came across his views on curing as well. He actually feels that the product is “finished” as soon as it is harvested (as long as the process is very well managed). I suspect he would recommend screening out the unprocessed stuff though! 😉
Nice job Bentley, super good info.
You’re amazing, Bentley! I’ve adored your website for so many years — you so willingly share such terrific information with everybody. When I teach vermicomposting at public forums, I always provide them with your website and tell them that you’re the one who taught me everything I know.
I was just now thinking…..I’ll bet that there are universities out there that would be proud to give you a Ph.D. using your website as the bulk of your doctoral thesis. It’s been fascinating for me to be made aware, by you, of some of the subtle and not-so-subtle changes to vermiculture over the past 20 years. YOU are responsible for finding & sharing so much of the bottom line about our precious worms!
Truly, Bentley — you’re the bomb!
Mary from New Mexico
Haha – thanks, Mary! It’s been so nice having you follow-along for many years now. Not sure the honorary PhD is in the cards, but I appreciate the sentiments. Feels good to know I’ve helped more people get educated (and hopefully excited about) worm composting!
😎
We often here about feeding 1/2 cup of food per pound of worms, but that must differ if one is feeding worm chow, manure, lettuce, table scraps,alfalfa, etc.
I “supercharge my small, indoor bins by adding organic plant fertilizer mix to the feed. I buy 36 pound bags to use in my raised beds. I take a small amount, mix well with water and add the paste with other food. The fertilizer is composed of chicken yard waste, bone meal, feather meal, kelp, bat guano, etc. I’m careful not to add to much but I’ve no doubt it gives a boost to the nutritional value!
Thanks for sharing, Les! Funny – I’ve done something similar this fall. I found an old bag of an organic fertilizer and used it as a supplement in a large number of indoor bins I was setting up. I agree, both in terms of not going too crazy with it – and in terms of the potential for boosting the potency of the vermicompost.
I was just reading a Cornel University study page and it was saying not to feed your worms watermelon rinds and banana peels due to toxic chemicals. I feed my worms both at different times but haven’t noticed any ill effects other than a complete orgy of worms devouring the stuff. Just wondering if you have had any problems using this feed for your worms. I also use a cornmeal, wheat bran, oats, malted barley , used coffee grounds crushed eggshell meal every feeding when I add the melon or banana waste. Thanks Dan
Bently, Thanks for all the information and taking the time to share it.
I’ve been raising worms and lactobacillus-serum for a couple years now.
I’ve tried different systems for both ventures with varying degrees of success. I’m looking to scale up my production.
Combining vermicomposting with bokashi and soil sterilization to transform a half acre of noxious invasive weeds and a large pile of clay into raised garden bed soil.
If your interested I can give you occasional progress reports.
Thanks Again,
Johnny Bokashi
Hey Johnny – sorry I am only seeing this so long after you posted it, but I would absolutely be interested in learning more about your activities. The raising worms with lactobacillus serum in particular sounds intriguing. I will contact you directly about this. Thanks! 😎