
Last week I made quick mention of a “homemade manure” mix that I’ve been playing around with this summer. I thought it might be helpful if I dedicated a post to the topic since some of you may be interested in creating something similar.

As some of you will recall, earlier in the summer I learned about, and started using, (hardwood) stove pellets in various ways. They soak up water like a sponge, have a very high C:N ratio, are clean (no chemicals), and are quite inexpensive (cheaper than coco coir, for example), so they make for a fantastic bedding material – especially if used in conjunction with something a bit bulkier like shredded cardboard.
Again, the brand up here in Canada – and available in some parts of U.S. – is Canawick. I have little doubt there are similar products out there, though, so don’t despair if this particular brand is not available in your neck of the woods. Two other brands of hardwood pellets I know of for sure are “Cleanfire” and “Turman”, so you may want to look those up.
Here, also, is a helpful directory of North American pellet manufacturers I was able to find:
http://www.wisewaypelletstove.com/pellet-facts-manufacturers.html
I’d certainly be interested to see if soft wood pellets are just as good (so please let me know if you do any experimenting with them). My reservation would be the fact that they contain resins that might be harmful (or at least unappealing) to the worms. That being said, I have used plenty of aged manure that was originally mixed with pine shavings (common horse bedding material) – and the worms seem to thrive.
Speaking of horse bedding…
There are plenty of different animal bedding mixes out there that are comparable (maybe even better) than these stove pellets, BUT keep in mind that they are likely going to be a lot more expensive because they are intended for a specialty application. We all know how willing people are to fork over loads of cash for the well-being of their animals! lol
Another interesting material I’ve been using for 2 or 3 years now – not very successfully I might add – is cubed alfalfa (and an alfafa/timothy mix). These dry cubes are typically soaked in warm water and used as a horse feed/treat. Like the stove pellets they soak up a LOT of water, so the actual volume of hydrated material you’d get from one 50 lb bag is substantial (likely an overflowing wheelbarrow full).
The challenge with this stuff, however, is the low C:N. When you leave it to sit (once wet) it heats up quickly and will become a foul anaerobic slop if you’re not careful. When I’ve added it to my worm beds, there has tended to be a pretty long lag time before the worms are willing to move into it. My hunch is that it releases too much ammonia gas early on to offer any appeal as a food material.

Of course, my “Reese’s Peanut Butter Cup” moment* finally arrived when I had the idea to try mixing the stove pellets with the alfalfa cubes. This helped to boost the C:N up into more of an ideal range, not only helping to avoid excess nitrogen loss, but also resulting in a really nice material that could be put to good use more quickly.
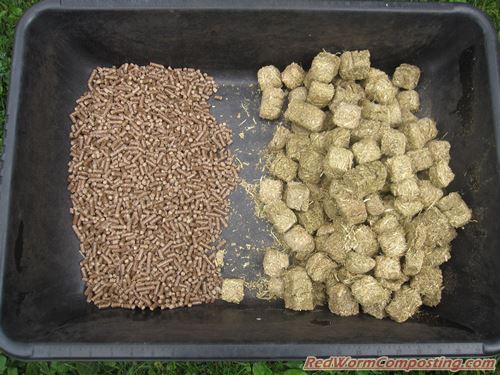
For your most basic mix (the stuff I wrote about last week, and what you’ll be reading more about in a minute) you can simply dump an equal volume of the pellets and the cubes into a wheelbarrow, then submerge with water. Let it soak up what’s there then continue adding water until it reaches your desired level of hydration. For me this is basically as wet as I can get it without any pooling in the bottom. Next you mix it up really well (actually not a bad idea to start the mixing process while you are hydrating) and let it sit for at least a few days, making sure to mix it daily (a compost tumbler might be a handy vessel for the mixing process).
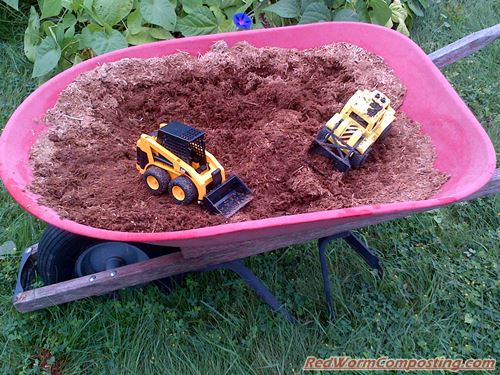
NOTE: I tried 5 gal pails filled with each of the 2 component and ended up with an overflowing wheelbarrow (and it’s a pretty big one – not the one pictured at top of this post). My recommendation is to try it out with smaller pails/tubs at first. You want a volume you can easily mix without having it fall out of your mixing vessel.
For more of a fancy schmancy all-in-one bedding-food recipe you might try this:
2.5 gal of pellets
2.5 gal of cubes
1 coffee tub (~ 2.5 liters | ~ 0.66 gal) of chick starter, or “Worm Chow”, etc etc etc
1 coffee tub of finished vermicompost
0.75 liters (~ 0.2 gal) of rock dust (ag lime would probably be fine as an alternative)
Please keep in mind that I am still in the preliminary testing stages with this mix – but the worms definitely seem to love it! Don’t hesitate to play with the proportions etc. When I first made this mix I actually dried it out again for easy storage, and then re-hydrated as it was needed (or sprinkled it in dry as a sort of worm bin conditioner – more on that in a min).
Rationale – My overall goal with this mix was to create something that could offer the worms both food and habitat value. As I just touched on, when added dry (along with typical kitchen scraps) it could also work really well as a worm bin “conditioner” (and even “living material”) of sorts. The vermicompost adds a starter culture of beneficial microbes, while also acting as a bit of a bio-filter. The rock dust helps to buffer excessively acidic wastes and adds some additional micronutrients.
My preliminary testing with Euros in open tub systems has been very positive! The worms moved into the material (when hydrated) very quickly. There was a noticeable increase in worm size over time, and I was pleasantly surprised by the number of cocoons (LOTS) I found in the tubs when I ended up harvesting them 3-6 weeks later (worms were harvested for customer orders).
Getting back to the basic mix…
My most recent batch didn’t end up getting the special treatment just outlined – largely due to the fact that I ended up with way too much of it at once (so it was a lot more difficult to dry it out, mix it etc). It ended up simply sitting outside in a couple of wheelbarrows for quite some time (perhaps a few weeks) while I decided what I wanted to do with it.
As mentioned, I added some of it to my vermi-fertilization bin last week. A few days ago I decided to use the rest of it as a base for new batch of homemade manure – this time, a mix more closely resembling the sorts of “homemade manure” mixes I used to write about.
I recently harvested quite a few giant zucchinis, and had plans to “recycle” them as worm food (since we typically only eat them when fairly small) – so this seemed like the perfect way to do it!

I enlisted the help of my (almost) 3 year old son – who has enjoyed digging around in the base material with his construction toys (lol) – and we filled up a plastic garbage can with alternating layers of sliced zucchini and the fake “aged manure” (that makes John sad – lol).


Once we got up near the top of the bin I started chopping and mixing everything up. Later, I had another brainwave (lol) and realized it would make more sense to transfer everything over to my big wheelbarrow!

As you can see, I wasn’t overly concerned about pulverizing everything – at least not initially. I’m now simply going to leave the mix to sit so that the zucchini has a chance to start decomposing. In a week or so I will likely chop and mix everything up some more and start putting the material to good use.
Stay tuned!
😎
*Remember those old Reese’s Peanut Butter Cup commercials where the person with the peanut butter crashes into the person with the chocolat bar? …Yeaah…still confused? lol
**For Even More Worm Fun, Sign Up for the RWC E-mail List!**
Only a tiny bit related: I use hardwood-sawdust-pressed logs for heat – it’s basically the same material as the pellets. Sometimes these get some water in them (even if wrapped) and break down into sawdust, which I then just dump in the bin. Usually small amounts, but occasionally a packet gets wet and larger amounts. At first I was concerned but the worms do not mind and it breaks down very, very well. Just harvested some and it is just fantastic soil. So I also agree this is a good bedding material. My guess is that either the pellets or logs would be much, much cheaper in bulk (not in bags), and the pressed logs at least will break down into sawdust with just water. (As an example, a stacked pile on a pallet of these logs was about $270/tonne delivered – and I think pellets might be less. Note also the type of pressed log I got is slightly more expensive kind because I find it holds together better, there are certainly cheaper ones)
Maybe I’ll try an experiment and put a log directly in the bin (which is usually pretty damp) and see how quickly it breaks down with no physical effort.
I started my first indoor bins two months ago with a pellets/leaves/black dirt/carboard combo (but mostly pellets, post-soaking) and they seem to be doing great. It’s great at holding moisture at the right level and if things get a bit too gooey on top, I just drop some more soaked pelllets on them to keep the smell down. I basically had the pellets for free, because I had them left over from when I had a pellet stove, but I think they still go for about $4 US per bag. And believe me, they expand so much that a bag goes a lot further than you would think.
I would like to try some of the chicken feed the next time around. That sound slike a nice food source to spread over the entire bin without getting too nasty if it doesn’t get consumed right away.
Thanks for the research!
Very interesting, GA!
I just did a pricing calculation for these bagged pellets ($5.99 for 40 lb bag) and it works out to $299.50 per tonne. Of course this doesn’t include delivery! lol
Still, pretty reasonable – and a nice option for those who don’t want to invest in such large quantities.
Keep us posted on your experiment!
Lynne – thanks for sharing your experience with the pellets! Nice that you already had a supply of them (sounds like U.S. pricing is very reasonable though! Wow).
If adding the chicken feed alone as a food supplement, just make sure you only add a small sprinkling at any one time. It is a protein (i.e. nitrogen) rich material, so it can release ammonia (and/or get pretty foul) if you’re not careful.
It’s hard to believe your son is almost 3…Looks like he’s having a good time helping
I was excited to read about your alfalfa pellet/stove pellet combo idea. I’ve been using pellets for years, but adding the alfalfa pellets to balance the ratios is a brilliant idea.
I recently had a population fall off in one of my bins, and I am still working out the reason as to why. I’m hoping that this combo might be able to help reboot this bin.
trying my mix no horse food cow manure next might try hog I will compost it first.
How long did you let the pellets/alfalfa sit together before you applied it to your bin(s)? Did you experience heating?
Can I use fresh horse manure or does it have to be compost like for one month before I use it in my warm bed
I’ve tried your mixture a few times over the last few weeks, with great success. 1/2 alfalfa cubes, 1/2 hardwood pellets, a little finished worm compost, some vegetables, let it sit for about a week, and it is worm heaven. I’ve used it to add to existing bins, and to fill an existing but abandoned large outdoor in-ground plot in our Master Gardener demo garden. The worms love it, gravitate to it, and are multiplying in it. One note – the alfalfa cubes I have take longer to dissolve, so I start soaking them first and then add the pellets.
Thanks so much for the great idea.
I’ve mixed mulched leaves,shredded cardboard, worm chow and castings in a 5 gallon bucket going to let it set for a week stirring each day an test use see what happens(fingers crossed ha ha)
Can I use wood pellets, shredded cardboard and some corn meal – along with some thawed food scraps? The Farm Store is fifty miles away.
Bentley got an update on this? I’ve begin experimenting along these lines but more like making pre-composted feedstock with straw and alfalfa pellets, but would love to hear if your “schmancy” recipe proved interesting?
Hey Ben – I have continued to experiment with HMM mixes (will likely be discussing in SWF before too long so stay tuned). This particular batch (written about above) was fantastic stuff – but what’s “funny” is it ended up infested with stable fly (like a biting house fly) larvae while outdoors, which made for a really fun experience once I brought a lot of it indoors (let’s just say I wore a hoodie and carried a rolled up newspaper any time I went down to the basement for a while – lol). I highly recommend creating some sort of HMM “brewer” that is tightly sealed up but has good vents for aeration (check out my recent breathable bucket system post if you haven’t yet – I plan to use those vents for food mix systems as well)