

When most people think of vermicomposting they tend to think of it as more of a continuous, active process.
This is all fine and good – and could even be considered one of the advantages of this approach – but I think more needs to be said about the power and potential of “batch” vermi-systems.
It a nutshell, the idea is that you add everything to the system right away – or at least early on – and then basically leave it alone, letting the worms and other organisms work their magic over time.
One example I have written about is Mark Payne’s “vernmenting” method, which even seems to offer the added advantage of letting you process some materials that wouldn’t be well suited for a typical worm bin.
I really love Mark’s approach with sealed (but still ventilated) buckets, but I personally prefer something a bit closer to a typical worm bin set-up.
The good news is that there isn’t just ONE “right” way to set up bins like this. The possibilities are endless, in fact. Even the bins within a group I set up at the same time can vary a fair bit.
That said…
There are still some key recommendations to keep in mind – and I will come back to these a bit further along. First, let’s look at how I recently set up a group of 15 “set-it-and-forget-it” bins in about an hour and a half.
I’ll start by sharing my “secret” bin of choice – 5 gal HDX bins (from Home Depot). They are super cheap, sturdy/durable, and they stack like a dream. Even better, they actually have channels in the lids so drilling holes in these means there will still be air flow even with other bins stacked on top (which is not to say that some ventilation in the sides isn’t a good idea as well).
I use these bins for setting up batches of Red Worm cultures (“Worm Mix”) and love them!
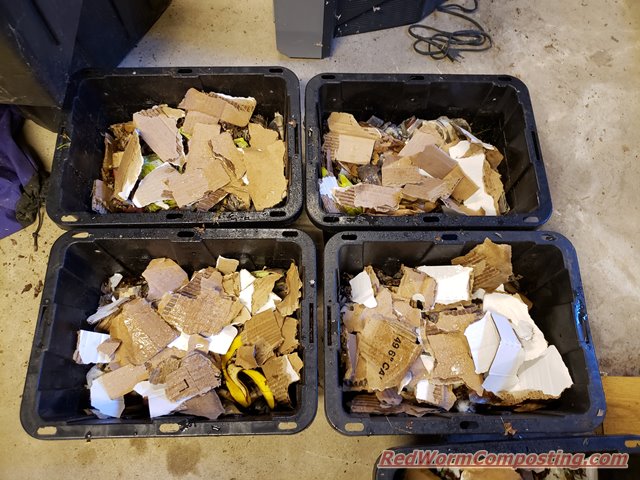
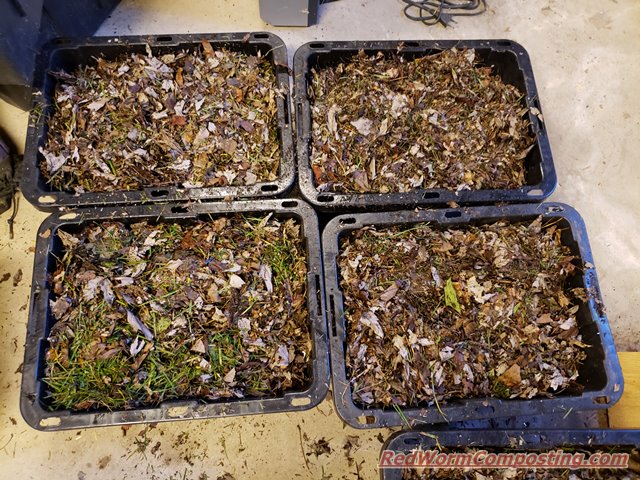
As shown in the image above, the first thing I did was lay my empty bins out in a row on the floor to assist with my “assemby line” set up process. If you plan to set up quite a few of these bins over time, I highly recommend using a batch set-up process similar to this as well. It can save you a LOT of time/effort, versus setting up one or two at a time.
…
Regular readers might be able to predict what I did next!
That’s right, I started by creating a false bottom. Bulky shredded corrugated cardboard tends to be my go-to material for this zone, but other bulky paper wastes like “scrunched” paper or hand-ripped newsprint can work as well. These help to provide some separation from the bottom of the bin, while also serving as a great long-term food source for the worms (becoming richer over time as liquids percolate down from above).

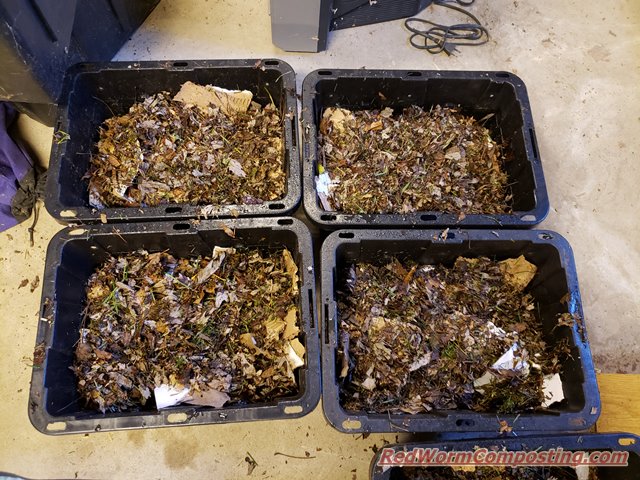
We had an extended period of (unusually) beautiful, mild weather early in November – so this gave me an opportunity do one last lawn mow, with lots of fall leaves on the ground! This lovely mulched mix was the next material added to the bins.

I don’t currently have good access to horse manure (likely my favorite for systems like this), or even large amounts of kitchen waste, so nutritional supplementation becomes more important.
I really like dry poultry feeds (such as “chick starter”). They are very inexpensive, and when used more as a supplement than as a food (my recommendation) a bag can last for quite a long time.

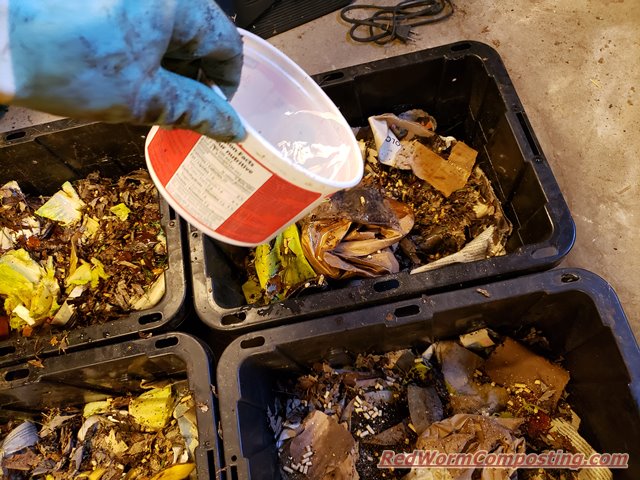
I next sprinkled in a small amount of this feed.

The mulched leaves/clippings mix could be considered a sort of “living material“, since it would introduce some beneficial microbes to the system. Nevertheless, since I had plenty of richer material on hand I figured I would add some down in the bottom zone to help kickstart breakdown activity down there.


Another bedding material I happened to have was used kleenex. Some may find the idea a little off-putting, but there is really no reason for this waste to end up in the landfill (or flushed down the toilet).

Once it was added, I bulked up this carbon layer a bit more with some additional paper-based bedding…

…and another layer of the mulched leaves/clippings.

With these long-term systems I always like having some water-rich wastes, bulky fresh(er) ones in particular, since they can serve as a slow-release supply of moisture and nutrition that gets doled out over time. Frozen-then-thawed kitchen scraps are great as well (and I use them quite frequently) but will tend to breakdown quite a bit more quickly.
For this particular set of bins I had a pretty limited quantity of scraps (especially considering it was 15 of them! lol) – but I did try to at least get some scraps in each bin.


Hard to tell, but I then added another sprinkle of the poultry feed as well.

One of the tricks with passive systems is getting the moisture levels just right. If you are adding a lot fairly dry material (as was the case for this batch), I recommend adding about ~ 500-750 ml of water for a bin this size. There will likely still be pooling initially, but gradually over time things should balance out nicely.
I added some of the water at this point, and the rest near the end of the set-up process.

Next it was another layer of bedding…
…and another layer of my mulched mix.
There are various options for adding worms to a system like this. The approach I most highly recommend involves adding worms + habitat material from another system.
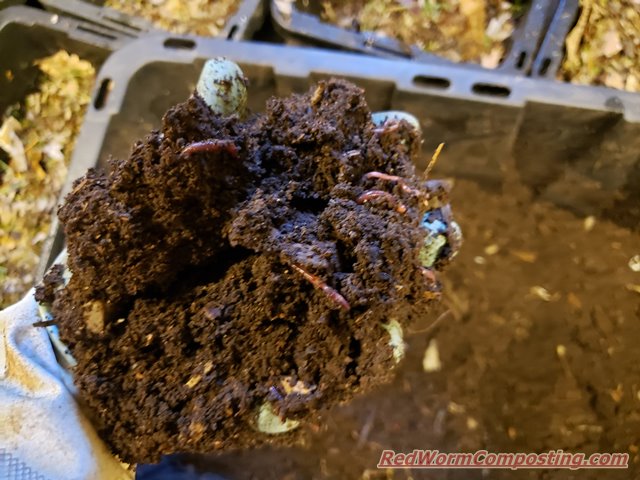
In my case, it can often be material from systems that have been sitting for quite some time. Looking at the picture below, many might assume it’s just a tub of finished castings.
And it’s true, I probably could have used a “light harvesting” approach to separate out a fair amount of really nice stuff from the worms. But, it would have added a lot of extra time to my work, and the microbe-rich material is more valuable to me as a system starter – especially with gardening season now finished.
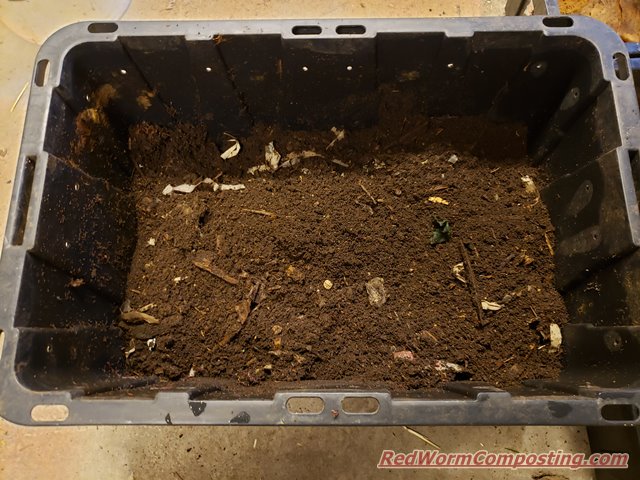
This mix was a bit more sparse in worms than I might typically use to start these sorts of bins, but this didn’t bother me in the least. For one thing, I knew there were actually a lot more worms in there than I could see. For another, I knew these bins would be sitting for at least 2 to 3 months.
Part of the “magic” of these types of hands-free systems is that we are setting the stage for a more natural colonization process – something composting worms are extremely well adapted for. In a sense, the goal is to mimic what might happen in a habitat like an old outdoor manure heap or compost pile, .
It doesn’t take a lot of worms, or even cocoons to lead to a population explosion! You just need the right resources/conditions…and time.
[NOTE: If you are working with bulk worms, I would recommend setting up at least 4-8 bins (assuming 5 gal size range) with a single pound.]
Nothing fancy about how the wormy material was added – but do note that it wasn’t mixed in, so as to give the worms their own habitat zone. This is another great reason to include habitat material with the worms – just in case they don’t feel “ready” to explore.

The last layer of material for the bin was more of the mulch mix. I often use a cover bedding like shredded newsprint – but I like the idea of having something with a bit more food value (and I happened to have plenty of it on-hand).
I should mention that my second watering happened sometime around this stage as well.

I decided to leave this group of bins down in my dad’s basement (where they were set up). It is quite cool down there so I’m really interested to see how things proceed.
“Worst case scenario”, they should be in great shape by early next spring – a time when I know I will be thrilled to have them available!
Note how nicely the bins stack!
That being said, if you aren’t overly cramped for space, and feel like giving the bins a bit more air flow, stagered stacking can work just fine as well! Here is another set I currently have on the go.

Again, I want to emphasize that there is no ONE specific “right” way to set up these bins but there are still some things to keep in mind…
>> I recommend alternating (relatively thin) layers with bulky bedding as your main material, along with some living material and some food.
>> Even if you don’t have living materials, try to include some natural materials like mulched leaves or straw if available (i.e natural “browns” not “greens”).
>> Food works well in mid to lower regions – this helps to avoid flies and creates a rich zone for the worms down where it will likely remain nice and moist.
>> The “ultimate” food/habitat material would be something like aged, bedded horse manure, but you need to be a bit careful if you have limited experience. One simple “rule of thumb” – when working with manure that smells like manure, I recommend adding it up near the top of the system.
>> With fairly dry materials, 500-750 ml of water should be ok for a 5 gal bin – less if adding a fair amount of fruit/veggie wastes and/or using other moist/wet starting materials.
>> Just generally, moisture levels will be something you may want to keep an eye on if you are fairly new to this – dry conditions can greatly slow down the process.
>> It is important to note that this approach assumes some form of climate control – putting bins like these outdoors is a whole ‘nuther can o’ worms altogether. The “big idea” here is that these are perfect little low-maintenance bins that aren’t going to create indoor hassles. One or two in a back closet could serve as excellent “Insurance Bins“.
>> If you want to ramp things up a bit – while still keeping them pretty hands-free – just add more food materials during the first half of the “brewing” process (maybe 4-6 weeks) – and then leave them completely alone for the second half.
What you do with these systems 1, 2, 4…even 6 months down the road is up to you. That’s right, once again there are no strict rules here! One of the fantastic benefits of a system with a lot of paper-based bedding materials (and modest starting # of worms) is that it can continue chugging along for ages.
They are perfect starter cultures for other (bigger) systems – and could even be sold as such if you happen to be entrepreneurial (something I explore in the “Suburban Worm Farmer” course – now part of CG Ultimate). They are great for starting up outdoor “vermigardening”/composting projects like vermicomposting trenches in the spring or fall. Also great for sharing with others, to help “spread the worm”!
I don’t typically use them for castings production, but there’s no reason you can’t – a lot of the original material you added should be nicely processed within a few months. Everything that isn’t can simply be screened out and use as a living material.
As for this batch o’ bins, I will keep everyone posted on the how the “brewing” process goes over the next few months.
Stay tuned!
😎
This is very timely for me, as I’ve been thinking of doing something like this. I actually started one bin a week ago. I’ve gathered up a decent amount of aged horse manure and mixed some of it up with leaf litter and cardboard. Once it rains in about a week from now, I was figuring this would be the beginnings of some decent living material.
Then I came across this post.
I’m thinking of building maybe 10 containers, but before I buy them I have a couple of questions.
Do you drill/make holes only in the lid, or in the containers also? What size holes, guessing 1/8″ would work?
How many worms/bin do you shoot for when you start one of these bins? I realize one will be putting in several cocoons also, so obviously no exact number here but is it10, 100 or ?
Roughly how much active worm bin material in each bin? A cup or two?
Just for fun, here’s what I roughly calculated I have on hand.
3.1 gallons of worms with active material
12 gallons of living material mix, consisting of some cardboard, leave crumble from my ficus tree, and manure. probably 45/45/10 manure, leaves, cardboard
12 gallons of just manure that’s pretty hard and roughly golfball size or so. I have two small bins I started in the past week or two that I could pull some additional active material / worms from also if need be, maybe as much as another gallon or so.
Seems like just the material listed above would half fill ten 5 gallon bins. With adding some more newspaper/cardboard, they’ll be roughly 3/4 full or so. I’m figuring I’ll add some food wastes over the first month or so, then let them sit. We generate a cup or two of vegetable waste a day.
I know there’s many ways to set up bins like this, just interested on a little feedback prior to diving in. To clarify, my goal would be to have the 12 gallons of living material go through a hopefully decent rain first so that it would not be dry, as presently it is totally dry.
So I just decided to go for it. I used only three 10 gallon bins, as that’s what I had on hand. I went through all the manure, so I’m not sure if I miscalculated or what. Anyway, one bit got presoaked manure/leaves and the bottom layer of cardboard, then dry cardboard in the other layers. No added water in that bin. The other two bins were all dry before adding water. The no added water bin was the lightest by a pound or two, which I thought was interesting.
I peaked a couple days ago when I added some food, some worm activity for sure.
I’ll chime in again in a month or two, look forward to updates on your 15! bins also.
Hey Matt
Sorry for the delay responding!
There is almost no “wrong” way to do this as long as you stick with the basic principles of successful vermicomposting.
These particular bins have holes in lid and upper walls (I think I might have something like 6 total in walls and 10 in the lid). 1/8″ should be fine.
The number of worms is up to you – and depends on what you are trying to do and how long you want to leave them running. Something I’ve experimented with in the past is using about 100 “breeders” and leaving the bins going for 6 to 8 weeks.
These days I tend to be more mellow about all this. This particular batch of bins was “understocked” and also left down in a cold basement. Since the time of my post, I decided to add more wormy material and to bring them up to a “room temperature” location. I’m still in no rush – I suspect they will be left alone for at least the next couple of months.
I look forward to your own future updates!
So I’m about 3 1/2 weeks into the three bins described above. I may have mixed apples and oranges, but let me describe what I mean. I’ve been listening to Easy Vermicomposting, and in there you mention once the bin is set up and sits, to mix things up, that is mix up the layers. Now my bins are already set up, but it seemed like mixing up the layers could be helpful in two ways, one being adding some oxygen to a closed plastic bin, the other getting to see how wet things are below the surface.
All three bins have had some white mold (definitely mold), so I was thinking maybe they’re too wet. After digging around in all three, it seems like this is not the case. The two heavier bins (which I added water to the bin, starting with only dry bedding) seem to be decently moist all the way through, definitely NO puddles or sludge anywhere. The bin which I presoaked some materials in (and is 2 pounds lighter) is definitely drier. This bin, like the other two, is rather wet in the top few inches of the bin. But below that, there is barely damp cardboard, and just an overall drier look to it. All three bins had some food at the start, and some added after, as well as portions of an outside bin (which was also the worm/cocoon stock).
All three bins have mite activity, smell fine, and have active worms, so I’m not particularly concerned about the overall viability of the bins.
I’m considering adding a pound or so of food waste to the dryer bin, and spread it out over maybe 1/3 or half the top. Everything is covered with a few sheets of newspaper, hopefully soon to add a burlap cover as well.
Like everything in my life, its moving around slower than I hoped, but I know that eventually the worm/microbe population will grow, and I’ll end up with lots of worms and vermicompost as well. Just maybe not in March, perhaps May?
Hey Matt – thanks for the update!
Even “slow” progress might be faster than you realize. 😉
(And it sure beats fast and “bad” – haha)
Gentle mixing while checking on things is great – although I do very little of this with my “set-in-and-forget-it” bins.
I wouldn’t be concerned with white fungal growth – unless there is a LOT (which typically only happens when bin is overfed – or during a prep stage before worms are even added). Mixing tends to take care of that as well. And cover bedding over everything never hurts.
Excess pooling in bottom isn’t ideal but don’t be afraid to spray some water in the system, ESPECIALLY when they don’t have regular plastic lids (not quite sure if you are only using the newsprint or if you also have plastic lids as well).
If you have questions don’t hesitate to reach out directly (especially now that you are a CGUer)!
Talk soon I’m sure.
😎
thanks for the prompt response Bentley. I figured I would post here as others can possibly benefit from my experience. These bins have a plastic lid with holes on 95% of the time. I did leave the tops off for a day to dry the top out a bit, that was before I found it was not really necessary.
While the topic is “Set and Forget”, my peaking on these doesn’t really coincide with “forget”.
It sounds like you suggest adding water (not food) to bring up the moisture a bit? Obviously either works, and water is a bit more controlled and faster acting.
These three bins are now LOADED with hatchlings and juveniles. In the next couple weeks or so I’ll be figuring out how to divide the spoils to make them available for folks in my community for purchase. I stopped putting any food in them about 3 weeks ago, but as my original worm rich material had LOTS of avocado shells in it there is still a lot of that material. I’ll likley just pick that out before selling some worm rich material to others.
I dumped one of these bins today into a mortar tub, and was pleasantly surprised to see how great the material looked, and just loaded with worms. At least this particular bin is really moving along nicely, looking forward to selling it and my two others to help folks get started on there vermiculture adventure.
I have a 5 tray Vermihut and am using all trays for feeding my 2000 worms spread throughout. Question…is it a good idea to use a 3 prong plastic rake to gently fluff each layer daily, to aerate the bins, or is that too much disruption? So far, they’re doing very well during the initial 2 weeks.
I’m cleaning out my pantry and found ingredients I’m not using. Can I give bee pollen, kelp flakes, semolina flour, potato powder, soybean powder, millet and millet powder to my worms , in moderation? I have additional organic flours and grains which I can run through the food processor to break down. Already giving cornmeal with good results but wasn’t sure about the other ingredients.
Hi Julie – those all sounds great, but just make sure they are added gradually over time – unless you have a bigger system maybe outdoors. A sprinkling here and there would likely be a fantastic boost for your worms!
Regarding your first question, Julie (sorry it got approved after the other one lol) – while I think the worms would handle all that fluffing OK I do tend to advocate more of a laid back approach. That also seems like it might be a bit time consuming with a multi tray system.