

It’s no secret that I am a huge fan of vermicomposting trenches. Ever since “accidentally” hitting on the idea back in 2008 they’ve remained one of my favorite outdoor approaches (also spawning a variety of other hybrid approaches).
With backyard gardening and composting projects being included as a pretty important component of my son’s “homeschooling” time this spring (during COVID-19 lockdown), I decided it might be fun to try some form of in-ground bin when I stumbled on some old bins full of drill holes.
It just so happened that my main vermicomposting trench was in need of a serious overhaul, so I figured that would be a great spot to get the ball rolling!
Don’t be fooled by the dull, boring look of that trench…

Down just below the cover material was plenty of beautiful, rich material inhabited by a decent population of Red Worms.

Step #1 of course involved digging the hole. It was great to see how much my son enjoyed helping with this. He is a trooper, but let’s just say he can get destracted and bored pretty quickly with some of the other “jobs” I give him. 😉


Finding big Canadian Nightcrawlers in the bed made it even more fun for him.

In terms of depth, I wanted the hole to be deep enough for the top of the bin to sit somewhat below soil level.

There were a few reasons for this:
1) It helps these bins serve as rainwater banks with the surrounding ground sloping down towards them
2) It leaves room for a thick layer of cover bedding (important to keep things cooler down below and to protect the bins from sunlight)
3) It also leaves room for adding a decent layer of bedding down below the bin. Which brings us to the topic of…
The False bottom
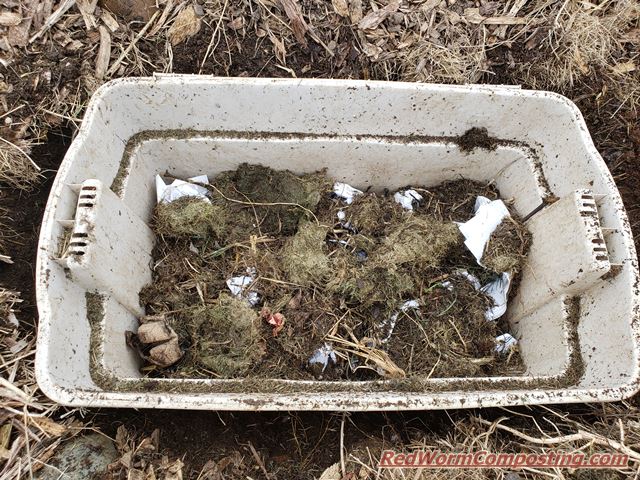
It’s to the point where I now create some form of “false bottom” in literally all my vermicomposting/vermiculture systems, and paper wastes are always a key component.
With these in-ground bins I decided to create one in the trench below and in the of the bin itself. All this bedding down in the lower reaches helps to create a “safe zone” for the worms, where moisture will be higher and temps cooler (or warmer during colder times of year). I love paper-based wastes since they also serve as a valuable long-term food source for the worms – becoming more and more nutritious as rich liquids drip down from decomposing wastes materials further up.


Apart from shredded cardboard (and “scrunched paper”), I also happened to have some old grass clippings, and a mulched mix of fall leaves and clippings from last fall.

In the sequence of images below you can see how I added everything in thin alternating layers.


Once the bin was mostly full I gave it a good soaking with a watering can.

With this first bin I decided to try using the lid. I recommend this in areas where animal invasion is a risk, and maybe in situations where you are trying to warm things up a bit. I weighed mine down with some rocks to make it even more challenging to pry open.

Although not shown in the images, I decided to cover the lid with quite a bit of loose bedding to help shelter the bin from solar radiation. This can damage plastic over time – and may also lead to the system overheating on warm sunny days.
I later decided to remove the lid since it was a hassle pulling back the bedding and moving the rocks every time I wanted to get at the system. I also noticed that temps did indeed seem warmer than in the other ones we installed (without lids) later on.
Speaking of which…
As of the time of this writing we have four of these bins installed, with plans for at least one more. I’ve been taking a “natural” stocking approach, simply letting local worms move in on their own. Initially I wasn’t seeing a whole lot of worm activity and temps seemed to be running quite high, but a recent cool spell make me realize there are now loads of worms in the first three systems and they seem to really be thriving!
Felt bad for interrupting these two! 😉

We were well into lawn cutting season by the time we were ready to install bin #4, and I didn’t have much else in the way of starting materials so I kept the set-up very simple with that one. Lots of paper wastes layered with lots of grass clippings. The level had dropped quite a bit by early this week, so I layered in more cardboard with even more grass clippings!


I will be really interested to see how long it takes for worms to become established in that one!
So far I am really loving the in-ground bins versus a more typical vermicomposting trench or pit. I feel confident that they retain moisture much better, and likely offer more protection against nearby tree roots (and maybe even burrowing animals like moles) – yet could still be used to fertilize crop plants.
I will leave it at that for now, but will definitely have more updates to share as the season progresses.
Stay tuned!
😎
VERY interested in this in-ground method. I have recently dug a trench for summer raspberry plants (to be moved in during the autumn) and am filling it bit by bit with kitchen waste, always including some paper or card. My REAL compost heaps are 6′ high with turves removed from the ‘meadow’ when we installed a wildflower section, a raised vegetable bed, an area for autumn raspberries, and a separate bed for rhubarb and courgettes (zucchini to those of you in North America). Hoping the compost-filled trench will retain water without water-logging our heavy clay soil. Am wondering it burying redundant laundry baskets might serve as ‘containers’ for growing my new collection of gooseberry and redcurrant bushes – if I can find enough people with redundant laundry baskets. Just HATE the idea of putting them in land-fill or even the recycling system (which i snot 100% efficient). Keep up the blogging – very interesting to those of us in the U.K. who have different growing conditions.
That is a great idea! I overwintered my worms here in Maine, zone 5, last winter, which was milder than usual. I would like to try it again this year and will try this bin idea. I covered mine with bales of hay last year piled three bales high. Do you think that is sufficient for the worms to survive a more normal winter in zone 5?
Hi Crystal! I think we have a somewhat similar winter here in Ontario and I’ve had not trouble keeping worms alive over the winter in trenches etc even just with some bedding heaped up over top (but your bale idea is great). I will likely try leaving these bins in the ground (maybe restart them in late fall) over the winter to see how they do.
Hi Helen – thanks for your kind words! I am all for not letting things go to the landfill (just ask my wife haha). And that’s why I ended up with a backyard vermi-filtration system (made from an old leaky rain barrel other people likely would have thrown out long ago). Not 100% sure how well the laundry baskets would work – I’m thinking of the ones we have over here and they tend to be pretty flimsy with huge openings. But the trench soaking up water without creating a waterlogged muddy mess is definitely the case. This is one of the reasons I love these types of systems. Even if we go quite some time without rain and then get a torrential downpour, the trench beds wick up the moisture like a sponge. Let me know how things work for you if you try any of these approaches!
😎
I am old school rasied bed gardener, Robert Rodale used a shovel & a turning fork, not concrete,logs or lumber. That how I do it, but I been thinking about your trench, which I have used. I come up with laying 2X6 frame over my new beds to hold shredded leaves & shredded paper, much like your outdoor bins, to give the worms a place to party & composting the whole bed at once. Then move back to trenching after the new beds are composted. I like that Meme’s Worms are close to South Carolina, less travel for my worms.