
May 2010
Worm Inn Journal-05-13-10

Some of you may be surprised to learn that I decided to dismantle my Worm Inn system (actually did this back at the end of April). Most of my focus these days seems to be on my outdoor beds, and outdoor activities in general – plus, I wanted to divert all that food waste to systems that need it more.
Part of my motivation also stemmed from the fact that I was REALLY curious to see exactly what was going on inside the Inn. There’s no doubt that the overall process has been working very well (after all, I’ve been putting heaps of food waste in the top and harvesting lots of nice vermicompost from the bottom), but I though it might be neat to see how things progress from top to bottom.
I certainly didn’t have the easiest of times getting the system off the hooks on my stand – I’ll definitely need to do some repairs before starting up back in the fall (was actually planning to get some better hooks anyway). I couldn’t believe how heavy the system was. I ended up weighing it, and it was 80 lb!
To empty the contents of the system I flipped it upside down in one of my worm trays, then unzipped the screen lid (which was on the bottom) all the way around. I had to pull off the Inn very carefully since the amount of material was quite a bit more than the tray could easily hold – plus I didn’t want to disturb the contents too much.
What was interesting to see, right off the bat, was that all the material around the outside was quite dry and a lot of it wasn’t very well processed at all. I definitely should have focused more on adding water around the perimeter. The overall percentage of unprocessed stuff was actually quite small though. Once I started pulling away the dryish layer I quickly started finding nice vermicompost.

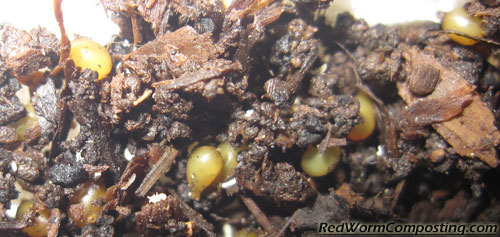
I was expecting to see layers of materials at different stages of decomposition as I went from bottom to top (with the original bottom material obviously being the closest to “finished”). What was surprising though, was the fact that much of the material in the system looked the same – well processed! All the way through the central core there was an especially nice looking pocket of rich worm compost, absolutely loaded with cocoons. The contents in general contained what was more than likely the highest density of worm cocoons I’ve seen in a smaller home system – even more impressive than the vermiponics bed.
The system was also loaded with Red Worms (surprise surprise!), and as expected they were mostly concentrated in the upper (well, technically lower since everything was flipped upside down) zone. I decided to see if I could concentrate most of the population using my souped up “light harvesting” method (see “Turbo Light Harvesting“). I recorded a video as I was getting close to the mass of worms at the bottom.
As I mentioned in the video, I didn’t bother trying to weigh them (and certainly wasn’t going to count them – haha!) – it was more for the purpose of simply seeing what sort of population I had in the system. As you’ll see for yourself (if you watch the vid), it was a pretty good gob o’ worms!
I ended up transferring all the worms to my big wooden worm box out in my backyard. The population in that system was already really high so it will be interesting to see how quickly food gets consumed in there now!
Before letting the worms go, I took full advantage of the fact that I had gobs of worms on hand (literally – haha), and took lots of pictures. Here’s a nice handful:

As I mentioned above, I will definitely be getting my Worm Inn set up again in the fall. I’m sure that between now and then I will be able to dream up some other way to test out the system (maybe it can be a new “Four Worm Reproduction” system or something like that). Whatever the case may be – I’m sure it will be fun, as always!
8)
What Makes Worm Cocoons Hatch?
A little while ago one of our readers, Mario, sent me an email asking how he could get some Red Worm cocoons to hatch. I suggested adding them to some moistened bedding (shredded cardboard, newsprint etc), and then adding a small amount of food waste (I suggested an apple core, I believe). Well, as it turns out, Mario did indeed follow my advice and – long story short – ended up with lots of little wigglers in his mini bin.
This got me thinking…(uh oh! haha)
I’ve always been curious about the factors leading to the hatching of worm cocoons – specifically those of composting species, so the results of Mario’s little experiment have provided me with more than enough inspiration to finally start testing things out for myself (thanks, Mario!).
One thing I’ve noticed in my own systems is that periods of cold, and then warming seems to really increase hatching rates – a prime example of course would be in the spring time, when loads of baby worms start appearing in outdoor beds. I have also noticed this when bringing materials inside late in the fall (there seems to be an abundance of tiny worms in the material not too long after it warms up).
All of this kind of makes sense when you think about it. Red Worms tend to breed a lot as temperatures drop, so presumably the number of cocoons would be increasing at this time. In unprotected habitats, a fair number (if not all) of adults would likely die during the winter, so all these cocoons would be important in terms of the overall survival of the population.
Apart from temperature, I am also curious about moisture content and food/habitat. Will the worms hatch out more readily in cardboard or a mix of cardboard and food waste? If the results of my “50 Cocoon Challenge” (link will take you to listing of related posts) experiments are any indication, I have a sneaking suspicion that I know the answer to that one.
Thankfully, I happen to have access to loads of Red Worm cocoons at the moment, so I should be able to test out a LOT of different scenarios. If you have any ideas/suggestions, be sure to add a comment!
I will of course write about this again once I have my first test(s) up and running.
Stay tuned!
8)
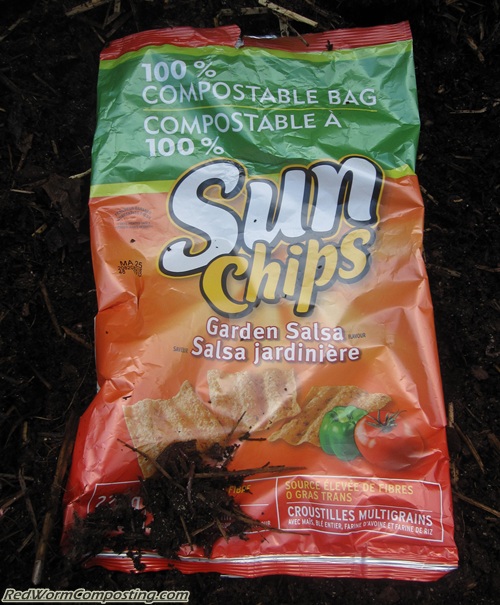
Sun Chip Bag Vermicomposting
There’s no denying the fact that I am a SERIOUS foodie! At times this results in me being a serious junk-foodie as well.
Needless to say, when junk food starts coming in compostable bags it’s inevitable that I’m going to be all over it like a Red Worm on a horse turd!
I first learned about the new compostable Sun Chips bags while flipping through one of my eco-gardening magazines (if I remember correctly). It was only a matter of days later that my wife showed up (after a grocery shopping expedition) with a bag of Sun Chips in hand and a big smile on her face. She is wise in the ways of the worm man, and knows the best way to my heart is through my stomach and my compost heap.
So what’s the dealio with these bags, anyway?
Let’s start with the propaganda on the package (ok I’m just kidding, ‘Sun Chips marketing people’!)…
Here are some of the interesting bits of info I found:
“You’re holding the world’s first 100% compostable chip bag of its kind. It’s made from more than 90% renewable, plant-based materials and it breaks down completely into compost in a hot, active compost pile.”
So, what does it do in a mesophilic (cooler) worm composting bed?
That’s what I’m planning to find out!
WARNING: Do NOT purchase this product if you have ANY desire to keep your chip eating habits under the radar! If you try and eat chips from this bag in the middle of the night while everyone else is sleeping you WILL be found out! Not only is this the world’s first compostable chip bag, but I’m pretty sure it’s the loudest bag on the face of the planet!
They even have a warning on the bag!
“This bag is a little noisy because it’s made from compostable materials”
I laughed when I first read that. I mean c’mon, how loud can a chip bag really be? Seriously!
😯
It’s LOUD!!!!
Ok – let’s get a bit more serious here. I don’t have any complex plans for trying to compost this bag. I won’t be employing any secret ninja worm composting techniques to try and speed up the process. I simply want to see IF it will break down in a worm bed, and if so, how long this will take.
All I did was dig a hole in my big wooden worm bin (in my yard) – which is absolutely loaded with Red Worms at the moment – then covered it back up.
I bought another bag (for experimental purposes!!!), and will likely put it in one of my windrow beds to see if there is any difference!

Unleashing the Red Worm horde! Each arrow represents a worm I was able to find in the picture (kind like a game of “Find Waldo Wormy”) – plenty more where those came from!
My prediction is that if this bag does break down, it will take a fair bit longer than the 13 weeks shown on the chip bag. I’ve added plenty of compostable “BioBags” to my systems over the last couple of years, and they are fairly slow to break down under normal worm composting conditions.
Whatever the case may be, it should be fun! And that’s what counts!
Stay tuned!
8)
Moving Worms
Here is a question from Shelly on a topic I know others are interested in as well. Just so you know, I’ve only included the first little bit of Shelly’s email for the sake of saving space here. She also provided some great info about her current set up (she has a mature Can-O-Worms) and some ideas about how she might move everything.
Dear Bentley,
Thanks to all of the wonderful information on your website, I’ve had a
successful worm bin in our basement for just over a year now (March,
2009).My fiance and I will be moving in June/July from Maryland to Georgia.
I was trying to find some information / advice on your website about
how to successfully move a worm bin system, especially if the worms
may need to be out of their worm bin for several days. I didn’t find
anything on your website. If you have posted about this, could you
kindly point me in the right direction? If not, I would love your
advice / pointers about how to make this move successful (i.e.
successful = keeping the worms alive).
…
Great question, Shelly
Similar to your second idea (included in original email) my suggestion would definitely be to transfer everything from the Can-O-Worms to a large bin type of system for the move. A bin will provide a lot more stability and make for a much smoother ride for the worms in general. I would make sure this bin had LOTS of air holes in the upper walls and lid, but definitely no drainage holes of any kind. I would also make sure to add a lot of new moistened bedding before adding the contents of your other worm bin. This will provide plenty of neutral habitat and will also help to cushion the worms a bit more. Speaking of cushioning, I would definitely sit the bin on a thick blanket if possible so as to help reduce the severity of the vibrations during the ride.
I like your ideas re: using frozen food to keep the bin cool (again, mentioned in Shelly’s original email), but I would probably be more inclined to steer away from food and simply use ice packs instead. The last thing you would want on a long hot journey is lots of liquid and waste materials melting in your bin – once everything thaws you could end up with trouble.
Aside from the moistened bedding mentioned above, I would likely add a really thick layer of dry bedding up top and simply sit little ice packs (ziplocks with ice cubes or frozen water bottles) in this zone. You could keep a bunch of them in a cooler (and exchange them as needed), or simply plan to stop at gas stations and grab ice along the way.
Assuming this isn’t a REALLY long journey, I don’t think you need to be overly concerned about “food” for the trip. Unlike with little kids, you certainly don’t need to put together a special travel pack full of snacks and beverages for your wormies. As long as there are still some things to munch on from the original bin they should be totally fine. Maybe as a treat (to reward them for not saying “are we there yet?” a billion times – haha) you can cut up a piece of cantaloupe or melon and add that before you set off on the journey. Again, just be careful with the amount, since you don’t want excess microbial activity and moisture release while you are on the road.
Anyway – hope this helps!
8)
Neesy Gots Worms!
Not too long ago, I received an email from Daric Lennard inquiring about the possibility of having me link over to his daughter’s small worm business site. Learning some of the backstory via our email exchange, I asked Daric if he might be interested in writing an article about his daughter’s business instead.
Some of you may recall my article about young Ryan Reynolds and his worm business (see “He’s 7 Years Old…and He’s Got Worms“). Well, this one is similarly inspiring, and I’m really glad Daric took the time to send me a note (and was willing to share his daughter’s story).
Neesy’s Story
By Daric Lennard
I guess you can say this story started when my autistic and mentally challenged daughter Denise (Neesy) was 4 years old. Her mom had been in the yard, doing some gardening when she spotted some worms that had washed up unto the sidewalk after a rain. She pointed them out to my daughter and THAT WAS IT. Immediately her love affair with worms was going full force. She would spend hours watching worms crawl all over her hands, digging them up, looking in spots where she would think she could find them, and really got to be an expert on finding the biggest ones in the yard.
Jump ahead 12 years later. Neesy’s love affair with worms has not changed. She still searches when she has time, but now her interests have been more focused on getting a job. To be honest, most people that know my daughter find her very bubbly, and she has a warm heart that will make anyone smile. But the job market in PA is not what it should be, and people are scrambling to find work. Most experts in the mental disability field have told us that finding a job for our daughter would be impossible. So late one night, I sat up thinking about our plight. How can I get my daughter a job? What kind of job could she really hold? It was puzzling, to say the least. Then it hit me…. why not find a business that she could help run? Dad and mom could help with the finances, and she could provide labor.
It was only a matter of moments after that when the idea to start a worm farm came along. After all, who better to raise worms than an autistic girl whose splinter interests are insects and worms? SO, last month (March, 2010), we started a website for my daughter and ordered a bunch of worms. The worms are fine, no signs of migration at all, and they are actually showing signs of making great castings. The idea of packaging the worm tea was another late night revelation. Denise is currently selling a 2 OZ and a ½ OZ. Bag on her site, which can be found at {LINK REMOVED – Someone seems to have taken over the site for spammy purposes}.

She is getting castings TEMPORARILY from a friend locally, but that will soon change once the castings start to grow here at home. She packages every bag by herself, weighing and ironing shut the bags. She works a little every day, because she gets bored easily, but does package each order herself. She has gotten her first fruits of the business, and bought a camera (pink, of course) so she can take pictures of, what else, her worms! In the pictures you can see her filling a bag in the backyard. She really does most of the work, we just make sure to keep her on task.
I am really very proud of my daughter, since she has overcome many people’s negative thoughts about not being able to do what every 16 year old wants to do… work and make money. It just shows what wonderful things can happen when you think positively, not negatively.


Thanks again to Daric and Neesy for sharing their story! Any support you can provide for this budding young entrepreneur will be greatly appreciated – here again is her website:
{LINK REMOVED – Someone seems to have taken over the site for spammy purposes}.
8)
Can You Vermicompost Meat?

Of course! But, would I suggest adding meat to a regular worm bin? Absolutely NOT!
I think everyone should know by now that I kinda like pushing the envelope a wee bit with my vermicomposting. I’ve been involved in this stuff now for more than a decade, and feel reasonably confident that I know what I’m doing by now.
😉
In general, I tend to be a bit of an armchair rebel – questioning a lot of the things others declare as “set in stone” rules. I’m no anarchist or anything (haha) – I simply believe that it’s important to keep an open mind, to constantly question things, and not to make too many assumptions and generalizations.
So yeah – that basic mental stance led me to toss some meat loaf in one of my outdoor worm beds not too long ago. Not sure why it’s taken me so long to do something like this, or what exactly it was about this left-over meat loaf resulted in this important mental shift. I think it was the fact that I was frustrated that there was still a fair amount left and I knew nobody was going to eat it (I hate wasting food). When this happens with fruits and veggies I always smile to myself and think “well, at least the worms will enjoy it!” – but I’ve always assumed I didn’t have this option with meat. For a decade I’ve blindly accepted the fact that composting meat is “bad” (the irony being that I’ve been composting kitty turds for some time now – haha).
The bed where I added the meat loaf isn’t really what I would even call a worm bed (i.e. it’s not one of the productive beds I actually harvest worms from). There are still quite a lot of Red Worms in this bed, but they tend to be spread around a fair bit and generally smaller in size (since I haven’t been adding much in the way of food). Really, it was the perfect place to add the meat, since I’m more likely to really SEE what happens.
The one thing about meat worth mentioning right off the bat (I will provide a complete list of important considerations later) is that it WILL generally give off a lot more smell – initially, as a tasty smell that can attract unwanted pests, and later as a not-so-tasty smell, that can also attract unwanted pests – so it’s never a bad idea to dig a decent sized hole if you are going to attempt this. As an added buffer, I decided to add a fair bit of peat moss I happened to have on hand (yes, I am an eco-sinner – so sue me! lol). I figured this would help to keep odor down and would provide some good carbon to help balance all that nitrogen in the meat.
Then, I basically waited (checking on the situation periodically, of course). It wasn’t long before activity in the meat zone had markedly increased. There seemed to be a lot more springtails in this area, and definitely more worms. The meat itself certainly wasn’t a seething mass of worms by any means (as you can see in the picture above) – in fact, I suspect that they’ve been mainly feeding on whatever microbial community has been developing in the material surrounding the meat.
I just checked on the situation today, and the worm numbers in that zone seem to a lot higher now, and I’m noticing bigger worms as well. I caught a few stinky wafts as meat loaf chunks were uncovered, but nothing too offensive at all.
All in all, I am really happy with the results thus far, and will continue to experiment with meat vermicomposting in this bed in coming weeks and months (and will of course keep everyone posted).
NOW, let’s get to my list of warnings and recommendations. I know people sometimes have a tendency to follow a “do as Bentley does, not as he recommends” approach (haha) and I want to try to curb this as much as possible!
The Dirt on Meat Composting
- I only recommend you attempt this if you are a seasoned composter/vermicomposter
- Start with very small quantities of (preferably) cooked meat
- Bury materials as deeply as possible
- ONLY do this in very well ventilated systems – preferably outdoors
- Dedicate a specific system to the task – don’t add meat to your regular beds/bins
- I don’t recommend this at all if you are in an area with lots of furry critters, such as racoons, rats, bears etc (their sense of smell is FAR greater than ours)
- Make sure you break up the meat and mix with a lot of carbon-rich material
- If using compost for plants, use only for ornamentals (even better if you simply create an in situ system close to shrubbery etc)
OK – you’ve been cautioned!
8)
Will Allen Makes Time 100
Last week, Anna passed along some great news (and as per usual, something I wasn’t aware of). It seems that Will Allen, of “Growing Power” was included in this year’s Time 100. He was included in the “Heroes” section, which to me is VERY appropriate! Ever since I first learned about Growing Power, Allen has certainly been among my own personal heroes, and to see him honored like this (in mainstream media) is truly inspiring!
Here is the Time 100 article: Will Allen
Have a vermi-news story you would like to share? Please drop us an email (with “worm news” or something similar in the subject)!