
Last month I wrote a post about the continuous flow worm bin that I had ordered. It ended up arriving shortly thereafter, and I’ve been meaning to write a post about it ever since. I finally decided to free up some time to start it up today, so it only makes sense that I also free up some time to write about it!
🙂
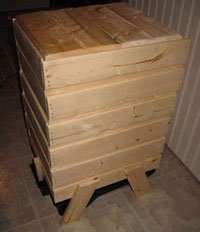
As mentioned, I bought the system from Wood Worm Farms. They offer a number of different sizes, and I decided to buy their largest system (5 trays) to help ensure that the castings in the first tray are finished by the time I fill the last tray.
I found the ordering process very easy and convenient. I buy a lot of products online (and work online), so I was more than happy to use the Paypal shopping cart system. I sent an email to them (Wood Worm Farms) just to make sure my order had been received and inquired about the estimated shipping time. I received a friendly e-mail back relatively quickly, and was happy to learn that I wouldn’t have to wait very long for my new system.
The package arrived sooner than I had expected (literally the day after I wrote the post on the blog), which was a nice perk. All in all I was happy with the way the worm bin looked once I had it unwrapped. It wasn’t quite as sharp looking as the units pictured on the website, and was a wee bit shaky (not sitting perfectly flat on the ground) – it also didn’t come with a handle on the lid as shown (on the site). That being said, it does seem to be structurally sound and of course looks much nicer than my usual worm bins – who knows, maybe my wife will even let me keep it out where people can actually see it!
😆
I was a little worried about the fact that the trays are made from untreated pine, and actually spent some time researching various earth-friendly ways to treat wood. Edward, from Wood Worm Farms, put my mind at ease (with a comment on the blog) by assuring me that he has yet to have a system become so rotten as to be structurally unstable (even systems kept outdoors). As such, I’ve opted to leave the bin untreated for now.
Bottom-line, I’m definitely happy with the purchase and very interested to see how the bin performs! I will talk about setting it up for worm composting in my next post since it relates to another fun project I’ve started up.
**For Even More Worm Fun, Sign Up for the RWC E-mail List!**
Hi Bentley,
The handle is on other side of the cover, just turn it around. It was packed so to save space.
Also please turn around the drip tray (black plastic thing at the bottom) to make the stopper facing the wall, and drip tray handle – facing front.
I hope this will make the bin less shaky.
Uhhhh…that might explain it (about the handle), Edward! Duh!
Thanks for the other tips as well.
8)
I am interested in receiving information on how to grow wood worms and where I can get a batch initially.
Ralph
Hi Ralph,
If you are referring to composting worms, you’ll find loads of info on this website. You can buy them from any number of different suppliers (including ourselves). ‘Wood Worm Farms’ is simply a business name and a description of the product they sell (wooden worm farms).
B
Stumbled upon your site today while researching worm composting, and think it’s great for a newbie like me. Thanks for all your advice! I’m particularly interested in these wooden bins, but was unable to find any follow-up posts describing how they were doing. Have they been working well?
Hi Shawn,
Thanks for stopping by. I actually hadn’t done all that much with my wooden stacking system. I’ve had the lower level operating ever since I set it up last winter, but haven’t added enough to it in order to add another level – well, at least not until very recently. I actually have been adding quite a bit of well-aged horse manure and am now up into the second tray. So far so good, the worms definitely seem to be moving upwards to feed on the freshly added material. Part of the problem I’ve found with the system is that is very prone to invasion from fruit flies and fungus gnats, but now that I have this manure compost that shouldn’t be an issue at all – I’m sure I could even bury food waste with the compost (since it covers in much more effectively than shredded paper etc).
I’m definitely interested to see how the castings in the bottom tray look by the time I reach the top of my 5th tray!
B
Thanks for your reply on these bins. Gnats and fruit flies are something I worry about. I’ve just about persuaded my wife to agree to get a worm bin (we live in an smallish apartment), but don’t think she’d be too thrilled if we ended up with gnats and flies in addition to castings.
Something I’ve thought of is draping a mosquito net over it, but I may just need to look for something a little more insect-proof.
Hi Bentley !
I’m very happy to have found a blog which speaks about wood worm farms! Thanks for making share your experience! I’m french and I search a Wooden Worm Bin. In France, there is Worm Bin but they’re plastic, it’s less cute! 🙂
I want to order the same that you on the site “wood worm farms”. But I’ve several questions :
– Do trays fit together well? Do they fit into each other?
– Does the black plastic receptacle settle underneath the tray?
– Is wood distorted or damaged now?
Sorry, I don’t know if I find correct words ! ^^’
Finally are you happy with this worm farms?
Thanks for your help if you have the time to answer me! :p
Laetitia
Hi Laetitia,
The trays fit together pretty well. The plastic receptacle basically sits on the ground beneath the lowest tray. The wood is not distorted or damaged now. All in all I am happy with the system – but have not used it enough.
Bentley
Do you start on the bottom tray and work up, or on the top tray and work down? Thanks! My worm farm will arrive soon (identical to yours, I think).
Hi Deborah,
You start with the bottom tray and work up. The other trays get added one at a time as each tray below becomes full!
8)
I looked at some of the pictures and it looks like the trays are only held together by a few screws, so it doesn’t look very robust. I’m wondering what that mesh is made of ? because something’s got to hold those trays rigid, besides two screws at each wood joint. It just looks like weak & flimsy joinery and I wonder how the trays would cope under a full load of damp compost over time.
I have been home worm composting for 6 years and had a major worm die off discovered today. I switched from using my rubbermaid bins to a worm condo last fall. I kept adding layers over the winter and it looks like things started to rot and I didn’t realize. I think the oxygen was impeded and when the worms started dying the food started rotting and creating more moisture which drowned more worms and/or poisoned them.
In future I could watch the layers more carefully and take out lower ones when they’re done instead of just keeping on stacking. I could also go to a new layer when there is less material because the stacking seems to compact everything.
Is a condo just a bad idea since surface area is important? I definitely won’t stack 5 layers again – maybe 3 at most.
Any feedback about condos? I have the plastic one.