

Last month I wrote about a new project I had started, involving the conversion of an old, leaky plastic rain barrel into a DIY greywater “vermi-filtration” system.
Since then I’ve written about some interesting materials I’ve been tossing in (will come back to this topic in a minute), and all the nutrient-rich wastewater I’ve been collecting (and putting to good use in other systems as well).
I’ve been having a lot of fun with this one. Similar to a “vermiponics” bed I tend to think is might almost be a sort of “ultimate” system for Red worms. Always wet, yet likely even more oxygenated than many worm bins, plus plenty of microbial nutrition available.
Part of the fun is being able to push the envelope a bit in terms of what get’s added. Apart from all the bulky, resistant materials – like wood chips, pine cones and corn cobs – I thought it would be interesting to try adding bones as well. We have an “Instant Pot” and I’ve found that it does a number on the bones I use to make soups – rendering them a lot more fragile (than regular cooking). I tossed in a batch of these I had been saving in the freezer, about half way up in the system.
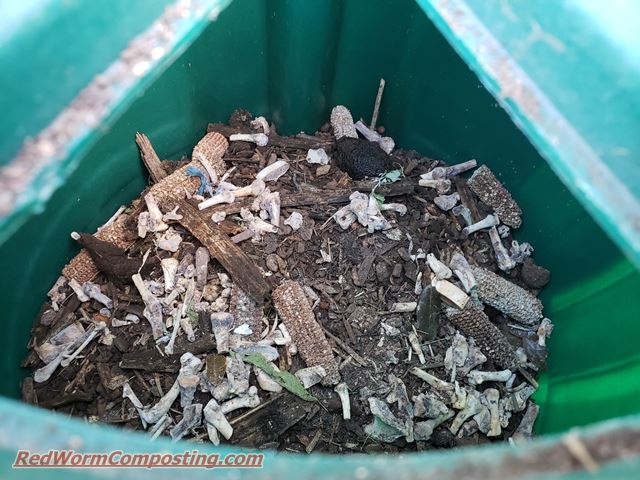
I also stumbled upon a plastic garbage can that was full of rain water and sludgy cardboard, sitting behind my shed. Amazingly enough there were even quite a few Red Worms living in it up near the surface. This got me thinking that adding quite a bit of cardboard in general wouldn’t be a bad idea. It will help to slow the flow a bit, hold moisture and provide the worms with some fantastic habitat/food.

Before adding the sludge, I dumped in a lot of dry, shredded cardboard I happened to have on hand at the time.
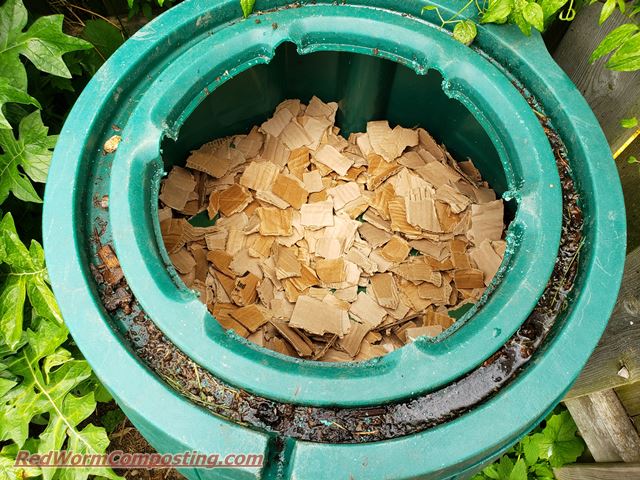

Even though I don’t consider the system fully “primed” yet, I’ve already been very impressed with the results. Take for example the smelly water from the cardboard sludge bin I found. This was pretty funky stuff, yet what came out the bottom was more like a dilute worm tea (and the system was still only about 3/4 full of filter media by that point).

Having found a length of seep hose in the shed, I started thinking maybe my original idea (to simply water/fertilize plants close to the system) wasn’t ambitious enough!
What if…
…I dug a trench and ran the hose all the way along my fenceline garden?
Seemed like a fun project to get my son involved in, so we got to work excavating.

Initial testing in the first stretch of trench, using a regular garden hose, seemed promising. We were able to get water to flow all the way to the end. What I failed to realize/remember about soaker hose, however, is that it needs water pressure in order to work properly.
So the new plan is to use an old garden hose with holes in the bottom.
The weather has been brutal for nearly 3 weeks as I type this – very hot, and not a drop of rain. This has me even more excited about the seepage hose idea – but it has also made the trench work a lot more challenging. At the moment I have a shorter length of hose that takes water to just in front of my kale bed. It also leaks directly from the barrel helping to keep that corner of the yard moist as well.
The barrel is mostly full now and there have been some promising signs that things are coming along nicely. Even though the bin is in direct sunshine for most of the day, I’ve started finding Red Worms fairly close to the top. I’ve noticed some settling as well – even little mushrooms popping up.

I won’t be adding any kitchen scraps to this bin, but I have started adding some weeds to boost nutrition and provide a sort of cover bedding.
Can’t wait to see where things go from here!
Stay tuned.
😎
My regular compost bin (large plastic tower with gaps between sections) works a bit like this. Because inadvertently my son didn’t understand my instruction about which pile I meant, he dumped a lot of wood chips from our treed lot in a new mostly empty bin. When I emptied out from the bottom, that part was mostly compost with a some wood chips still visible. It was lousy with worms, which was great news as I’d never found worms on this lot before. So it was sort of wood chips with vermicompowt mixed in, if you like. Reitnred some of the worms to the top of the bin, the rest used around the garden.
Anyway I think the real takeaway is that wood chips in a thick layer that is kept wet by adding scraps etc above and waste water will work perfectly for your vermifilter. The chips and compost at the bottom were damp but not wet (note, the bin open to ground, so water would go through regardless.)
Thanks for sharing, Greg! Your tower system sounds very interesting.