
January 7, 2009
Worm Bin IV

That is IV as in ‘intravenous’ not “4” by the way!
🙂
I seem to be on a roll with getting posts published today, so I figured why not continue to ‘go with the flow’.
As you may recall me mentioning, I am now basically an open vermicomposting system convert. I love the fact that the air flow in these bins is so much better and they don’t end up with water pooling in the bottom – so it is easier to produce good quality vermicompost.
While I still love my Vermicomposting Trays, I’m starting prefer using shallow (but still deeper than the trays) 55 liter Rubbermaid tubs (without a lid, of course). I find these hold moisture a bit better, plus I can fit two of them per shelf on my vermi shelving unit, while only a single tray will fit on each shelf.
Since these open systems DO gradually dry out over time, I have to periodically water them to ensure that the worms stay nice and moist down below, and that the decomposition process continues to move along.
I’m not a big fan of just dumping water on them however, since it generally just runs straight to the bottom without really soaking the composting mass. Sure, it does get wicked up and spread around over time, but still – I’d rather introduce the water at a rate that will allow for it be be soaked up right away. My preferred method when in this frame of mind is the use of a spray bottle, BUT – as anyone who has tried this can attest – it just takes SO long to make any progress.
A little while ago, on a whim I decided to play around with a little contraption that basically releases liquid from a bottle at a fairly slow rate. The cool thing is that – unlike the spray bottle – with this I can set it up then leave it sit (well ok, it is technically hanging from a ceiling pipe in the basement) while I do other things.
You could even add some liquid ‘food’ if you wanted to. For example, today I mixed some baking yeast pellets with water and started dripping it down onto one of my tray systems. I haven’t really tested this out before, but I suspect that the worms will congregate in the region with the yeast water. Even if they don’t directly feed on the yeast (which I suspect they actually would), the increase in microbial activity in this zone would certainly translate into a nice buffet of microbes for the worms to munch on.
I don’t imagine too many people will have a bottle exactly like this (I’ll spare you the details on what it’s original intended use actually was – haha), but I’m sure it wouldn’t be all that hard to rig up something similar, especially if you happen to be the creative type!
Anyway, I will be sure to report back on the results of the yeast feeding!
8)
Sow Bugs – aka Woodlice
I’ve been meaning to write more on the blog about various worm bin critters. And what better time to finally start doing so than right after receiving my brand new digital camera! Whoohoo!
Before you get too excited with visions of 15 megapixel SLRs with macro lenses and specialized flashes…I should tell you that I’ve opted for yet another handy dandy ‘point-and-shoot’ badboy. It is a Canon Powershot SD880 10 megapixel – nestles in the palm of your hand cutie pie – digital camera.
Sorry – got a little carried away there.
😆
All joking aside, I absolutely love ultra-portable Canon cameras. I’m no photography pro, so I’ve been blown away with the image quality of my previous two models (both very much in the economy class of digital cameras) – and just as importantly – the decent macro capabilities. The new one is a bit more expensive and offers the nice 10 mpx, so I’m hoping I can take even nicer worm pics (I am indeed THAT cool!).
I’ve owned a (non-digital) SLR camera before, and in all honesty it just stressed me out having to pull everything out, fiddle with the dials yada yada. Life goes by fast, so I’d much rather have something quick and easy – even if it means giving up the best image quality.
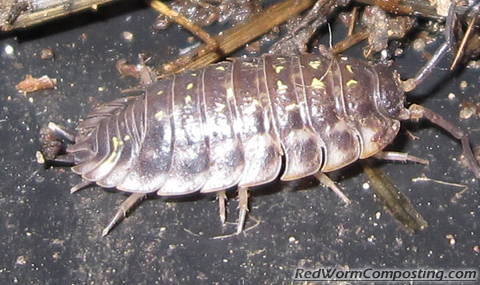
Anyway…getting back to the topic of this post. I’m sure most of you are at least somewhat familiar with Sow Bugs, even if you don’t have them in your worm composting systems. They are incredibly common in many dark, humid habitats -sometimes in huge abundance. Aside from the ones that look similar to the one pictured above, there are also the “Basketball Bug” (family Armadillidae) Woodlice. The name of course, comes from the fact that when disturbed, this variety rolls up into a ball (similar in appearance to a basketball).
Don’t be fooled by the common names of these arthropods – they are in fact crustaceans, not insects (and certainly not lice!), related then to lobsters, crabs and shrimp. They are not restricted to terrestrial habitats by any means. I’ve found freshwater species that look quite similar to the terrestial one shown above (although somewhat thinner). Apparently, there is even a huge variety (as big as a football I think) that lives in the ocean as well.
Who’da thunk?
Like most of the other creatures in a composting system, these invertebrates should not be viewed with disdain. Not only do they not harm the worms in any way whatsoever, but they actually perform a very beneficial role as ‘shredders’, basically breaking up large fragments of organic matter, thus making them more accessible to microbes for further decomposition. Generally, they prefer a somewhat damp, dark environmental – but not the really moist conditions your worms love. If you notice that the number of sow bugs in your system seems to be increasing, it may be an indication that you are not keeping the moisture content high enough.
The Super Simple Ultra Basic Worm Harvesting Tube
Or SSUBWHT, if you prefer!
😆
Likely the biggest pain in the rear for new vermicomposters – apart from fruit flies and fungus gnats – would be harvesting vermicompost from a mature worm bin.
As you may recall, I am quite interested in DIY worm harvesting contraptions (see DIY Worm Harvester and John’s Homemade Worm Harvester) and have even come up with my own hairbrained ideas for passive worm harvesting – namely, the Garbage Bag Worm Harvesting Method.
I have been meaning to create one of these homemade rotating harvesters at some point, but in the meantime, my dad and I have been playing around with various ideas for smaller harvesting systems – those geared more towards to home vermicomposter (and once again using a passive harvesting approach).
We originally thought that some sort of ‘worm traps’ might work well – basically, the worms would be lured into a container or bag of some sort due to appealing food material and/or increased moisture levels. This is an idea I still want to test a little more, but so far we haven’t see any earth-shattering results.
My next ‘Eureka’ moment (haha) came when I started thinking about some sort of 2-compartment box with a screen floor between the two sections. I’ve witnessed worms tendency to head downwards, especially when disturbed and with light shining on them. I figured that if a hot, bright lamp was turned on directly above the material containing the worms (which would be sitting on the screen floor), the worms would dive down into the lower compartment, thus leaving behind most of the worm bin matrix. Thus the idea for the SSUBWHT was born.
🙂
Since the time of the original idea being hatched, I’ve revised the concept a few times, but kept the principles the same. Rather than messing around trying to build some sort of interlocking wooden boxes (I’m not exactly Mr. Fix-it), I thought perhaps that some sort of tube cut into two pieces, with a screen in between, could work just as well or better. I’m leaning towards ‘better’ since the circular shape will likely help to concentrate the light from the lamp.
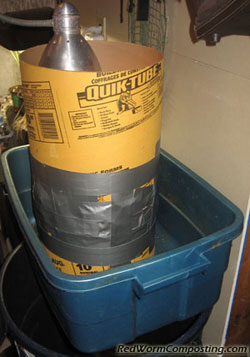
I originally planned to use some sort of PVC piping, but in the end I opted for a cheaper and more readily available option. I am using a 10″ diameter reinforced cardboard cylinder, intended to be used as a mold for concrete post foundations (for decks, fences etc).

The screen is a fairly heavy guage 1/3″ metal mesh – essentially like a heavy duty chicken wire. It works well because it is strong enough to hold a decent amount of compost, but flexible enough that I was able to create reinforcement tabs that were pressed up against the outer wall of the tube.

Basically, the harvesting tube consists of two pieces of the cardboard tube, with a screen floor in between. The upper section is about 1 ft in height while the lower section is somewhat less. The supplies for the system cost about $20 (including the price of the duct tape used to secure everything – hehe), and that would be enough for 2 or 3 of these harvesting tubes – so pretty inexpensive!


Like any good pseudo handyman, I relied heavily on duct tape to put the system together.
![]()
While it WAS incredibly easy to put together this system, when it comes down to it, the big question is whether or not this thing is even going to work for me!
I decided to start testing it out using some bulky material (and worms) from my European Nightcrawler Worm Inn system.
There is a fair amount of vermicompost in the mix, but also a considerable quantity of unprocessed materials as well. Due to the moist, bulky, and generally inconsistent nature of this bedding, it would likely be a real pain to harvest worms from using traditional methods, so I felt that it was a prime opportunity to put the SSUBWHT to the test!
😎

For my initial test I added approx. 3 lbs of bedding/worms (with extra worms included for good measure) over the screen floor, then positioned the lamp head directly inside the tube. While I use mostly fluorescent bulbs around the house, this particular light (occasionally used in my ‘worm room’ for various tasks) actually has a 60 watt incandescent bulb. If you really wanted to drive the worms down quickly, an actual heat lamp might not be a bad idea (although, in that case your tube should be made of something heat resistant).

As you can see in the image at the beginning of this post, the tube was positioned in a Rubbermaid tub. The lowermost compartment is simply positioned over top of a heap of moistened brown paper to provide shelter for the worms once they go down.
So how did this puppy perform?!
My initial attempt with the harvester proved to be ineffective, although it would be a great way to collect mites – WOW!
😆
My suspicion is that A) I didn’t leave the light on long enough, and B) there is too much light getting in to the lower compartment (so it’s not a very tempting retreat). This morning I made a plastic skirt for the tube (using a garbage bag) which basically slides down and completely covers the tub. I turned the light on again about an hour and a half ago, so we’ll see if that helps.

[…crickets chirping…]
Ok, I’m back!
Well, it looks like I still have more work to do. Again, I’m seeing LOTS of other compost critters down below (mites, springtails etc), and the worms ARE moving downward – but they still aren’t going into the lower compartment.
Just remember, Edison discovered thousands of ways NOT to make the lightbulb before he finally figured it out!
😆
I’ll keep you posted!