
August 2011
Woodchip Vermicomposting
A question from Walt:
Great Website. Great Information. Thank you.
I am working on plans to build a C&D (construction and demolition)
recycling facility in the Phoenix Arizona area. Included in this waste
will be a lot of wood, (scrap 2×4 & 2×6 etc.) and the local market is
for already saturated with woodchip bedding, sawdust, mulch etc. I
need to find a new use.One Question:
Can I chip the wood, and mix it with waste paper from construction
sites, some food waste, and dirty horse bedding (more woodchips, with
manure) to make food for the worms?I know that my next biggest challenge will be temperature, but this
can be kept under control with shade and an automatic watering system.This will be on a large commercial scale, and I plan to sell the worm
castings, and tea locally.
Hi Walt,
That sounds like an interesting project. While I’m not 100% sure that you will have the sort of success you are hoping for with that particular approach, I do still think there may be some potential there.
Wood wastes generally aren’t the best composting materials due to the fact that they have a very high C/N ratio, and have a structure that’s very resistant to microbial degradation. They also tend not to hold moisture all that well. Some of the other materials mentioned – namely the food waste and bedded horse manure – are great for vermicomposting, but all in all it seems as though you are going to have a mix with a pretty high C/N ratio.
As a “worm food” wood chips – even rotten wood chips – are pretty poor unfortunately, but they could still serve as a valuable bulking agent to help keep your beds oxygenated. Assuming you’ll have access to enough food waste and manure to get your C/N to a good composting range (25:1 to 30:1 or so) I’d actually recommend hot composting your mix for a while before adding it to vermicomposting beds – this should help to reduce the heating potential and just generally make it a bit more “worm friendly”. The chips themselves, along with some other resistant materials will need to be screened out at some point, but perhaps you can market this stuff as a microbially-enhanced mulch or material people can add to their own backyard composters as a bulking agent and microbial inoculant. You might also consider mixing it with more manure etc and composting/vermicomposting it a second time so as to enhance it even more.
Apart from microbial heat (generated when attempting to compost large quantities of material), you will of course also have your local climate to contend with. I would imagine that it might be quite challenging to operate a large-scale outdoor vermicomposting facility in Phoenix Arizona – but perhaps with your shade and watering systems you’ll be able to keep conditions in the beds favorable for the worms.
Hope this helps. Good luck with your project!
8)
Do Red Worms Self-Regulate Their Numbers?
A question from Debbie:
Do the worms self control their numbers based on the size of their
habitat? Or will I end up having to “cull” some of them to another
bin? I could see that it might get out of hand that way. Thanks
Hi Debbie,
That’s a great question – and one that comes up a fair bit.
The good news is that you certainly don’t need to worry about your worms becoming so abundant that they start pouring out of your bin, or anything crazy like that (haha). They definitely will start to self-regulate eventually. Still, it’s generally not a bad idea to split your bin (assuming you want to expand your worm herd), give some of your worms away etc etc before they get to that point. While loads of worms aren’t really a problem, the rapidly declining habitat, and rapidly increasing concentration of worm castings can lead to more serious issues – especially if some of the worms start dying off.
Splitting basically involves removing half of the contents of your bin and filling in the empty half with new bedding/food material. The material removed can then be used to set up a second bin in a similar manner. You may prefer to actually harvest your vermicompost (see the harvesting section on the HOT TOPICS page for links to relevant blog posts), and then add your worms to a newly set up system (after you’ve let it age for a week or so) – or multiple systems.
Giving away some of your extra worms shouldn’t be too difficult either if that’s your preference. Simply post an ad on Craigslist etc and/or some of the vermicomposting forums and you should get some responses fairly quickly.
Hope this helps!
8)
Comfrey and Banana Peels?

This may be another one for the “hair-brained ideas” file!
🙂
The plants in my new vermiponics system clearly haven’t been getting enough nutrients from the two bags of vermicompost I submerged in the reservoir, or even the additional horse muffins (lol) I have floating in there. I can’t say I’m overly surprised – we’re talking here about a tomato plant and a summer squash plant, not lettuce!
For whatever reason I started thinking about my big comfrey plant – wondering if I could make some sort of nutrient rich food out of the leaves. I’ve been interested in comfrey for awhile now – ever since learning that it was a “dynamic accumulator” (aka “nutrient miner”). If you are new to these terms, it basically means this plant has a talent for extracting and accumulating nutrients from the soil. Comfrey seems to be one of the top dogs in this department, likely due to the fact that it sends taproots way down into the lower soil horizons where it grabs nutrients a lot of other plants can’t reach.

I did some additional reading the other day and was pleased to discover that comfrey leaves decompose quite rapidly if chopped up and moistened – it sounded like a great way to make them more worm/microbe friendly!
As for the banana peels…I’m not 100% sure, but I thought perhaps that banana peels might be a decent source of potassium (K) since the fruit itself is known to contain high levels of this element. Potassium is part of the NPK trio of key nutrients that are vitally important for plant growth, so I figured why not!
I chopped up a bunch of comfrey leaves (and some other greens) and banana peels and then inflicted some mortar and pestle action on them in a small bucket. I also mixed in some of my trusty rock dust for good measure!

Before adding the mix on top of the gravel in my bucket pots, I stocked them with some more worms (actually the first time I’ve added worms to them – pretty sure there were at least some already in there though). Once the worms/habitat, and then comfrey mix were added I put some wet burlap over top to help shade the worm feeding zone and retain more moisture. I poured a little water from the reservoir into each pot to make sure everything was nice and moist – will continue to do this a few times a day just to make sure this zone doesn’t dry out at all.
One other thing I almost forgot to mention! Yesterday I did “cheat” a little bit with this system. I cleaned out my daughter’s goldfish tank (Marlin and Nemo were clearly pleased with the new development) and added a lot of the fish tank water to the vermiponics system (in the pots and in the reservoir). It was really just an effort to “play catch-up” a little bit – a fertilizer boost that will (hopefully) help to avoid permanent stunting or general poor health due to my lack of attention as of late.

Anyway, should be fun to see if the growth of these plants improves!
For a great list of dynamic accumulator plants (and the specific nutrients each one accumulates) be sure to check out this webpage:
Dynamic Accumulators of Nutrients for Composting
I think my next target plant will be dandelions! Wow!
8)
Compost Sak-08-03-11
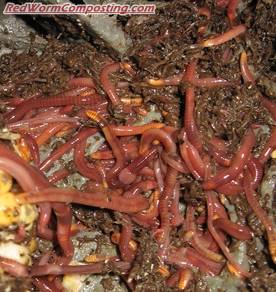
Just a quick Compost Sak update for everyone. The first “sak” I set up (as a composting system) has been doing very well! I’ve added quite a lot of food waste since getting started, and have been blown away by how quickly the waste materials are breaking down. Initially I was starting to think that it was going to be a much better warm/hot composting system than a vermicomposting system (since the contents were heating up quite a bit) – but when I finally did some serious digging down into the lower reaches of the bag yesterday, I couldn’t believe the swarms of small Red Worms I was finding! I can only imagine how well this system will work once temperatures cool off a bit and we get rain on a more regular basis. I really think this could turn out to be a killer worm bed!
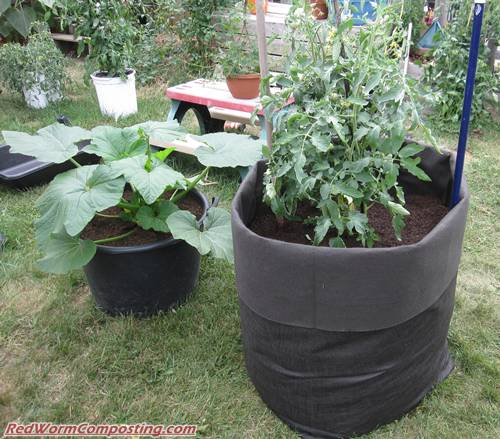
The only “negative” so far is the overall look of the “sak” – well, the one I’m using for composting anyway (more on the other one in a minute). It’s not filled all the way so it droops over to one side and doesn’t exactly look as sleek and sharp as my regular backyard composters (which I’m sure plenty of non-composters would actually call “ugly”! haha). Luckily I’m a function over form kinda guy, so I’m very pleased so far!
As you can see in the picture above, I decided to use the other one basically as a giant “Smart Pot”. I’ve had a few tomato plants in small buckets this year – hoping I’d be able to come up with some more spacious digs eventually, so it was nice to be able to rescue this particular plant. I am especially excited about this one since it’s a heirloom variety – called “Great White”- that I’ve read is rather tasty. Yumm!
I really pulled out all the stops for this one when setting up the new “pot”. At the very bottom I put some cardboard and horse manure, then some potting soil, earthy sand, vermicompost and a small bag of organic fertilizer (which basically just looked like vermicompost). Next I put in three bags of composted sheep manure (store bought), some coffee grounds/filters (just for kicks and giggles), and topped up with a very thick layer of vermicompost.
Should be interesting to see how the plant responds. Hopefully I didn’t leave it in the small bucket for too long!
BTW – if you are wondering about the squash plant in the pot sitting next to my new tomato sak, that is actually one of the Crookneck Squash plants from my vermicompost experiment! Amazing what happens when you give them a bit more space to spread out. I suspect it will even get a fair bit bigger than that.
8)
NCSU’s 12th Vermiculture Conference
I received this notice from Rhonda Sherman:
NCSU’s 12th Vermiculture Conference, October 10-11, 2011
The Friday Center, Chapel Hill, North Carolina
**********************************************************************************North America’s only symposium on mid-to-large scale vermiculture and vermicomposting is coming to Chapel Hill. You will get the tools you need to start or expand your earthworm or vermicompost production operation. You will also learn the latest research on vermicompost and extracts (tea) effects on plant growth and their impacts on disease and pest reduction. Check out the agenda at http://www.bae.ncsu.edu/workshops/worm-conference/agenda.php
Field Trip: This conference will include a field tour of a grocery store that pre-composts and vermicomposts food waste (including meat) and cardboard on-site.
Registration is limited this time, so REGISTER now to reserve your seat at the conference. Go to http://www.bae.ncsu.edu/workshops/worm-conference and click on the Registration button. Register and pay by August 19 to receive the early bird rate!
This conference is sponsored by NC State University, Department of Biological & Agricultural Engineering, and NC Cooperative Extension.
— Rhonda Sherman, Conference Chair, NC State University, Department of Biological & Agricultural Engineering, Campus Box 7625, Raleigh, NC 27695-7625. Phone 919-515-6770. rhonda_sherman@ncsu.edu
P.S. This is “BIG” and exciting for sure – but NO, it’s not what I was referring to in my last post.
😆