

I finally got my Worm Factory 360 set up this morning. Whoohoo!
🙂
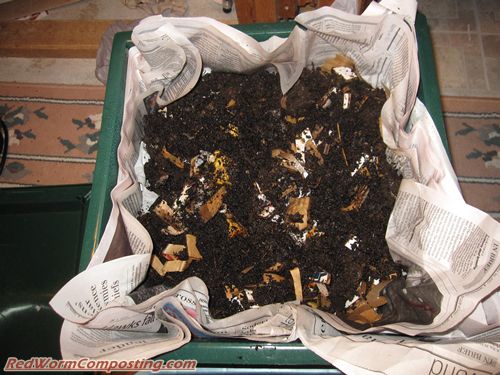
The first thing I did was set up a super-thick newsprint floor, sprayed with water to make it more worm-friendly and to help it stick to the sides and bottom. My aim here is to avoid having worms roaming down into the reservoir right off the bat. As you can see I tried to create a sort of newsprint container by folding it up the sides.

Speaking of worms in the reservoir, I realized after putting up my last Worm Factory 360 post that I totally forgot to mention the “worm ladder” – shown below. It is a black plastic insert that fits down in the reservoir. The idea is that it provides the worms with a way to crawl back up into the first tray.

I had plenty of options as far as starter “food” goes, and settled on some pretty ripe pumpkin “guts” that had been sitting in a bowl ever since our family pumpkin carving event last Sunday. I think I may try to avoid doing that again (letting it sit) – lol – WOW! Pretty foul I tell ya! As you can see, it had a nice growth of mold as well.

Oh – did I mention that it was also crawling with fruit flies and fungus gnats? Yep – as per usual, I am trying to create some “commonly encountered problems” right out of the starting gates. I’m not overly concerned – partially because the cooler temps down in the basement seem to be limiting the growth of the fruit flies, and partially because I have my trusty parasitic nematodes to help me!
By the way – in my recent “Parasitic Nematode Update“, I mentioned that the fruit flies seemed to be hatching a fair bit more in the nematode infested system (aka my “nematode farm”) and the larvae seem to be crawling up the sides. Well, I looked in today and it’s absolutely LOADED with adults now and I can see some dead larvae on the sides – even thought I could see nematodes coming out of some of them. So, the good news is that the nematodes DO seem to be effective against fruit fly larvae – the bad news is that it will likely seem like your infestation is getting worse before you see any sort of population crash. Just something to keep in mind if you plan on using these nematodes agains fruit flies!
Ok – getting back to the set-up…
I mixed the pumpkin guts with the bag-o-shredded-paper/cardboard that came with the bin, spraying it with a bit more water as well. The result was something akin to my “homemade manure“. I then added the stuff to the first tray (sprayed some more as well).

I used my typical method for stocking worms – that is to say that I simply dug wormy material (what I might also refer to as “compost ecosystem”) from another bin and mixed it in to the food/bedding zone. The bin I took the wormy stuff from had received a fair quantity of coffee grounds (so some additional food value) and – LUCKY ME – just so happened to have a nice little population of fungus gnats as well! My nematodes are going to be working over-time!

The last thing I did before putting the lid on was add some additional shredded cardboard over top (oh – I should mention that I also added some of this material – and mixed it in – after the homemade manure was added).

That’s it, that’s all!
8)
Now I will basically just let the system sit for the next week or so. I normally would do a set-up with food and bedding and actually let it sit before adding the worms but like I said, the pumpkin waste was already pretty ripe (pumpkin/squash family plants tend to break down quickly anyway – so great if you are in a hurry) – plus I was adding plenty of good habitat/food material along with the worms so it’s not like they’d be starving anyway.
I’ll be sure to post another update next week!
UPDATE:
1) Almost forgot…in case you are not on the RWC newsletter list, or just happened to miss my last message – you can enter yourself a Worm Factory 360 prize draw if you visit our page on the Nature’s Footprint website and fill out the survey. Here’s the link:
http://naturesfootprintinc.com/redwormcomposting
2) Please also refer to this follow-up post: Worm Factory 360 – Important Follow-Up
(There were some important things I forgot to mention)
Great idea for the newspaper floor. I have a different brand of flow through system and frequently find 100 worms that have fallen through. So far I’ve not been that pleased with it. It doesn’t seem to have any advantage over my rubbermade bins except for the auto drainage. I frequently have to lift out the top bin to drain the lower catchbasin with the double rubbermade bins. This is how I set them up: http://botanyspeaking.wordpress.com/category/gardening/
I just so happened to have received my Worm Factory 360 the first day you posted about yours. The bin has gone sour. Most of the worms have crawled out or are dead. I have not entirely decided what went wrong. I will be curious to see how yours goes and what tips you might have…
Thanks for sharing this project.
I’m assuming you will operate this inside your home. Given that assumption, I was amazed at the photos of what you put in it. Seems like that would smell up and bug up the house big-time. And the seemingly large size of the stuff surprised me.
Of course, in comparison, my two small shallow indoor worm bins look like hospital wards! With everything cross-cut shredded, pureed, and/or frozen etc.
Thanks for the input everyone!
JAMES – this will indeed be inside my home. There is definitely some “magic” to aerobic decomposition – what leads to most of the stink issues in bins is overfeeding and development of serious anaerobic zones.
While there were certainly some larger chunks in the mix, it was well on it’s ways to being pretty rotten. When I mixed everything up with the bedding materials it resulted in further breakdown of these chunks. Just generally having lots of bedding in the system helps to ensure that I won’t have any trouble with stink since oxygen will be able to penetrate the composting mass.
As for “bugging up” (haha) – like I said, I’m actually kinda trying to get myself in trouble in that department! hehe
I actually forgot a couple of supplies that come with the bin (coir and pumice) – will be adding these as well to make chances of any stink issues even LESS likely.
Just wait till you see what I add to my Worm Inn when I set it up! HAHA
Fun stuff! Thanks for sharing your thoughts
8)
I’d been reading your web site for several weeks and became interested in establishing a small “Worm Farm” hobby project. Additionally, I would like to commend and thank you for all the valuable information.
After scouring and studying other information on the internet, I decided to try the “Worm Farm 360” as a starter. The Worm Farm 360 was delivered promptly, shipped from the manufacturer in Washington State to the Midwest USA. Immediately after receipt of the “360” I ordered 2 Lbs of European night crawlers from a supplier in Michigan. The Euros took about ten days before they arrived and I was becoming concerned since I had received absolutely no acknowledgement of my order. Only after I emailed the supplier requesting acknowledgement of my order, a ship date, and tracking numbers did I receive the worms. Since I had paid with PayPal I was considering filing for a resolution with PayPal.
Sorry for the long intro, so I’ll cut to the chase, I did finally receive the worms today. Awaiting the arrival of the worms, I had previously prepared food for several days. The food consisted of the regularly suggested mixture of shredded veggies, coffee grounds, etc. and it was well on its way to deterioration.
Immediately after the postal service delivered the worms, I was off to the basement where I had already set up the “360” and had it initially prepared for the worms. Prior to depositing the worms, I mixed the coir (1/2 brick) and paper bedding material that came with the “360”. I left it mildly damp but certainly not saturated. Per manufacturer’s instruction, I placed ONE single sheet of DRY newspaper in the bottom of the first tray. (Here I notice a difference where I believe you state you used several layers of WET news paper on the bottom) After thoroughly mixing the coir, paper bedding, and adding about two handfuls of pumice, I placed the entire combination of material in the first tray making sure I kept it fluffed up as much as possible. After leveling the bedding with the small plastic rake (included with the “360”), I placed approximately 1/2 cup of food in each of two opposite corners of the tray. The worms had arrived in a sealed bag containing the worms and about 3 Lbs of additional bedding material. I deposited the worms in the center of the tray between the foods and gently leveled the bedding. The few worms that were exposed appeared to be lively and immediately started movement crawling out of their original shipping material. I then covered the entire tray with multiple layers of wet newspaper, replaced the top, crossed my fingers, and left the little wrigglers to rest and recover from their journey.
What now?
Now since it obvious I’m an amateur at this, I would appreciate any recommendations and suggestions anyone may have for me. If I did something wrong, feel free to be critical. If there is something else I should do, by all means let me know. Any and all comments will be appreciated.
Thanks for your indulgence………..
….Don (Missouri, USA)
I read in some post somewhere (can’t find it, would like to thank him) to put wooden posts in the corners of the worm bins to support the next tray. I didn’t do that the first time, and the lower bin had a stinking, soggy mess, compressed by the upper bin, and I assumed all the worms died that didn’t migrate upwards. Huge amount of smelly leachate (I assume also dead worm moisture) I needed to clean out. I removed half the soggy mess to dry out and add to my garden, added rolled cardboard posts (not having wood) to the corners, stirred it with the mini pitchfork, to give it some air, added lots of shredded cardboard, giving more air to the lowest bin, and presto! After 2 weeks the stink is gone. Worms are alive and thriving!