
As much as I love my “trench worm bins“, I realize a lot of people are looking for outdoor vermicomposting projects that are easier and to get up and running.
Even something like a buried plastic garbage can be pretty cumbersome, as I learned with my Vermi-Fertilization & Watering System.
The good news is that a bucket with some holes drilled in it is really all you need. Back in early June I decided to set one up to see how well it worked. I wanted to get it up and running as quickly as humanly possible – so I did cut some corners. (SPOILER ALERT: Everything has worked really well with it, regardless).
—
First I found a small bucket in my shed. I would have preferred one of my bigger buckets, but this 3 gal pail already had a bunch of holes drilled in the bottom and lower sides (pretty sure it was used in a vermiponics system some years ago). This is very important since it allows for drainage and even movement of worms in and out of the system.
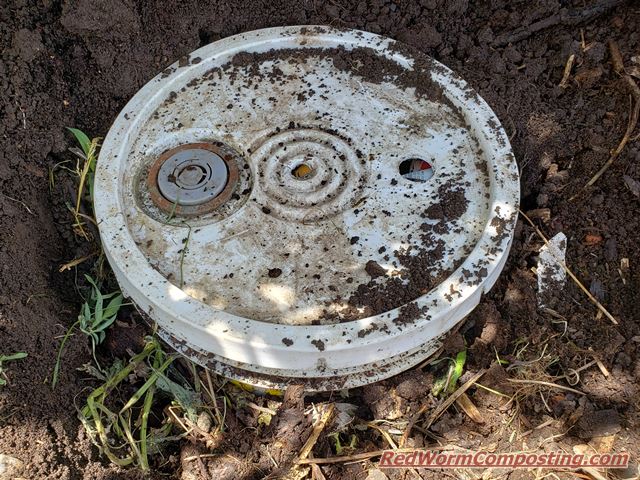
Unfortunately, the only lid I could find had two big holes in it – it was from the bucket I used for “Bentley’s Super Duper Worm Food Tool“. With bigger holes there is more potential for critters (like shrews) and surrounding dirt etc to get in.
Had I been starting the bin from scratch, I likely would have drilled more holes in the sides, and more/smaller holes in the lid.

Digging the hole took very little time at all. I decided to put the system in a garden bed fairly close to the house for convenience. It gets sun for most of the day – which had me a bit worried, but I figured it was worth testing (worms could move out if it got too hot).

I always like having a false bottom of paper-based bedding materials down in the lower reaches of my outdoor systems. As I did with my trench bins, I decided to put some of the bedding in the hole below the bin, and even more in the bottom of the bucket itself. I can’t emphasize enough the value of having these bulky bedding-rich zones in the bottom of in-ground systems. Even if everything “goes wrong” up above, this zone can serve as a safe haven for your worms.


For initial “food” I simply dumped in a small bag of compostable kitchen scraps I had been collecting. I then decided to add some water just to make sure everything was nice and moist in the lower half of the system.


Next I added a bit more bedding as an initial separator between the food zone and the worm zone. NOTE: basic “scrunched” paper can actually work really well as an easy/fast bedding (and stress relief exercise – haha). It helps you avoid some of the matting that can happen with strips of paper.

The worms were added in the form of a fairly small amount of ‘wormy’ material from another system. This is always my preference when stocking new systems since it helps the worms much more quickly acclimate to their new surroundings.
Don’t be fooled by the “dirt”-like appearance!
Thar be plenty of worms down below!
😉

With the volume of the bucket mostly full by this point, I decided to then simply top up with a cover layer of shredded newsprint. Colored flyers aren’t my first choice, but it’s what I happened to have on hand and I knew the worms wouldn’t likely be offended (I DO avoid the glossy stuff, though).

Once everything was in, it was time to put on the lid and fill in the dirt around the sides of the bin. Initially, I even decided to put a layer of dirt over top – A) because I wanted to demonstrate that these in-ground buckets don’t need to be an eyesore, and B) because I was feeling a bit concerned about the potential for this system to overheat with direct, hot summer sun shining on it for much of the day.


I basically then left the system mostly alone for 2 to 3 weeks before conducting a more thorough check on things. Normally with in-ground systems you should leave them in place – especially in cases where you are actually trying to fertilize nearby plants – but with this being a bit more of an “experiment” I really wanted to get up close and personal to see how things were coming along.
Right off the bat, it was pretty clear that a fair bit of dirt had indeed fallen into the bin, but the overall level of material had still gone down.

I dumped everything out into a mortar mixing tub, and was thrilled to see loads of worms – along with plenty of cocoons. The worms also seemed bigger and “juicier” (haha) than when I first added them. The available nutrition and moisture-retention of the bucket were clearly superior to the open outdoor system the worm mix was harvested from.


Rather than simply dumping everything back in, I used the opportunity to revamp the system a bit. There was a lot of rich compost/soil material, so I decided to separate out as much of that as I could. It ended up being dumped into another backyard system since there was a decent number of worms I didn’t manage to round up.

It ended up being a bit of a “trade” since I took some rich, nicely aged habitat material from the backyard bin and put it into the bucket, along with the original bedding and worms etc I had separated out.

I decided to top up the bin with some older grass clippings. This approach warrants some caution – even with older green wastes – but layering them up at the top with decent ventilation should help you avoid any problems when there is a nice safe zone for the worms down below.

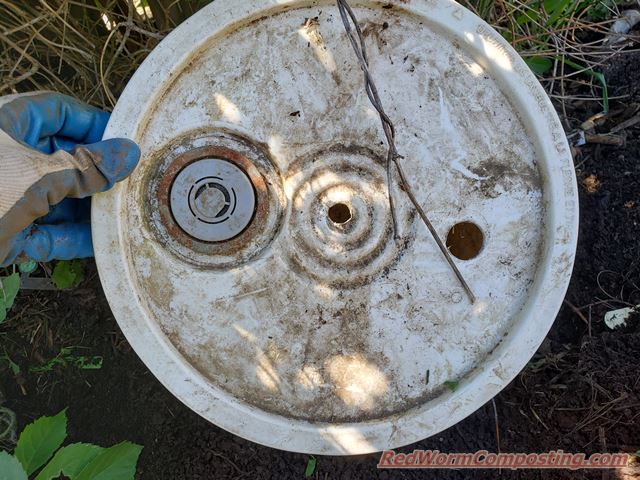
This time around, I decided not to cover the lid with dirt and I even placed a rock over top of the biggest hole. I figured the other hole was big enough for air exchange (plus, the rock didn’t exactly form a seal either – haha).
In case you are wondering…
Yes, that is indeed a bone sitting next to the bucket.
😉

Since the time of this checkup things have continued to hum along beautifully in this system. What’s really interesting is that the sun/heat-exposure + moisture retention has served to accelerate break down of wastes in the upper zone, and the worms are going gangbusters in the habitat zone down below.
I’ve mostly just been adding weeds – a waste that normally takes some time to break down in outdoor bins/beds – and I’ve been really surprised how soon I am able to add more.
All in all, I am super impressed with this system – and in some ways kicking myself for not setting up more of these over the years! The bucket helps you contain and protect everything, unlike a more typical “worm tower“, and any number of other open outdoor systems. It helps you moderate climate extremes – keeping the worms cooler when it’s hot, and warmer when it’s cold. It’s small enough to easily work with and move around, yet big enough to actually process a reasonable quantity of waste materials (once again – unlike a typical “worm tower”, in my opinion).
This is a method I highly recommend for anyone with some outdoor space (and soil access).
😎
I dug a large trench last year as a Heugal trench experiment. Filled it with small logs, straw, and leaves, then filling the Trench with mixture of backfill and homemade compost. Weekly additions of produce/garden waste and of coarse light irrigation. Sounds like your buried bucket system without the bucket. Hoping to have any local worms come to the trench, “build it and they will come” theory. Suggestions? Add worms?
I’m curious: why use a bucket at all, and not just a hole in the ground? Is it just for protection from animals and moisture loss?
What about the plastics in the soil? They will degrade eventually, although on a small scale.
Not sure I follow, ASD – do you mean the bucket will break down over time plastic will end up in the soil from having the bucket sitting there?
There are definitely plastics I highly recommend avoiding – a prime example is polyweave used for cheap tarps – that makes a real mess of plastic fragments (so I would never recommend any sort of sack system using old feed bags or even old super totes (big bags for cubic yards of soil etc).
Hi,
I’m intrigued by this method. I live rural very much in the woods..pests of all kinds being a concern. I also want to compost my kitchen scraps, and understand worms do this fastest. While i have a tumbler ive never gotten the hang of making ”the balance” and will work on that later. Im scared to try vermicomposting in any system where I may be responsible for killing them. I want this or worm tower type set up so they can escape if i do something wrong.
Here are my concerns if you could help: I live on a mt-boulder not a big depth of soil where im wanting to put this. The area i want to put this is a wet, clay basically non draining area and I expect worms to aerate the soil–but i dont want them to drown either..we get a lot of rain. I never understand after reading umpteen articles on this subj and composting..how much kitchen waste can i add at one time and how often and do i have to always have on hand something else to add at same time for ”balance”? I refuse to keep an indoor compost for scraps because our home is humid, we have alot of plants and i will be trying indoor gardening this year to boot, in past summers we usually have a bout with fruit flies or flies at some point..i dont need the headaches plus kitchen and home tiny and cluttered enough..including the space in my fridge/freezer. I cant ‘trench’ my kitchen scraps due to raccoons, rodents, dogs, coyotes, etc. Is this going to make a dent in getting rid of daily kitchen scraps because im beginning to doubt that..however im still interested in the worm casting gold for my garden-so i would like to understand. Lastly in spite of all this ..im really grossed out by worms..how can i get past that? Any pointers or ideas or places to get more info? Thanks
Hi Kim – this is one of the absolute best bins if you are worried about pests (I am assuming you mean larger animals like racoons etc). This is also a great way to keep your worms alive. They aren’t soil worms so they wouldn’t do much soil work for you even with really nice loamy stuff – but even just having an escape option can make a big difference. The problem with the “how much to feed” question is that there isn’t ONE definitive answer. It completely depends on the system, the conditions, the types of wastes – just to name a few factors! Shredded cardboard/newsprint and similar bedding materials can help with balance. If you have a few of these in ground you could likely process quite a bit of your compostable kitchen waste.
My son is starting raised beds at the new house. So I am sending him this link, maybe it can help him as much as you have helped me over the years.
Hi JOLJ – that is great, and I appreciate the kind words! This posts is just scractching the surface, so please don’t hesitate to give him my e-mail and I’m happy to help him directly if this is something he is interested in.