
December 2008
Stacking Worm Bin Update

As some of you may recall, about a year ago I started up my “Four Worm Reproduction Experiment“. Although I didn’t spend enough time tending to the system (surprise, surprise – haha), the results were quite interesting. Over the course of 5 months or so, the worm population underwent a 25+ fold expansion (I counted 106 worms, but certainly would have missed some). Pretty impressive – although the vast majority of worms were still very young.
Anyway, I haven’t written all that much about the wooden stacking bin I used for the experiment, so I thought it might not be a bad idea to update everyone about that system. Once the experiment was officially over, I continued to add food and water to the bin in an effort to use it the way it was intended (ie. by actually adding additional trays etc). Initially, I was a little frustrated with the system’s tendency to dry out really quickly, as well as the trouble I had trying to keep it free of fungus gnats and/or fruit flies. Thankfully, adding the parasitic nematodes did seem to help.
Once I had secured a large supply of the aged horse manure (with bedding) – which has been all the talk of the blog for the last few months it seems (haha) – I found myself enjoying the stacking system much more. The aged manure was an excellent bedding/food and it also contained lots of baby worms and cocoons. I noticed activity in the bin increasing by leaps and bounds. I found the material to be great for burying food waste as well, and no longer had serious issues with gnats or fruit flies. In no time at all I was up to the final (5th) tray and ready to evaluate the end result.
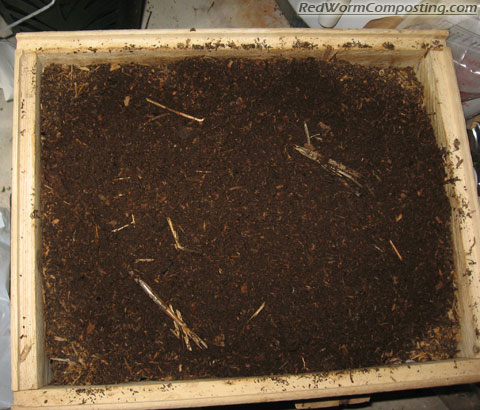
The material left behind in the lower trays looked quite good (with a fair amount of resistant debris understandably still intact). Interestingly enough, the best material wasn’t in the lowermost tray, which had totally dried out and still had lots of organic matter not yet decomposed. The second and third trays on the other hand both had a nice dark, uniform looking material – undoubtedly, at least partially due to the fact that my bedding (aged manure) was already pretty uniform stuff.
As expected, most of the worms were up in the top two trays where there was more moisture and better food resources. I harvested most of the larger bodied worms (ie not the infants – haha) and ended up with about 3/4 lb of fairly small Red Wigglers. At one time or another there had actually been some Blue Worms (Perionyx excavatus – more on them in an upcoming post) in the system, but I wasn’t able to find any.
All in all, I’d say that the system worked quite well. On the positive side, it was very easy to use and provided excellent aeration, thus aiding the production of high quality vermicompost. Again, the main negatives included the need to keep it moist and the tendency of the trays to easily become infested with pest flies.
The system now sits empty. I’m sure I’ll come with some sort of fun way to put it to use in the near future though (suggestions welcome). And as per usual, I’ll keep all of you posted!
😎
Christmas Sale Update – Worm Mutiny!

I have a really important update for all those thinking about buying Red Worms (from me) in the next little while. My worms have informed me that they are starting their Christmas holidays early this year, and after this week won’t be available for sale until the New Year (I guess Red Worms need a break every now and again too!). SO, you’ll need to get your orders in by 3 pm EST on Saturday December 6th if you want Red Worms in 2008. Unfortunately we can’t arrange for any delayed shipments after the week of December 8th (eg ordering now and getting the worms shipped during the week of the 15th etc).
I’m still in negotiations with the European Nightcrawler union boss – things are looking more promising on that front – who knows…perhaps we might even be able to organize a Euro sale! I’ll keep you posted.
😉
Cat Litter Composting – 12-02-08

Hopefully the very last bag of cat litter waste I send to the landfill!
I’ve decided to start adding dates to my cat litter composting posts – like my Worm Inn Journal, this is going to be an ongoing series, so I’ll need some way to differentiate between them.
Yesterday was a big day on this front. After once again becoming annoyed with stinky-cat-litter-smell while down in the basement, I finally decided to completely dump out the litter box with the normal clumping cat litter in it. Enough is enough – I’ve decided to switch completely over to the earth-friendly stuff. The cats have responded very well to it, and it has also been working incredibly well in general thus far (little odour, absorbent, easy to work with etc). I was initially a little concerned with the high cost of it (in comparison to the clay litter), but I’m actually starting to think that it might cost less in the long run. I found that we went through the regular clumping cat litter quite quickly, whereas this seems to be lasting longer (only time will tell though).

Both litter boxes are now filled with PC Green Clumping Litter
I made sure to take in the experience as my eyes and nasal passage burned (due to the ammonia) during my litter dumping. It may very well be the last time I’ll have to deal with that so I wanted to remember it well (haha)! I also took a picture (shown at the top of post) of the big ol’ bag of dirty litter I hope will be the last I send to the landfill. I actually have a full, unopened box of the regular clumping cat litter, which I thought I would get through before switching completely, but I think I’ll be passing that along to my dad to use for his cat (before I convert him to a green litter user, that is!).
As for my litter vermicomposting experiment…
I have been collecting waste from the one litter box and storing it in an empty (resealable) litter bag. I figured what better time to start up my litter composting bin that on the night I switch completely to the new litter!
I am definitely going to start slowly, and on a small scale, with this cat litter composting. This is new territory for me, so I want to make sure I don’t end up with a stinky mess on my hands. As such, I decided to use one of my small Rubbermaid tubs (3 or 4 gal, I think). I won’t be using a lid for this bin so as to allow any noxious gases (namely ammonia) to escape without harming the worms, and generally so as to provide lots of oxygen.

I started by mixing together (and moistening) some shredded corrugated cardboard, fall leaves, coconut coir and compost. Initially my goal is to create a good worm habitat. This will provide the worms with a protective retreat should the conditions in the litter zone be unpleasant for them.
![]()

Next I added a modest layer of cat litter waste. I wanted enough to get us started, but (hopefully) not so much as to create nasty conditions in the bin. I made sure to moisten this layer fairly well since these materials tend to be quite dry.
![]()

I then covered the litter with a layer of moistened coir. This should help to balance the C:N and filter out any undesirable odours
![]()

Lastly, I added more shredded cardboard and compost, with a final layer of leaves over top for good measure!
![]()
The ‘compost’ material contains some worms and cocoons, but other than that I have not actually stocked the system with worms yet. I will likely let it sit for a week or so to get the decomposition process rolling nicely.
So there you have it! We are off to the races.
8)
I’ll keep you posted!
Note: Cat litter composting warrants some caution, and should generally only be attempted by those with previous composting experience. Any dog or cat waste composting system should be separate from your ‘regular’ composting systems. Cat litter shouldn’t be handled at all by pregnant women or young children.
Worm Inn Journal – 12-01-08

As mentioned, I don’t want to let these updates fall by the wayside like my ‘Worm Bin Journal’ updates did, SO I thought I should get everyone up to speed with my Worm Inn testing.
One interesting development on the Worm Inn front actually relates to the last post I wrote. I little while ago I noticed (with dread in my heart) that some fruit flies were coming out of the bedding in my Inn. This something I’ve been really worried about ever since setting the system up. Basically, I figured I’d be totally doomed if even a few fruit flies laid eggs in my bedding, since it would likely (in my mind) escalate to a full-blown infestation. After all, it is essentially a completely open system, unlike a typical plastic worm bin.
Each day I would go down to my worm room expecting to see clouds of fruit flies billowing out of my Worm Inn – but for whatever reason it just never happened. Oh sure, I had lots of fruit flies flying around the room, but as mentioned in my other post, they were coming almost exclusively from one particular bin. I was lucky to see two or three fly out of the Inn.
Again, I think there are two possible mechanisms at work here: predation and/or competition. I really think it has made a big difference that I have a decent density of worms in the system (although not as many as I would like), and that I’ve been feeding them a well-blended (and partially decomposed) food mix. The addition of a fair amount of manure compost (chock-full of critters) has likely played an important role as well.
Needless to say, I am enjoying this system more and more each day! (Let’s just say I’m not a big fruit fly fan! hehe)
On another note…
Last week I had my first ‘show and tell’ session with (potential) customers who were interested in seeing an active Worm Inn and chatting with me before deciding whether or not they wanted to purchase one. I decided to set up some of my ‘regular’ worm tub systems as well, feeling quite certain that they would opt for these instead (they had expressed some skepticism re: the effectiveness of the Inn beforehand).
As it turns out, both they and I were pleasantly surprised with the end result. I think seeing the system up close and realizing how much bigger (than it looks in the picture) it is was a big part of it. I have little doubt that the beauty of the camo design helped to work some magic as well though.
😉
Long story short – they walked away with two Worm Inn kits, and I was left with two starter bins ready to go to some other customers. Pretty cool!
Anyway – I’m really hoping to add some more worms to the system before too long. With the high demand for worms right now (which is rather bizarre given our winter weather, I might add), unfortunately I can’t set any aside at the moment, but hopefully before too long. I’m sure the population is growing naturally on its own, which should make this even more interesting.
Stay tuned!