
January 2009
The Super Simple Ultra Basic Worm Harvesting Tube
Or SSUBWHT, if you prefer!
😆
Likely the biggest pain in the rear for new vermicomposters – apart from fruit flies and fungus gnats – would be harvesting vermicompost from a mature worm bin.
As you may recall, I am quite interested in DIY worm harvesting contraptions (see DIY Worm Harvester and John’s Homemade Worm Harvester) and have even come up with my own hairbrained ideas for passive worm harvesting – namely, the Garbage Bag Worm Harvesting Method.
I have been meaning to create one of these homemade rotating harvesters at some point, but in the meantime, my dad and I have been playing around with various ideas for smaller harvesting systems – those geared more towards to home vermicomposter (and once again using a passive harvesting approach).
We originally thought that some sort of ‘worm traps’ might work well – basically, the worms would be lured into a container or bag of some sort due to appealing food material and/or increased moisture levels. This is an idea I still want to test a little more, but so far we haven’t see any earth-shattering results.
My next ‘Eureka’ moment (haha) came when I started thinking about some sort of 2-compartment box with a screen floor between the two sections. I’ve witnessed worms tendency to head downwards, especially when disturbed and with light shining on them. I figured that if a hot, bright lamp was turned on directly above the material containing the worms (which would be sitting on the screen floor), the worms would dive down into the lower compartment, thus leaving behind most of the worm bin matrix. Thus the idea for the SSUBWHT was born.
🙂
Since the time of the original idea being hatched, I’ve revised the concept a few times, but kept the principles the same. Rather than messing around trying to build some sort of interlocking wooden boxes (I’m not exactly Mr. Fix-it), I thought perhaps that some sort of tube cut into two pieces, with a screen in between, could work just as well or better. I’m leaning towards ‘better’ since the circular shape will likely help to concentrate the light from the lamp.
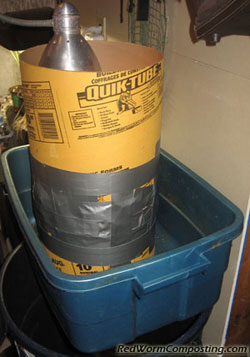
I originally planned to use some sort of PVC piping, but in the end I opted for a cheaper and more readily available option. I am using a 10″ diameter reinforced cardboard cylinder, intended to be used as a mold for concrete post foundations (for decks, fences etc).

The screen is a fairly heavy guage 1/3″ metal mesh – essentially like a heavy duty chicken wire. It works well because it is strong enough to hold a decent amount of compost, but flexible enough that I was able to create reinforcement tabs that were pressed up against the outer wall of the tube.

Basically, the harvesting tube consists of two pieces of the cardboard tube, with a screen floor in between. The upper section is about 1 ft in height while the lower section is somewhat less. The supplies for the system cost about $20 (including the price of the duct tape used to secure everything – hehe), and that would be enough for 2 or 3 of these harvesting tubes – so pretty inexpensive!


Like any good pseudo handyman, I relied heavily on duct tape to put the system together.
![]()
While it WAS incredibly easy to put together this system, when it comes down to it, the big question is whether or not this thing is even going to work for me!
I decided to start testing it out using some bulky material (and worms) from my European Nightcrawler Worm Inn system.
There is a fair amount of vermicompost in the mix, but also a considerable quantity of unprocessed materials as well. Due to the moist, bulky, and generally inconsistent nature of this bedding, it would likely be a real pain to harvest worms from using traditional methods, so I felt that it was a prime opportunity to put the SSUBWHT to the test!
😎

For my initial test I added approx. 3 lbs of bedding/worms (with extra worms included for good measure) over the screen floor, then positioned the lamp head directly inside the tube. While I use mostly fluorescent bulbs around the house, this particular light (occasionally used in my ‘worm room’ for various tasks) actually has a 60 watt incandescent bulb. If you really wanted to drive the worms down quickly, an actual heat lamp might not be a bad idea (although, in that case your tube should be made of something heat resistant).

As you can see in the image at the beginning of this post, the tube was positioned in a Rubbermaid tub. The lowermost compartment is simply positioned over top of a heap of moistened brown paper to provide shelter for the worms once they go down.
So how did this puppy perform?!
My initial attempt with the harvester proved to be ineffective, although it would be a great way to collect mites – WOW!
😆
My suspicion is that A) I didn’t leave the light on long enough, and B) there is too much light getting in to the lower compartment (so it’s not a very tempting retreat). This morning I made a plastic skirt for the tube (using a garbage bag) which basically slides down and completely covers the tub. I turned the light on again about an hour and a half ago, so we’ll see if that helps.

[…crickets chirping…]
Ok, I’m back!
Well, it looks like I still have more work to do. Again, I’m seeing LOTS of other compost critters down below (mites, springtails etc), and the worms ARE moving downward – but they still aren’t going into the lower compartment.
Just remember, Edison discovered thousands of ways NOT to make the lightbulb before he finally figured it out!
😆
I’ll keep you posted!
**For Even More Worm Fun, Sign Up for the RWC E-mail List!**Cat Litter Composting – 01-05-09

Corn cob cat litter – amazing stuff!
This is yet another blog series that I haven’t been updating as regularly as I had hoped. I’m sure some of you have been wondering how my cat litter vermicomposting experiment has been going. Well, I am happy to report that it is indeed still going. In fact we’re only just getting warmed up here.
8)
I’ve decided to really take my time with the project, not only because of my own time constraints but also for the sake of making sure the system I am using stays relatively balanced (a challenging feat for most new vermicomposting bins). That being said, I have actually upgraded the system to a 55 liter tub (previous was ~ 20 liter container), and have added a lot more material – including a lot more cat poop. I should mention that I’ve decided to not add the urine clumps to this bin given the fact that is a relatively small system with no drainage. Urine contains inorganic salts which can accumulate in the system like this, potentially causing harm to the worms. In a large outdoor system this wouldn’t be nearly as much of an issue (and I’ll definitely be demonstrating this once spring arrives).
While I still haven’t directly added many worms to the system, I have added a lot of spent worm bedding (ie most of the worms were harvested from it) that actually seems to now have a major abundance of smaller worms in it. The worms that were already in the smaller bin seemed to be doing very well (have grown in size etc), so I suspect that I will have a thriving bin in no time.
I will more than likely now leave the new bin to sit for a month or two without adding much of anything to it (other than the occasional sprinkle of water since it is an open system), but will of course provide some updates along the way. Once the worm population is nicely established, I will definitely start adding the cat waste on a more regular basis.
As far as the cat litter itself (PC Green Cat Litter) goes, I really can’t say enough good things about it! Now that I’ve used it for a couple months, I know for a fact that I will never go back to normal litter again. While it may seem like it is a more expensive product, I’m convinced that it actually costs about the same amount, since it lasts longer in the litter box before stinking too much (still have not reached that point) – ie. the point at which you have to dump the entire remainder of the material in the tray.
With my typical litter box cleaning schedule (scooping every couple days or so) the room where the two litter boxes are located never smells excessively of cat litter – and it is a tiny bathroom, so this is no small feat. This was certainly not the case when using the regular litter! Apart from that, the cleaning and tossing aspect of the regular clumping cat litter was vastly more annoying. Not only is it much much heavier stuff, but you have to toss it out with the regular garbage.
All in all, I am so happy that I decided to make the switch!
Previous Cat Litter Composting Posts
Cat Litter Vermicomposting
Cat Litter Composting – Update
Cat Litter Composting – 12-02-08
Note: Cat litter composting warrants some caution, and should generally only be attempted by those with previous composting experience. Any dog or cat waste composting system should be separate from your ‘regular’ composting systems. Cat litter shouldn’t be handled at all by pregnant women or young children.
Euro Shipping Sale

Happy New Year everyone! As you can probably tell, I didn’t have as much time for blogging as I would have liked over the holidays. I definitely want to get the new year off to a good start though. And what better way, than with a worm sale??
😉
Before Christmas we had our ‘Christmas Red Worm Shipping Sale’, so it’s only fitting that we hold a sale for the European Nightcrawlers as well. If you are in a hurry, feel free to check out the worm sales page for updated Euro pricing (down below the Red Worm section), otherwise you are more than welcome to stick around for more info below.
Similar to the first sale, this one is all about greatly reduced shipping costs – in fact (unlike the previous sale), this time around you pay no shipping on 1 lb of Euros, and we actually pay YOU for the shipping on 2-5 lb orders! In other words, if you’ve been thinking about ordering some European Nightcrawlers, now is definitely a great time to do so. [NOTE: Unfortunately, I couldn’t actually use negative shipping rates when setting up the Paypal order buttons, so you will see the reduced price with zero shipping once you click-through]
As per usual, apart from excellent worms (with the usual guarantee), you are also getting full (and fast) customer support for as long as you need it!
For those of you not all that familiar with the European Nightcrawler (Eisenia hortensis), these are the larger cousin of the Red (Wiggler) Worm (Eisenia fetida). They are also know as ‘Belgian Nightcrawler’, ‘Euros’, or ‘ENCs’. Don’t let the name fool you though – they are definitely NOT the same thing as ‘Canadian Nightcrawlers’ (Lumbricus terrestris), which are also originally from Europe.
Like the Canadian Nightcrawler, the Euro is much better suited as a bait worm or food worm for larger creatures (fish, reptiles, birds etc) than Red Worms. Unlike CNC’s however, Euros can easily be raised and bred in an indoor ‘worm bin’. Many fishermen who have used them as bait would also likely suggest that they are a superior bait worm (to both Reds and CNCs) since, they are not too big or too small – they are just right!
🙂
By the way, my supplier has informed me that these particular Euros are somewhat smaller than some (since grown in high densities) – but this simply means you will likely get more worms per pound! Once they are in a ‘regular’ home system, you should see them increase in size to their normal maximum range (obviously assuming the proper set up of you system etc).
Academic research has suggested that they grow and reproduce much more slowly than Red Worms, but after growing them for a year myself I’m not so sure about this. As mentioned in a recent post, I started up a second Worm Inn using only European Nightcrawlers. While I haven’t really had the opportunity to determine their effectiveness in this type of system, I have been amazed by the number of cocoons and baby Euros I’ve been finding – quite surprising given how recently the bin they were transferred from was set up. I am hoping to set up a small experiment soon to compare growth and reproduction rates in Euros and Reds (yeah, I know I’ve mentioned this before – haha!).
Some may wonder if Euros and Red Worms can be mixed together in a worm bed. While this is certainly ok (they won’t harm one another), over time you may find that the Reds gradually outcompete the Euros – plus it will be a real pain if you ever want to separate them. On the positive side, when Reds and Euros are in the same system, you may notice that the Euros tend to stay down below where the moisture content is highest, while the Reds are closer to the surface. In other words, there may be an increased chance of processing all the waste materials added to the system.
Like Red Worm castings, those produced by Euros are exceptional for plant growth promotion – you might even want to try out this species in a vermicomposting trench running next to your garden(s). I haven’t tested them out in this capacity yet myself (hope to do so this spring), but I suspect that they would be better adapted (than Reds) for life in a partial-soil system.
Getting Back to the Euro sale…
Once again, be sure to check out our worm sales page for the updated pricing (below the Red Worm section).
The Euro Shipping Sale will run from Monday, January 5th to Sunday January 24th
If you have any questions/concerns etc, don’t hesitate to get in touch!