
May 2012
Worm Inn Journal-05-11-12
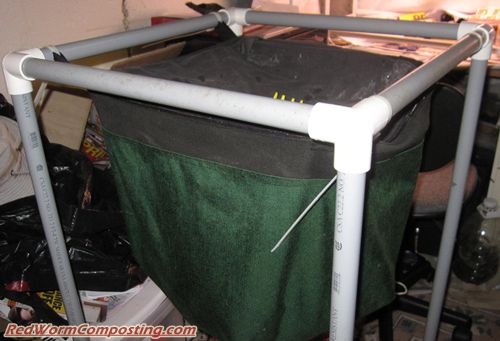
I checked on my Worm Inn late last week intending to provide an update, but as you can see I got a bit sidetracked!
😆
On the plus side, that means this will end up being a sort of “double update”!
Back on April 20th (date of my last update) I added about 3 lb of frozen carrot strips to the Inn, along with some living material over top. Once the clump of carrots had thawed out, I mixed everything together really well. As expected, this mix attracted lots of worms and ended up being processed quite quickly (needless to say, not much evidence left by the time I next checked on things!).
Last thursday (May 3rd) I added 1925 g (4.24 lb) of frozen-then-thawed food waste, once again mixed with living material.


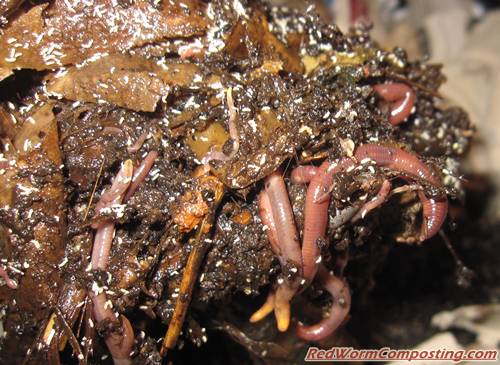
What’s really cool is that the mix hasn’t ended up smelling at all since then, and as I discovered on Wednesday (this week), most of the food waste has already been processed! When I dug around a bit in the feeding zone I found LOADS of Red Worms and springtails seemingly occupying the same habitat and getting along just fine (thank you very much! lol) – whether or not this will be the case in a bedding-dominated system remains to be seen, but I am certainly interested to find out!
Given how well-processed the last batch of food was, I decided to add some more today – this time it was 1053 g (2.32 lb) of frozen-then-thawed food waste mixed with more living material. There was no particular rationale behind adding that quantity – it just happened to be the amount that was in the bag I grabbed out of the freezer earlier in the day.
All in all, it looks like things are really starting to hum along now that I am actually putting some effort into feeding the system regularly. I will aim to add even more waste materials next week and once again attempt to remove some vermicompost from the bottom. I suspect there will be far fewer worms down there now with all the tasty food materials being added up near the top, but we shall see!
Stay tuned!
8)
Worm Cocoons?
RWC reader, Jackie “Grammie” Wolverton, recently sent me a really nice shot of some material from her worm bin. She had come across some interesting capsules and was wondering if they were worm cocoons.
I asked Jackie if I could share the photo here on the site, since I knew others would benefit. She happily obliged.
(Thanks again, Jackie)


As I explained, these are actually fly pupae, not worm cocoons. In the close-up (I created using a photo editor) you can see what an empty worm cocoon looks like in comparison. They (cocoons) tend to have more of a rounded tear-drop shape, and range in color from yellow to dark brown (when close to hatching).
There are various types of flies that can lay eggs in a vermicomposting bin – the house fly typically being the most common, especially when a bin is indoors (or at least semi-indoors, such as in a garage). Before you find these capsules, however, you will almost certainly find an abundance of white maggots in the bin.
House flies tend to be more attracted to smelly waste materials (like rotting meat), but I don’t doubt that they would invade a worm bin if that was the best “food” option they had available.
It’s important to note that there is also a fly called the “Stable Fly”, which looks like a house fly and produces similar pupal capsules as well. It actually seems to have a much greater tendency to invade the sort of waste materials that could be found in a worm composting bed. I’ve found plenty of them in aged manure and coffee grounds, for example. You’ll know you have these guys (as opposed to regular house flies) if they land on you and bite you! lol
Anyway – thanks again to Jackie for sharing!
8)
The Buried Bucket Bin
Question from Bill:
I would like to start a new garden spot for next year and had an idea.
Could I dig a hole large enough for a 10 gal. Plastic bucket in
proposed garden spot to be buried 100%(no lid) filled with bedding
then place a 3 ft. Square 6″x6″ compost box on top of bedding bucket.
This would allow my wife to simply dump composing material into box
and walk away. Will use plywood as lid on box to keep “critters” out.
We live in SW Kansas where weather is harsh and we travel some so need
to have farm be self sustaining for a week at a time. We do have
neighbors that water current garden but want to build new spot a year
in advance about 100 sq.ft. in size so plan on moving compose box
about every 3 months.
Hi Bill,
This is a really interesting idea – and actually a great strategy for those living in areas with extreme weather (hot, cold, dry etc). You didn’t actually mention worms, but I am assuming that this would be a vermicomposting system.
Rather than simply putting bedding in the lower bucket, I would recommend mixing the bedding (well moistened) with some food waste materials and letting that age for a bit before adding the worms. This way you would be creating more of an appealing worm habitat than the bedding alone would provide.
I would also make sure that: A) the bucket had plenty of drainage holes in it, and B) that I used bulky bedding like shredded corrugated cardboard (cut into strips using a box cutter, then let sit in bucket of water before shredding by hand). There wouldn’t be much air flow down below the ground in a bucket like that, so best to keep the habitat materials as bulky as possible (vs something like peat moss, for example).
In the upper bin, I would add (water-rich) food wastes and more bedding both initially and on an ongoing basis – but as you suspect, you should be totally fine leaving the system for periods of time without any new additions once it’s up and running.
Your plan to move the system around sounds like a great way to create a number of very fertile planting zones – and I have little doubt that the worms (again, assuming you are using them) should really help to speed up the process and leave you with a superior compost for the plants.
8)
Springtail Experiment-5-08-12

I checked on my two “springtail experiment” bins late last week to see how things were coming along.
I should mention right off the bat that some additional food was added a short time after stocking the the bins with worms (a few weeks ago) – equal quantities (100 g) of diced turnip, which had been frozen and thawed beforehand.
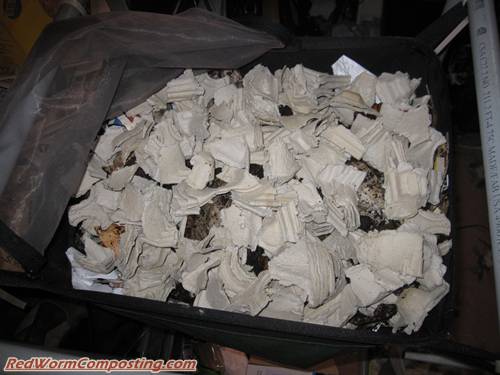
The initial appearance when I opened both bins was quite similar – essentially bedding materials with an abundance of gray-colored mold growing over it. As you can see in the middle photo, however, the springtail bin did have some critters (namely springtails and white mites) up at the surface.


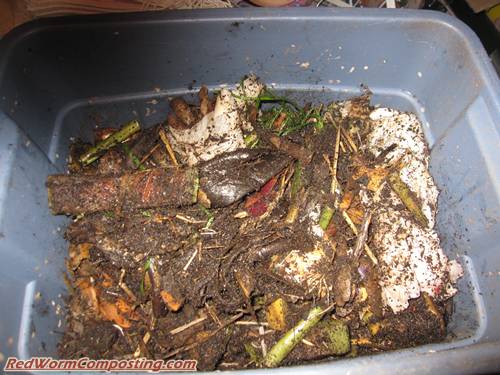
When I dumped the contents of each bin things changed though – I started to see some interesting differences, apart from the presence of springtails in one bin and not in the other. The bedding in no-springtail treatment seemed to be somewhat dryish at the bottom in comparison to the springtail bin – which almost seemed to be dripping with water. In the springtail treatment there were virtually no worms down near the bottom, yet this seemed to be where most of the worms were hanging out in the no-springtail treatment. I found this odd since most of the food materials had been added up close to the top.
Speaking of food materials…
As I made my way through the bedding I was able to find quite a bit of semi-recognizable turnip goo (for lack of a better term) in the no-springtail bin, yet there was hardly a trace of it in the springtail treatment. I finally started finding Red Worms up in this zone in the springtail treatment as well. I will have to do an official count the next time I check on the bins, but it seemed as though there might be fewer worms in the springtail bin overall. It would certainly be an interesting find if that were the case.
Getting back to the higher moisture content in the bottom of the springtail bin (mentioned earlier), I suspect this is largely due to the fact that more of the turnip has been processed in this treatment (i.e. less water locked up in turnip tissue).
Not much else to report on thus far, but I’m definitely looking forward to seeing how this one continues to play out.
Stay tuned!
8)
Red Worm Stocking Density?
Question from Joe:
How many worms do I need for a 4′ x 5′ composting bin and 7 raised
beds that are 5′ x 17′ x 1′ deep?
Hi Joe,
In my mind there are two main schools of thought regarding the “proper” stocking of a vermicomposting system (we’ll talk about your raised beds in a minute).
1) The “x lb of worms per sq ft” approach – the idea here is that you stock a certain quantity of worms per square ft of your bin’s upper surface area. An example of this can be found in Mary Appelhof’s “Worms Eat My Garbage” – she recommends one pound of worms for every 4 sq ft of bin space. So a bin that’s 2×2 would be stocked with 1 lb of worms.
This is a solid approach (and likely the most commonly used/recommended), especially when you are ordering worms by the pound. Some of the potential “negatives” can include restless worms, worm mortality, and greater cost.
2) Add worm-rich material (from another system) and not worry about exact quantities – this has been my preferred approach for quite a few years. What I like about it is that you are allowing the worm population to expand naturally to an ideal level based on the resources available (this can happen quite quickly with a new bin) and you are also adding lots of great starter material/organisms to help the worms get settled into their new home.
This can require a bit more patience, and the wormy material may not be readily available (assuming you don’t already have another vermicomposting system up and running), but on the plus side it’s more of a “natural” approach with fewer headaches early on (assuming you can resist the urge to add a lot of food) and can result in the rapid development of a large, healthy worm population. This approach can also be less risky/costly for those fairly new to vermicomposting.
Getting back to your question, Joe…
Assuming you are looking for a specific quantity of worms, according to Mary’s calculation your 4×5 bin should take about 5 lb of Red Worms. If you are fairly new to vermicomposting, my recommendation would be to start with less than that – perhaps 2 or 3 lb. Just make sure you get the bin set up like a worm bin (not a regular compost bin) beforehand, and keep a close eye on the temperature. A bin that big can easily overheat.
As for the raised beds – if these are being set up in a typical raised bed manner (eg “Square Foot Gardening” type of approach), I wouldn’t recommend stocking them with composting worms at all. Remember, they are not soil worms so they won’t do well in a typical garden bed.
If you were planning to mix in a lot of well-aged farmyard manure (real farm/stable stuff – not store bought) into the bed it would likely support some Red Worms. You could also install a vermicomposting trench or “Worm Tower” in the beds, and then simply stock those with worms.
Hope this helps!
8)