
May 2012
Large Flies in Worm Compost Bin
From Bonnie:
I have a recent problem with large (horse?) flies in my worm compost
bin. Fruit flies are not a problem but I do not know how to get rid of
the large flies. There are quite a few. Thanks for any help you can
provide.
Hi Bonnie,
My hunch is that those are Black Soldier Flies since Horse Flies wouldn’t likely be attracted to a composting system.
Apart from putting the system inside some sort of screened enclosure, I’m not really sure how you can prevent soldier flies from laying eggs in an outdoor worm bin. Black Soldier Fly larvae are great composters as well, but you may find that they outcompete your worms over time (eating all the wastes and creating an environment that is unfavorable for them).
The ideal outdoor system for allowing them both to coexist would likely be a larger bin in a shaded or partially shaded location, with an open bottom and pit down below so the worms are able to hang out below the bsfl zone where it’s cooler.
Regards
Bentley
**For Even More Worm Fun, Sign Up for the RWC E-mail List!**Bagged Manure-05-30-31

Quick update on the bagged manure “compost” front.
Remember how I said I hoped I’d end up being “surprised” by the results of this one? Well, so far that’s definitely been the case! Worms have moved into the material in both of the beds it was placed in. Again, in some ways this was to be expected in the case of my not-so-ultimate (lol) bin, which I’ve been having no luck keeping nice and moist – but I was still surprised by the number of worms (lots) I found in the compost.
I’m actually starting to think that this might be something of an “ultimate” missing ingredient that could help me to get this bed back in good shape, since it holds water very well, yet it doesn’t have the same heating potential of even the well-aged horse manure I have in my other beds.
I only had a small amount left, however, so I simply put more in the corner where my original test spot was located (will let you know what I did with the rest of it in a minute).

As you may recall, what I really DIDN’T expect to see happen was worms moving into the sheep manure compost that I placed in one of my aged horse manure beds. It wasn’t quite as many worms (as in the “ultimate” bin), but interestingly enough, there now seems to be more worms in that zone than in surrounding aged horse manure zones!
I have a sneaking suspicion that temperature and moisture content are playing an important role here. It’s been very hot as of late and the worms seem to be congregating down near the bottom and sides of my outdoor beds. The material up higher tends to be very warm and not nearly as moist. The sheep manure compost on the other hand seem to hold moisture better, and it doesn’t feel as warm, so this may help to at least partially explain why the worms are attracted to it.
The next thing I want to test is the use of sheep manure compost in an indoor bin. Yesterday I mixed up the remaining amount with some water then put a big dollop of it over top of some bedding materials in one of my Euro bins. Almost looks like a fresh cow patty! lol

NOTE: Please keep in mind that this is an experiment, and that I have many years of experience with this sort of thing. I would NEVER recommended adding wet sloppy material like that (and that quantity), much less any sort of (untested) “manures” to an enclosed plastic bin. This particular bin actually has really good aeration, and lots of absorbent bedding in it, so I’m very confident there won’t be any issues at all.
I’m actually really interested to see what the Euros do with it! Temperature and moisture content aren’t going to play as important a role as they do in the outdoor beds, so if the worms do show an interest I think it may suggest some actual “food” value.
Anyway – lots more to come on the bagged manure front! Now that I know it has some potential value, I want to conduct a variety of tests with it, and try out some other kinds of bagged manures. It’s pretty inexpensive stuff, so it could potentially end up being a good habitat material to mix in when setting up a normal worm bin!
8)
My New Wooden Flow-Through Bin
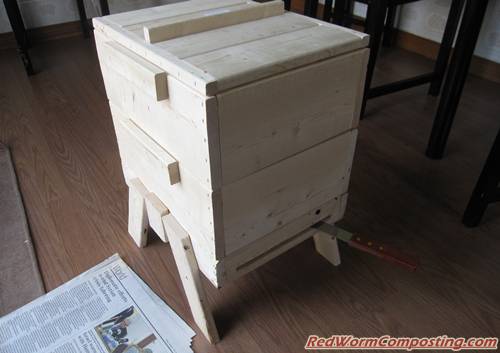
Not too long ago I received yet another worm bin for testing – this time a hand-made, single-compartment flow-through bin from Wood Worm Farms. Truth be told, when I happened upon an image and description of the bin on the site a little while ago I immediately emailed them to see if they’d be interested in having me do a review. I’ve been wanting to test a small single-compartment flow-through like this for quite some time, and this one looked way too cool to pass up!
As some of you (looooong-time RWC readers) may recall, I actually own another bin from Wood Worm Farms – a 5 tray stacking bin I’ve used for a few different projects, including the “Four Worm Reproduction Experiment“.
Here are a couple of other posts you may want to check out:
My New Stacking Worm Bin
Wooden Stacking Bin – The Return!
In all honesty, it’s not a bin I’ve been all that impressed with, however. My main complaint is that the trays are far too shallow. This combined with the wood construction (more “breathable” than plastic) makes it much more difficult to keep the contents nice and moist. This shouldn’t be nearly as much of an issue with the new bin.
At first I assumed this one was a stacking bin as well (with nice deep trays), but there actually isn’t a screen on the bottom of the second level – it’s simply added when you want to increase the volume of your “single compartment”. As you can see below (with my cat for scale), it’s not a huge bin – about 1 cubic foot of vermicomposting space with both levels added, but I think this actually makes it more appealing (nice and compact – great for those who don’t have a huge amount of space).

The screen floor at the bottom also seems better quality than the tray screens in my WWF stacking system, and it even comes with a nifty little tool for loosening up the vermicompost once it’s ready. There isn’t any sort of “reservoir” attached to the bin (as there is in Worm Factory, and similar, plastic stacking bins), but it did come with a tray that sits nicely underneath the unit (you can see it in the image with my cat).

Yesterday I decided to start getting the system ready for use. I mixed some (frozen-then-thawed) food waste and living materials together and added it over top of multiple layers of newsprint laid down inside the bin.


I then mixed in some shredded cardboard and wet everything down fairly well.

I’ll likely leave the system to sit for at least a couple of days before adding any worms. As per usual, I don’t have any specific quantity of worms in mind – but I am thinking it would be nice to hit the ground running, so I’ll likely add more than I usually do.
Stay tuned! I should have another update for you sometime next week.
8)
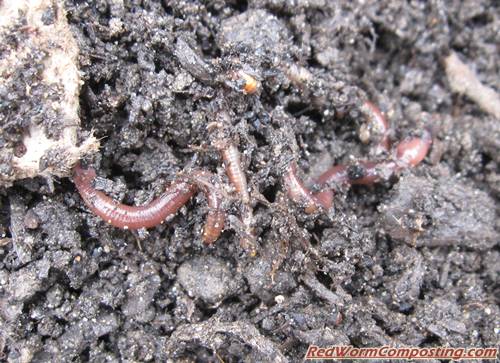
Store-Bought “Manure” as Worm Bedding/Food?
Something I’ve been meaning to test out for quite some time now is the potential value of bagged, store-bought “manures” and “manure composts” as a vermicomposting bedding, or even food source. Typically I’ve recommend that people avoid using them, since they tend to be nowhere near as nice in consistency as a real aged-manure (straight from farm or stable), not to mention the fact that they are basically sterilized. I’ve also wondered about potential salt content in some of these materials (remember, worms are VERY sensitive to salts, even at low concentrations).
Nevertheless, it’s always important to actually test things out – so that’s what I’ve decided to do! For my first trial, I am using a bagged “sheep manure compost” that was purchased from a local grocery store garden center. I am testing it in two different beds: 1) In a bed containing a beautiful, rich aged horse manure mix (that the worms absolutely go bananas for), and 2) In my “ultimate” bin (a work-in-progress for sure), containing mostly shredded cardboard and coffee grounds.
Opening up the bag and examining the material this morning did nothing to increase my optimism re: the value of this composted manure as a bedding/food. As you can see it is gray in color, and almost looks like it was mixed with a fine-grain sand (very gritty).

When I soaked it down (figure it will have a greater chance of attracting worms if it’s added nice and wet) it basically turned into mud – almost looked like wet concrete in fact! lol

As you might imagine, I have the lowest expectations for the material that I’ve added to the aged-horse-manure bed – the only redeeming quality I can see this material having (in comparison to the aged horse manure) is perhaps a greater water-holding capacity. But you never know!

I think the sheep manure compost added to my “ultimate” bin has a MUCH better chance of being colonized by worms, since I’ve been having difficulty keeping that bin well-moistened, and quite frankly, I wouldn’t be surprised if it offers a preferable habitat to the cardboard and coffee grounds anyway!

While I may seem pretty skeptical here, I should make it clear that I’m keeping an open mind, and am actually really hoping I end up surprised by the results (always fun when that happens)!
Will keep everyone posted!
😎
Worm Inn Journal-05-23-12
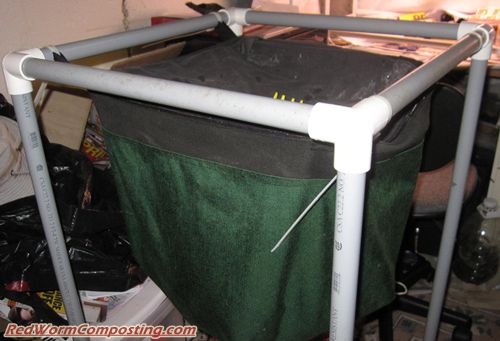
Still running a little behind with my planned Worm Inn updates (had hoped to provide one late last week), but the extra time certainly seemed to help the worms clean up every last remnant of food waste previously added! lol
Given how well the system is performing, I decided to try and “push my luck” a little (lol) by adding quite a bit more (frozen-then-thawed) food waste today – 3187 g (7.03 lb) to be exact!

Mixing the wastes with “living materials” seems to be helping a lot so I’m continuing to do so – in other words, the total amount of material that went into the Inn today was a fair bit more than 7 lb!

Apart from mixing the living materials with the waste, I also decided to use it as a cover material as well. Don’t think I’ll need to worry about any funky smells as a result of this coverage, but ya never know (that IS a lot of waste after all).
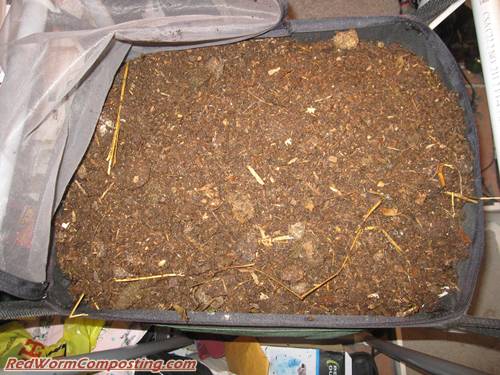
As you can see in the picture, the Worm Inn is totally full of material – so I definitely need to get back to harvesting vermicompost from the bottom. I was in a bit of a hurry today, so I’ll likely just wait until early next week to do so (certainly won’t be adding any more wastes between now and then).
Stay tuned!
8)
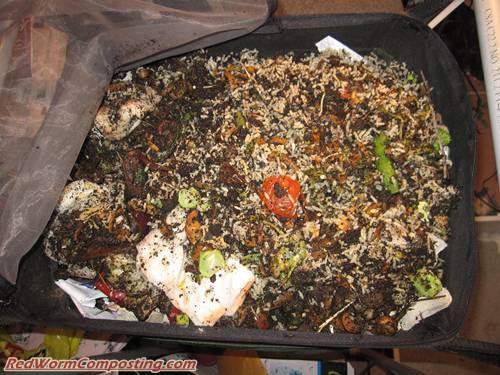
Bentley’s Ultimate Bin-05-18-12

Things have continued to move along (slowly but surely) with my “Ultimate Backyard Worm Bin” project. Most of the overheating has subsided and I’ve been seeing more and more Red Worms moving in (and even laying cocoons) – especially around the sides.
I’ve been mixing in more shredded cardboard and watering the system fairly regularly. I’ve also recently started adding lots of coffee filters (as you can see in the image above). As an added bonus, taking the time to rake out the filters and other materials in the coffee grounds mix (such as egg shells and small amounts of fruit/veggie waste) leaves me with some nice looking grounds that I’ve started laying down as a mulch. Previously, the stuff coming from the coffee shop was only fit for hidden applications. lol
As you can see below, my first mulching project has involved creating a nice thick bed of grounds out in front of my backyard composters. I wish I had some “before” pictures for this location – it was a REAL eyesore (OK, so it’s still a work-in-progress! Haha)! Apart from just making this corner of the yard look nicer, I also want to see if the mulch bed will end up with lots of Red Worms in it. I suspect that I will need to pile it on pretty thick if I want to keep it from drying out all the way down, but we shall see!

Getting back to the ultimate bin…
I recently received a huge load of beautiful well-aged horse manure (even had some Red Worms already in it) and I am toying with the idea of adding some to the bin. On one hand this sort of feels like “cheating” since I really wanted to see how the worm population would do in a cardboard-dominated bin, but at the same time, if this is really going to be an “ultimate” bin I need to do everything I can to create the best habitat for the worms.
I will definitely give it some more thought, and let you know what I’ve decided to do in my next update!
8)
Euros vs Reds-5-17-12
It’s been more than two months since my last “Euros vs Reds Head to Head Challenge” post (see “Euros vs Reds-3-8-12“), so I figured I’d better check on things. lol
Right off the bat I’m going to say that this is definitely the LAST time I am counting cocoons (and likely even juvenile worms)! Man oh man – if you’re looking for a way to burn through hours it’s great, but for the rest of us…
😯
Griping aside – I must say that the results were pretty wild (objective scientific lingo, I can assure you)!
Here are the quick stats before I elaborate a bit:
~ Red Worms ~
Cocoons – 78
Empty Cocoons – 18
Juveniles – 10
Adults – 8
~ European Nightcrawlers ~
Cocoons – 104
Empty Cocoons – 59
Juveniles – 71
Adults – 8
If the difference between the two isn’t surprising enough as-is, I should also mention the fact that I was NOT even able to go through the Euro bin as thoroughly as I did for the Red Worms – it was simply taking too long. I don’t think the numbers are TOO far off, but I wouldn’t be surprised if there were 20 or more additional cocoons hidden away. As you may recall from my last update (linked above), in spite of the fact that Euro cocoons are bigger than Red Worm cocoons, they tend to be a lot more challenging to find in among the castings (which are also a fair bit bigger) and fragmented bedding material.
Bottom-line, the Euros seem to be kicking butt in this comparison experiment! Of course, we can’t really make any generalizations based on these results. For one thing, I did give the Euros a pretty decent head-start (especially when considered in hindsight!). I added 6 adult Euros and 2 cocoons, while the Red Worm bin only had 6 juveniles at the beginning. In light of this I guess it’s not too surprising there are so many cocoons and juveniles in the Euro bin. The picture below says it all!
😆
I am also wondering if the lack of “real” food has had an impact (I have fed these bins very little over the past few months). Perhaps the Euros are better at deriving nutrition from bedding materials than Reds. I definitely want to see if adding food on more of a regular basis makes a difference.
I still have a sneaking suspicion that the Reds are going to catch up, but only time will tell!
As I alluded to above, from here on out I will only be counting adults for the sake of saving time (and my sanity). This obviously isn’t the greatest way to compare them right now – so I AM glad I did one last cocoon and juvenile count – but as the populations grow in size it should become more and more valuable as an indication of overall “success”. I have little doubt that there will be more adult Euros (than Reds) the next time I check on the bins, but beyond that it’s hard to say for sure. Should be interesting.
Will be sure to keep everyone posted!
8)
Previous Posts in Series
Euros vs Reds-3-8-12
Euros vs Reds-2-21-12
Euros vs Reds-2-09-12
Euros Vs Reds – Take Two…and…ACTION!
The Euros vs Reds Head to Head Challenge