
November 2009
The “Mini” Worm Composting Bin
As promised, I have put together a video outlining how to make a smaller version of the “Bait-O-Matic 6000“. I actually created the “Mini” system long before the BOM-6000 was even a goofy daydream in my brain – about a year and a half ago, to be specific. As I explain in the video, I decided to make it so I could sell it to local worm customers. I didn’t have any sort of “worm bin” for sale at the time, and people often wanted to get started with some sort of “kit” – rather than having to figure out how to create their own system etc.
I did eventually stop offering these bins in favor of helping people make their own systems (via videos like this one) – when it comes down to it, I would just rather spend my time playing with worms and writing about it on the site, rather than building worm bins!
Like the BOM-6000, the key feature of the “Mini” is the air vent system. These little plastic vents are a great way to increase air flow in a worm bin (as compared to drill holes), and if I do say so myself, they certainly make the bin look a bit sharper as well.
I’d like to take the opportunity to thank Jeff “The Friendly Worm Guy” for originally telling me where to buy these vents. As I discovered, they are NOT the easiest things in the world to track down!
Anyway – I hope people enjoy the video. As mentioned in my recent newsletter, there will be a number of new videos on the way over the next few weeks, so stay tuned!
8)
The Bait-O-Matic 6000
Every so often, there comes along a product SO original, SO ingenious, SO revolutionary, SO HUGE…that it completely changes the way we live our lives FOREVER! (and ever!)…
🙂
Oh, and if you want to learn more (after watching the video of course) be sure to go >>HERE<< Hope everyone (in the U.S.) is enjoying their Thanksgiving weekend!
The Jumbo Food Scrap Holder

In my winter windrow post, I mentioned a “new food scrap storage approach” – the one I’ve adopted specifically for this winter composting experiment.
As many of you know, I am a big proponent of storing food scraps in some sort of container/bag for a period of time prior to adding them to a worm composting system. Aside from allowing the materials to pile up a bit, it also gives everything the chance to start rotting a little (i.e. gives the microbial community some time to become established). In the case of winter composting I am obviously NOT going to want to head out to my winter bed EVERY time one of my small food scrap bags is full! Not only will it mean trudging out into the cold a lot more often, but it will also be really counter-productive.
We are trying to conserve warmth as much as possible, so it obviously doesn’t make all that much sense to be opening up our tarp and digging around in the windrow all the time – valuable warmth will be lost everything we do this. By adding a lot more material at once, we not only greatly reduce the number of trips, but we also add a large quantity of (indoor-temperature-warm) ‘fuel’ material all at once, thus helping to generate warm zones in the bed.
As you can see in the picture, the vessel (for lack of a better word) I have chosen for my ‘jumbo food scrap holder’ is a large horse feed bag. I tried to find the volume of the bag written somewhere on it, but had no luck – I’m sure most farm folks will have a pretty good idea of size I am talking about here. Sitting flat on the floor, the top of the bag comes pretty close to my hip.
Like any ‘food scrap’ holder, this one started with a good ‘false bottom’. I had two cardboard pizza boxes sitting around so I decided to shred them up for this purpose.

Two pizza boxes shredded into small pieces

‘False bottom’ of shredded cardboard – helps to absorb moisture and improve air flow
I also had a big bowl of food scraps ready to go, along with another small bag full (I keep a biodegradable bag in a special scrap holder under my sink). Interestingly enough, the material from under my sink had a pretty decent fruit fly population, which actually surprised me since they hadn’t really made their presence known. As I’ve written elsewhere, I have been battling a pretty bad infestation in my basement, which I am happy to report is finally starting to dwindle – but the fly numbers upstairs has been pretty minimal, or so I thought.

Big bowl o’ food scraps ready for the new scrap bag – a typical daily amount
We are still doing a lot of juicing these days so that has really helped as far as producing lots of ‘worm food’ goes. We basically fill the big plastic bowl (pictured above) every day, so it won’t take all that long to fill my big scrap holder, despite its ‘jumbo’ size!
🙂
One thing to mention, given the fruit fly presence in the house still, I decided to put the big bag out on my deck while it is getting filled. Once it is ready to be added to the windrow, I will bring it back inside and let it warm up for a day or two (making sure to prevent any fruit flies from invading it). I will still be harvesting worms from my outdoor bed for local customers so the last thing I want to do is start them off with a fruit fly invasion as well!
😯
When we set up the big winter bed we used most of the materials I had on-hand, but I made sure to hold on to some of it so I would still have some extra stuff to add along with my food waste. One particularly nice leftover – and an accidental one at that – was a garbage can full of beautifully mulched grass clippings and leaves. Had I realized it was there, I almost certainly would have added it along with everything else. In hindsight, I am definitely glad it went unnoticed!

Mulched leaves and grass clippings – perfect winter worm food
This material will work really well as a bulking agent to mix with my food wastes in the jumbo sack, along with more shredded cardboard etc. Again, these sorts of materials will help to improve air flow (important for heat-generating microbial activity) and up the C:N ratio – we certainly don’t want to end up with ammonia gas being released (a common occurrence with low C:N) inside the windrow. With the grass clippings mixed in there, this stuff will also be a great winter food as well (likely a fair bit slower to break down than the food scraps).

Food scraps covered with a layer of mulched grass and leaves
I have at least a few of these horse feed bags so I may even fill them ALL before adding them to the windrow, again helping me to compound my bed-warming efforts. Speaking of ‘bed warming’ – things seem to be moving along very well in that department. The last time I checked, the tarp over the bed was actually somewhat warm to the touch. I was a little worried by that, but when I opened it up the bed itself didn’t seem overly warm by any means. I will need to keep an eye on this during the early stages of winter, since we definitely want to save most of that heating potential for later in the season when we REALLY need it!
8)
Parasitic Worm Bin Mites?

Along for the ride, or causing harm? Tiny mites hold on tight as this beetle scuttles about
This is a topic I have been meaning to write about for quite some time – what stinks is that I definitely had more photos to include but now can’t seem to find them at all.
One of the things that kinda held me back from writing about this sooner was my concern that many people might start to worry about ALL the mites that appear in their bins. I’ve tried to emphasize the fact that there are countless different species, and literally only one or two even known to be at all parasitic to worms, but I suspect that photos like these ones I’ve included might still strike fear into the hearts of a lot of worm bin caretakers. That being said, I think just the appearance of the beetle larva picture below might be enough to do that!! (wouldn’t want to encounter a human-sized one of those in a dark alley!)
😆

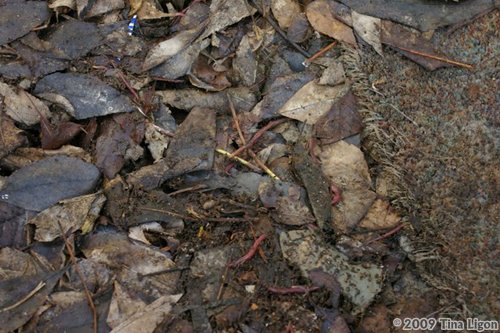
Over the past couple of years I have encountered similar situations as the ones pictured above on a number of occasions (and as mentioned above I even have some other photos – hopefully I can track them down). What I have noticed is that the ‘host’ (assuming this is indeed a case of parasitism) is always an arthropod (a member of the large group of organisms that includes, insects, spiders and crustaceans, among others). Apart from various beetles (and beetle larvae), I have also found these mites on the back of woodlice (aka ‘sow bugs’ or ‘pill bugs’) – a type of terrestrial crustacean.
I have yet to see anything similar to this going on with the worms. Back when I was fairly new to vermicomposting, I certainly had my fair share of experiences with white mites coating my unhealthy or dead worms, but as I’ve written multiple times before, that is not parasitism or predation – those mites are scavengers and are simply taking advantage of a readily available (and nutritious) food source.
Anyway, I’d be interested to hear from others about this. Has anyone observed mites on the backs of various other critters in your worm bins?
BTW – if I ever did see mites that looked similar to those in these pics on the back of my worms I likely WOULD be a tad concerned. There are frequent reports of a reddish/brown parasitic mite that can invade worm beds and attack the worms. I don’t want people to get paranoid about this though. As is shown in the video (put together by Christy Ruffner) I recently posted on the blog, when there is a massive mite population explosion in your worm bin it can certainly look as though the mites are attacking the worms (since they are everywhere!), but it’s important not to jump to conclusions too quickly. If you set out melon pieces (as outlined in the video) and find them coated with the mites, you almost certainly have the regular brown worm bin mites.
In all honesty, I am still a wee bit skeptical that the parasitic ‘red mite’ issue prevalent as some have suggested. Seeing the concentrations of mites in Christy’s video (still gives me the shudders – haha) I can certainly see how some people would end up convinced that these mites are the ‘bad’ ones. Based on the background research I’ve done, my understanding is that the mites that are parasitic on earthworms are reportedly pretty rare.
That being said, I’m certainly still keeping an open mind about this! If anyone has some convincing shots with parasitic red mites on worms, DO let me know! I certainly won’t be shy about ‘eating crow’ on this one!
🙂
Winter Worm Composting Windrow

Phase I of my new winter worm composting project
In the most recent issue of the newsletter I wrote about my success with rounding up a bunch of fall leaves last week (most of them – more than twenty bags worth – came from one neighbor). It was really cool, and also provided me with a valuable lesson in the importance of ‘stepping outside your comfort zone’! Next fall I’m definitely going to make more of an effort to let people know what I’m doing, thus (hopefully) helping me to collect even more of these sorts of materials from my nearby neighbors!
With bags and bags of great worm composting materials in hand, I decided that it was finally time to get my outdoor beds ready for winter – originally it was planned to be a ‘winter slumber’, but after giving it more thought I ended up deciding it was time to try out a new winter worm composting system this year (my third in as many years). There is no doubt that last year’s winter worm bed was HUGELY successful, and I know I will be making another one just like it at some point down the road, but the major issue with that system is the fact that it is sitting in my dad’s backyard – not mine!
The time involved in hauling materials over there, and just generally driving back and forth really doesn’t make too much sense to me anymore – I have really big plans for the next few months and a lot of work ahead of me (much of it on my computer – wink wink), so I need to be much more of a ‘home sticker’ this winter. Of course, I still want to have my yearly Winter Composting “Extravaganza” though! I can’t let my loyal readers down!
😆
Apart from that, its just WAY too much fun to go out in the middle of a blizzard (while my neighbors look on in disbelief) and feed my worms!
I am really excited that this year I am going to have the opportunity to try something completely new – and as the title of the post implies, it’s going to be a ‘winter windrow’ this time around! Earlier this week my dad and I basically winterized ALL my outdoor beds (those that haven’t already been emptied out – well apart from my big wooden worm bin, which will be emptied very soon) – we put some extra focus on one particular stretch of bed, which is going to be my designated winter bed. Obviously, it doesn’t make a whole lot of sense to try and keep EVERYTHING out there active. I’ll just end up spreading my resources too thin (literally) and it will be a lot more difficult to maintain.
I selected a stretch of trench bed perhaps 20 feet in length (will do some actual measurements before too long – I might be WAY off here!), and we added a lot more material in this area – although you wouldn’t know it by looking at the pics. The entire garbage can of pumpkin waste (basically liquified by this point) was mixed with a considerable amount of mulched grass clippings/leaves from my own property and added, along with some aged horse manure, some miscellaneous yard waste, lots of fall leaves, some material (with lots of worms) from other stretches of the bed (those not part of the fully protected system) – and of course lots of straw.
The other stretches of trench beds received mainly fall leaves and straw – which should be just fine for keeping everything alive and kicking over the winter.

Similarly, the sandbox worm bed was mounded up with organic matter (mostly fall leaves and straw) as well. You may recall that I added a big tarp (that had been folded multiple times) as an added layer of protection to this bed last year. Well, that tarp is going to be one of two sitting on top of the winter windrow this year, so the sandbox worms will simply have to make do with what they’ve got!

Have no fear though – with all the material that’s on there now, plus the snow that’s going to pile up on top, the worms will be snug as bugs in rugs down below!
This is basically “phase I” of the winter windrow set-up. While the tarp-protected stretch is certainly in good shape to keep the worms safe for the winter, there is no way I will be able to keep it really active the way it is. I definitely need a LOT more material. That’s where my system from last year will come in handy – all those nicely-rotten straw bales will be an excellent food material, and a great way to provide the windrow with a LOT of extra volume as well. Both tarps being used have plenty of room for expansion as well, so it should be no problem continuing to keep everything covered as well.
I will be making a video about this bed, showing exactly how it was set up etc – but will wait until I have added the material from the other bed.
I have adopted an interesting new food scrap storage approach for my windrow as well. Will write about that in another upcoming post!
Stay tuned!
😎
50 Cocoon Challenge Wrap-Up

Everything looking pretty well processed in original ’50 Cocoon Challenge’ Bin

We are getting pretty close to the 6 month mark of the original ’50 Cocoon Challenge’ (oh how time flies) so I thought it was as good a time as any to start wrapping things up – well at least as far as ‘phase I’ of the challenges goes. As mentioned in other posts, there are at least a couple of other 50 cocoon systems I want to test out (namely cardboard-only and straw-only).
All in all, it was a really interesting experiment – especially early on. As it turns out, and as per usual, I did very little to maintain the system over time so I definitely have mixed feelings over the significance (if any) of the current population status. My original plan had been to do a full tally of all the worms and cocoons in the system, but in thinking about it some more I realized that this probably wouldn’t be a good use of my time (and believe me, if I thought the results would be valuable I’d be all over that). You see, the system in no way shape or form represents anything close to ‘typical’ (ie the average home worm bin) – like I said, the early findings were very interesting, and in my humble opinion helped to shed some more light on the potential for Red Worms to hatch and grow quite rapidly (as you may recall, within 6 weeks I was finding fully developed adults in the bin). Obviously we can’t make any grand sweeping generalizations here, but clearly it IS possible for these worms to grow to adulthood in a matter of weeks.
If I had continued to feed the bin on a regular basis, I can only imagine how many more worms there would be – and believe me, there are a LOT. There are also many many cocoons in the mix as well. As you can see, one of the other interesting finds in the bin was a VERY determined avocado plant!
🙂

On the off chance that I might want to do something further with this material/worms (apart from transferring everything to a new system that is), I decided to dump the contents of the bin out into one of my open tray systems. The material is very wet and gooey so even if I DID want to do some sort of population assessment, I would at least need to let everything dry out quite a bit.
So we shall see – perhaps if I am feeling extra motivated I will start carefully removing material (separating out any cocoons and worms I find) and see if I can effectively and quickly concentrate the remaining worms. If nothing else, it would at least be kind of interesting to see what sort of a ‘gob’ we’ll be left with.
One other semi-related tidbit to throw your way. I also have plans to start-up a second ‘Four Worm Reproduction Experiment‘ which should be a lot of fun! This time I will be using a fairly typical system (although as you shall see, it is a bin I haven’t used before or even made mention of), rather than the stacking flow-through bin that kept drying out on me. I think it will be really interesting to see the difference! (and yes THIS time there will definitely be ongoing maintenance involved – no more slacking!!).
Stay tuned!
8)
Previous 50 Cocoon Challenge Posts
The 50 Cocoon Challenge
50 Cocoon Challenge – Update #1
50 Cocoon Challenge – Update #2
50 Cocoon Challenge – Update #3
50 Cocoon Challenge – Horse Manure
50 Cocoon Challenge – Update #4
50 Cocoon Challenge – Horse Manure – Update
50 Cocoon Challenge Updates
Tina’s Outdoor Worm Bin Experiment
By Tina Ligon (Coal Creek Canyon, Colorado)
Our old refrigerator, we had the freon removed and stripped it of all parts
Background – This outdoor worm bin is located at ~7800’ in the foothills west of the Denver/Boulder area of Colorado (40 degrees latitude).
This experiment began in August 2009. We took our old refrigerator to a recycler and had the Freon removed and then stripped of all the mechanical parts so that we were left with a great insulated box. I did have to construct a new lid because the original doors got lost at the recyclers. I drilled several holes in the bottom for drainage. I also had to build a flat spot for the bin as is the case with all yard projects when you live on a slope. The original bedding consisted of old compost, straw, sawdust, shredded cardboard and some kitchen/garden scraps for a depth of about 4 inches. When leaves became available, I added a 4-5 inch layer as a food source and insulation.

I had to build a new lid because the door got lost at the recyclers
Once I had the bedding in place for about a week, I went to volunteer for our local worm man, John Anderson (http://www.cowormman.com) for a morning in exchange for a wealth of information as well as a five gallon bucket of worms and bedding. I can’t tell you exactly how many worms were in there, I didn’t count them. After I checked the bedding to make sure the temperature was staying pretty constant I dumped in the worms and let them settle into their new home. There is a carpet cover on top of the bedding to help maintain moisture and darkness.
After the initial break-in phase my goal was to increase the volume of the bedding before the weather cooled off for more thermal mass. So I dug into one end and added more bedding (similar to the original mix). So the total height was about 6-8”. Note on bedding: I keep an ongoing pile of cardboard egg cartons, shredded newspaper, other torn cardboard and a trashcan of leaves to add when I feed.
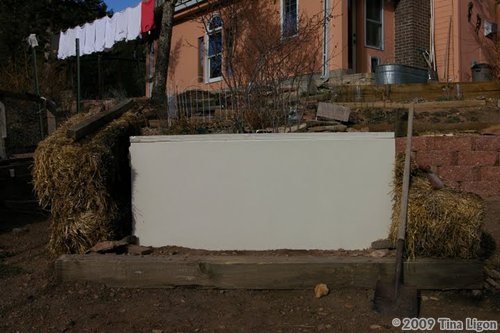
This is 2 inch insulation cut to fit the box
I also took some 2 inch rigid foam that I had and made an insert for the top of the bin. There are some gaps so it is not airtight. This piece of foam seems critical to keeping the inside of this bin warmer and moister. I have added some old straw bales on the non-south sides of the bin for added protection, especially on the west end to block our prevailing westerly winds.
Old carpet covering the worm bed
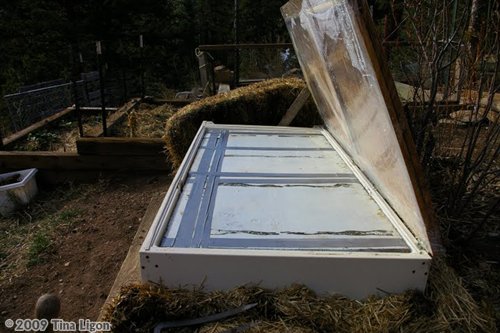
The temp has cooled off to about 65-70. My goal is to keep it in this range. On sunny days that I am around and can monitor, I open the lid and put a translucent cover on the bin to get some solar gain to heat the bin. You do have to watch this as it is amazing how warm it can get in there. But I am hoping this will help me with heating during the winter as we do usually get some sunny spurts of weather here for most of the winter. We have already had a few significant snowfalls (a couple of 1 footers and 1 – 3 footer) and cold spells (extended cloudy weather and temps in the teens) and so far so good. I realize this is the beginning of the winter season and have the colder weather to go yet.

Trying to warm these wigglers up a bit, solar power!

I have harvested about 4 pounds of worms out of the bin to start 2 indoor bins (the Rubbermaid type). One I gave to my neighbor and the other is my insurance of a worm supply in case of an outside disaster.
I have worms of all ages and stages going in the outdoor bin. There are lots of cocoons and babies so all seems good. The plan is to harvest the castings in March (assuming a stretch of decent weather) and put the worms back in with new bedding. If all goes well there should be extra worms by then to try some other projects. I have also started a log for temperature data and notes.
Silly lesson learned number 1 – Worms need air – As the weather started to cool I thought I should try to tighten up the bin’s air leakage some. I added a seal around the edge of the top with a few small gaps. The next morning I went out and the worms were staging a mass exodus up the walls seeking air, oops. I removed the seal from the two short ends so more air can circulate and all seems well.
Silly lesson learned number 2 – Composting creates heat – I added some food scraps (which I keep in a five gallon bucket to start decomposing before adding) and covered with about 4 inches of leaves. There was enough composting action going on to heat up the area to about 90 and some worms were again staging a revolt and trying to leave. So I had to pull the leaves back to let it cool off a bit. I now make sure I add food to only half the bin at a time and monitor the temp for a few days. I am trying to use this to my advantage now to create wanted heat.
Some More Pictures
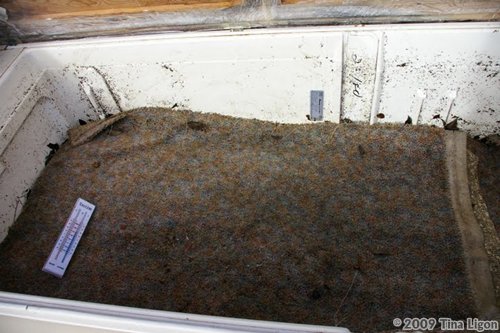
Happy worms, they love these rotting leaves

A 3-4 in. layer of leaves for more insulation and bedding/food, east end
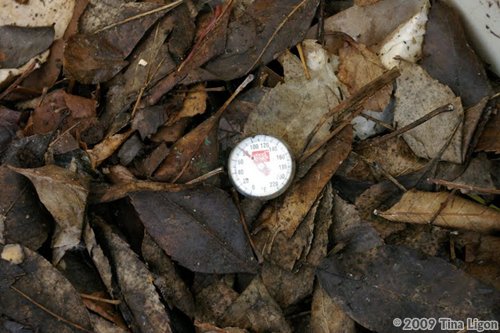
Kitchen meat thermometer, I fed this end over a week ago, it is about 4 degrees higher than west end

West end
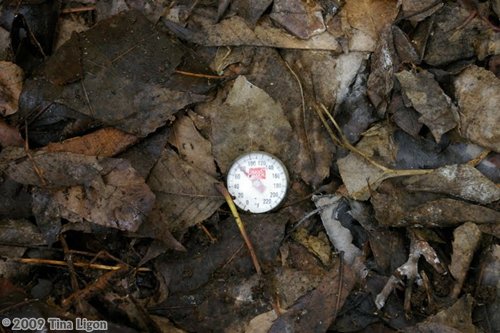
West end, 78 degrees
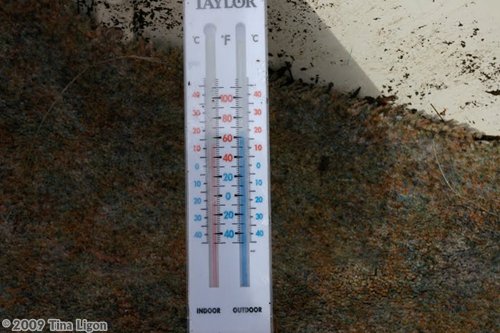
Simple thermometer with outdoor probe near bottom of the bin, reads 66, air temp 54
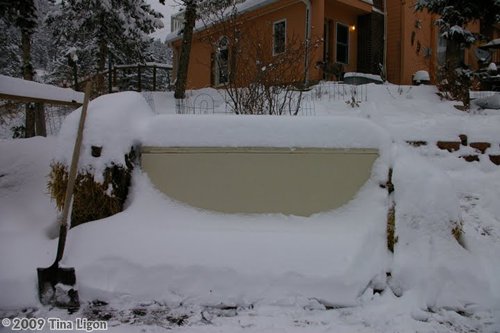
Some extra insulation
Bentley here – I just want to take the opportunity to send a BIG thank you to Tina for putting together this article and letting me post her great photos. Being the winter worm composting nut that I am, I was definitely keen to learn more when she first told me about the refrigerator worm bin, and am so pleased to include this among our great guest posts here on the blog. Speaking of which, if YOU have something vermicomposting-related that you would like to share, don’t hesitate to drop me a line!