
July 2011
Something BIG…
…VERY BIG!
…is coming soon!
8)
Until then, I may be a wee bit scarce around here.
Over and out.
**For Even More Worm Fun, Sign Up for the RWC E-mail List!**Quick ‘N’ Dirty Vermiponics

I must say that it can be a LOT of fun when inspiration suddenly hits me out of the blue. That’s exactly what happened last night during an email exchange with my good friend, Jim Joyner (see “Vermiponics“). Jim recently started up a forum for those with a serious interest in the topic of vermiponics and we’ve been in discussion about him possibly providing a bit of an update here to let everyone know what he’s been up to this season. Nevertheless, I had already made what I thought was a “firm decision” not to set up my own vermiponics system this year. I am absolutely fascinated with the concept, but the fact is, I just have so much gardening/composting stuff on the go (not to mention a serious lack of space for any new systems) that I figured it would be more trouble than it was worth.
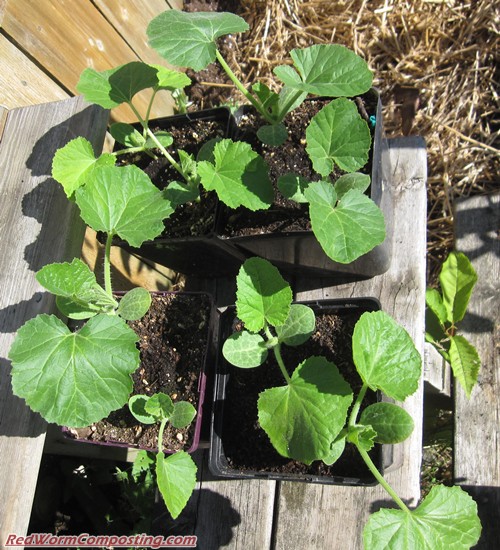
Well, I guess the stars and the moon were aligned last night (haha), since everything just kinda fell into place – and I KNEW exactly what I was going to do this morning. I had remembered that there were two buckets filled with used hydroton gravel (from last season’s system) sitting out in the yard. One of them already happened to have a small tomato (volunteer) plant growing up in it, and I figured the other one could be used to try growing one of the Crookneck Squash plants from my vermicompost growth experiment.
So yeah…about the vermicompost growth experiments…
😆
I basically gave up on the radishes and marigolds. The oppressive heat and lack of rain has just made it silly for me to try and keep these poor plants alive. The results from the squash experiment have been quite interesting (see the photo below – taken just before I put the smallest squash plant in the vermiponics pot) – as expected, the soil-only treatment showed the poorest growth, and the best growth was in the two 33% vermicompost treatments. The 100% vermicompost treatment plant wasn’t as small as the soil-only plant, but clearly growing plants in just vermicompost isn’t necessarily the best approach. All of these results are very much in line with academic research findings, BUT… In hindsight, it would have been better if I had put a little fertilizer stick in each pot, since the amount of starter fertilizer in the Pro-Mix probably isn’t enough to really support the growth of the squash plants as they get bigger. In other words, we can’t say for sure that the increased growth in the 33% vermicompost treatments isn’t simply due to the nutrients available in the vermicompost (and in fact, I’m sure that’s a BIG part of it).

Anyway, it was still a fun experiment – and perhaps I can come up something similar (but with more reps – and additional fertilizer being added) before the end of the season.
Ok – getting back to vermiponics!
The first thing I did with my buckets of gravel was drill a bunch of holes down near the bottom. The idea here is that this will allow for oxygenation of the root zone and flow of nutrient-laden water as well. The set up is pretty basic – the buckets are simply sitting in a larger container of water, with a pump circulating it through piping and back into the reservoir continually.

I propped the buckets up on blocks in the reservoir so as to allow for some bottom flow as well (have some holes on the bottom of the buckets, and plan to add more soon) – plus it pushes the water level up, meaning I don’t need as much in the reservoir.

The reservoir container I’m using (same one from last year’s outdoor vermiponics set-up) has a series of openings all around the rim – these worked very nicely for holding the hose in place. All I did for the last little length of hose was clamp it to the side of the tank so there’s no chance of it popping out and pouring water onto the lawn.

I’d be very surprised if there weren’t at least SOME Red Worms in these buckets already, but I will likely add some more as well. This time around I will be trying a combination of worm-feeding (haven’t decided on the food just yet) and vermicompost tea creation in the reservoir. This morning I filled two small small bags with vermicompost and submerged them in the water.

I’ve been having great success with this screened vermicompost in my garden this year – it seems to be providing my plants with all (or at least most) of the “fertilizer” they need, since I haven’t really been adding anything else (waste materials for the worms to break down etc etc) in most cases. This was a big part of why I wanted to see what I could do with a “tea” made from this material.
If I can actually grow a tomato and squash plant that produce a crop in this system I will be impressed. I’ll likely add a bit of the micronized rock dust periodically just to make sure I’ve covered the bases in the micronutrient department – but I don’t think I’m going to add any molasses etc. I want to make sure my solution stays well-oxygenated, and that might be pushing my luck given the relatively modest flow of water back into the reservoir my pump seems to be producing for me.
So, that’s basically it! I’ll be really interested to see how quickly my squash plant catches up with the others still sitting in their small pots (will aim to get these planted somewhere in the yard before too long, though), and just generally, how quickly these plants grow in comparison to the rest of my garden plants. If any system was ideal for hot, dry weather – this would be it!!
I’ll keep everyone posted!
8)
By the way, if you are fairly new to the site, and this is a topic of interest, you may want to check out the “Vermiponics” section on the HOT TOPICS page for a listing of past blog posts on this topic (among numerous other topics).
Also, if you are interested in joining Jim’s vermiponics forum please drop me a line (make sure to include “vermiponics forum” in the subject) and I will help you get connected with him so he can create an account for you.
Ground Cherries 2011
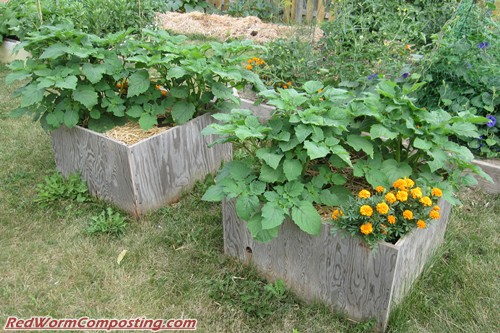
Some of you may recall my attempt to grow Ground Cherries (Physalis sp) last season (see “Ground Cherries“). It was definitely a long shot given how late in the season I got started, but I gave it the ol’ college try anyway! I ended up getting pretty close to having ripe fruit by the end of the season, but the plants were killed by frost before they could provide me with a tasty harvest.
This year I vowed to get the ball rolling a lot earlier, and to really put a serious effort into producing an abundance of these tasty little “cherries” (actually a close relative of tomatoes). Aside from getting the seeds started many weeks prior to my starting point last year, I also decided to give them a lot more room to spread out in. Last year they for forced to grow sad little container (actually the top of one of those enclosed kitty litter boxes – haha), but this year I reserved my big wooden “tomato/potato boxes” (of previous seasons) for them, and have been pampering them all the way along.
I am happy to report that they are well on their way towards producing a crop of ground cherries. As you can see in the picture below, many flowers have already turned into the husks in which the fruit grows – so I’m probably about 2 months ahead of where I was last year!

The only thing I’ve given these plants in the way of “fertilizer” is screened vermicompost (one of the boxes has however also received some rock dust as a bit of an experiment), and it really seems to be working well. Can only imagine what would happen if we actually got some rain!
😆
(Ok, ok – I’ll stop complaining about the drought!)
Water Socks?

For some reason, I found myself wondering this morning if I should create a new category on the blog called “Hair-Brained Ideas”.
😆
So yeah, remember how I said that it was finally raining yesterday? Well, as it turns out, Mother Nature and the Weather Network were just teasing us! Funny…my understanding of weather forecasting was that “100% chance of precipitation” means there’s a reasonable chance it might rain – not that it’s going to be clear as a bell and sunny. lol (Ok, ok – we DID get a teeny bit of rain in the morning, but not the 20-30 ml they were calling for, that’s for sure)
Anywho…
For those of you just tuning in, it’s been really really hot and dry in my region this summer, so I’ve naturally been thinking a lot about ways to conserve water as much as possible while still keeping my garden plants alive. Over the years, I’ve had great success with using straw mulch around my plants – and it’s certainly helped this year – but the combination of crazy hot temperatures (for up here, that is) and zero rain has the potential to really take a toll on the plants – especially if I happen to be away from the house for a day or two (stranger things have happened during the summer months – haha).
SO…I decided to test out a new hair-brained idea!
I tend to be a bit of a pack-rat – always trying to find uses for a lot of the stuff we no longer want/need. My wife likes to call me a “hoarder” (lol), but from time to time, my hoarding tendencies do actually kinda pay off (well, I think so anyway! haha). A little while back, my wife handed me a garbage bag of old clothes that she no longer wanted, and which were not really well-suited for donation. Of course, my first thought was – COMPOSTING! Specifically, I knew that old (moist) clothes would likely make for a nice composting worm habitat. I can’t say my wife was too thrilled with the idea of some neighbor (or future house occupant) potentially finding a partially composted piece of…uhhhh…”clothing” in their yard – but I did my best to assure her that the worms and bugs would ensure that there was no (biodegradable) evidence left behind.
~{INSERT EVIL LAUGH}~
I may still using some of the old clothing for vermicomposting at some point, but given the fact that there were many pairs of old socks in the bag, I came up with what may very well be a much better use for all that cotton!
I stuffed some socks full of other garments and tied off the ends. These “water socks” were then soaked in a bucket of water until sopping wet.

The idea here is to provide slow-release moisture for those plants/gardens with a greater tendency to suffer from the hot dry weather. In my mind, the ideal location for one of these water-logged cotton sausages is underneath dense vegetation, or some sort of mulch. Obviously it doesn’t make too much sense to use them if most of the water just ends up evaporating away (although in certain cases – such as small container gardens – if it allows you to keep your plants alive while you are away, I figure it’s worth a little bit of lost water).

Of course, I couldn’t just share this water socks idea and leave it at that! This is a vermicomposting blog after all!
8)
One thing I’ve noticed about the (good quality) vermicompost I happen to have an abundance of this year is that it can work really well for creating watering “dams” at the base of my plants. We have heavy clay soils in my region, and as anyone who has dealt with these soils in the summer can attest, they can harden when drying out – making it very difficult to water without 3/4 of the water running off on you. With a nice handful of vermicompost at the base of the plants it becomes much easy to rein the water in and keep it where it’s needed. Having water percolating through the vermicompost on a regular basis can obviously provide the plants with a mild “vermicompost tea” application as well.
The only issue, however, is that the vermicompost can dry up and/or slowly get washed away – reducing it’s effectiveness over time. I thought perhaps that if it was sitting inside a sock instead, it might provide benefits for a fair bit longer. Like the cotton water socks, it would certainly be a good slow-release water source – but with the added benefit of providing the plants with the “tea” instead of plain water. Each time you water you could simply pour it directly onto the sock, soaking it in the process and sending good stuff down to the roots as well.
I made up a couple of vermi water socks this morning so I could test them out.

I soaked them in water (making myself a nice simple tea in the bucket at the same time), and then added one to my big potted Sungold tomato (sitting on my deck), and one down at the base of a clump of Echinacea that have been suffering a bit with all this hot dry weather (they are just starting to flower so I’d like to help them out a bit).


Of course, there are lots of different materials that could be stuffed into socks and used for water-holding and slow release moisture – it would actually be really interesting to compare different materials. I wonder, for example, how scrunched up newsprint would compare to cotton? How about paper towels?
Perhaps something I can test out at some point!
Anyway – I will keep everyone posted!
8)
Lasagna Gardening-07-18-11
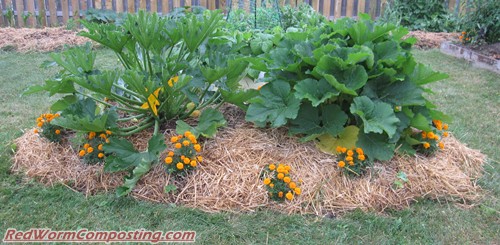
It’s been nearly a month since my last lasagna gardening update, so I figured it might not be a bad idea to let everyone know what’s going on with the project. Conditions have been extremely dry this summer – it’s finally raining today, but it’s probably been at least a month since our last decent rain fall – so I finally smartened up and put a nice layer of straw over the lasagna bed a little while back. It’s amazing how much of a difference this can make in terms of water conservation. I’ve still needed to water these summer squash plants fairly regularly, but considering their large size, they been holding up very well (not wilting all that much) during some serious sunny “heat wave” weather.
One thing I STILL haven’t done, though, is add food waste! The only thing (apart from what’s already in the bed) these plants have been receiving is vermicompost, which seems to be helping them along quite nicely. Both plants are producing squash (one is “Italian Ribbed Zucchini”, the other is “Vegetable Marrow Squash”), and we’ve enjoyed some of them on the BBQ already.
Apart from adding some more waste materials to this bed, I also want to see how the worm population is doing. In general, all this hot dry weather hasn’t exactly been ideal for my worm beds, so it will be interesting to see if they are faring better in this garden bed (where moisture levels may be somewhat higher).
Anyway – that’s basically it for now. Will provide another update again before too long!
8)
Compost Sak Vermicomposting-07-15-11

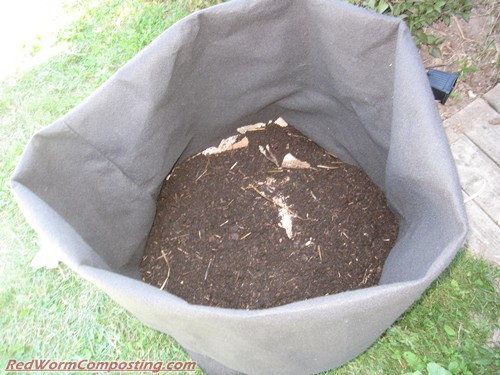
I finally got around to setting up my Compost Sak vermicomposting system today! Whoohoo!
As is usually the case when I set up a worm composting system, the first thing I did was add a nice thick later of ripped up cardboard down at the bottom. As you can see, I’ve initially rolled down the sides of the Compost Sak since I won’t be filling it to the top any time soon!

Next, I added a bunch of “compost ecosystem” material (material from my worm beds, from which a lot of worms have already been harvested). This will help to get the Red Worm population started, help to establish the “habitat” zone etc.
I then added a bag of frozen food waste…
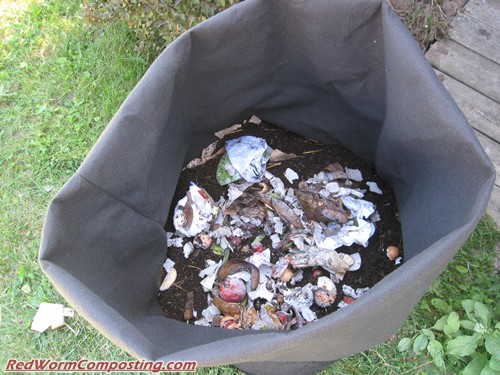
…some compost tumbler waste materials, and some rock dust.
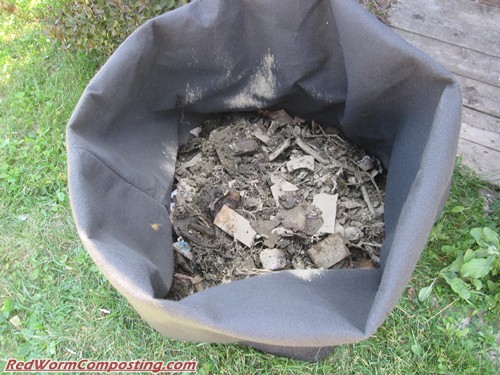
Next, I added even more compost ecosystem.

Then, as an afterthought, I decided to add some old coffee grounds and filters.

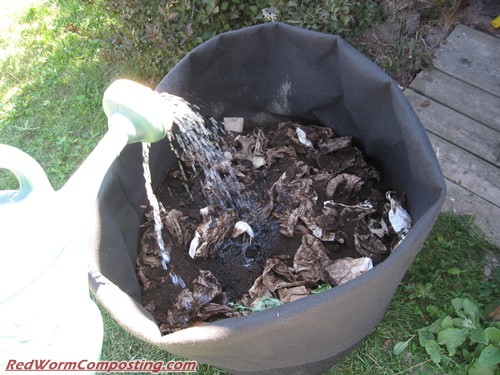
Lastly, I watered everything down before putting a thick layer of straw over top (as you can see in first image) and dragging the sak to its permament location (it’s already getting really heavy, so I certainly won’t be wanting to try and move it after today).
I must say that I am REALLY excited about testing out this new worm bed – in my humble opinion, it has the potential to become a highly effective waste-processing (and worm growing) system! I suspect the only real issue I will be faced with is trying to keep it moist, given how breathable it is – but I’m sure this won’t be a major problem, especially if we actually get some rain this summer (…SIGH…)
As for the other Compost Sak…as much as I was looking forward to my potato tower idea, I think that given how late in the season we are already, it makes more sense to simply fill it with soil (and vermicompost etc) and transfer one of my bucket tomato plants over to it. I think it could be an outstanding raised bed for a single tomato plant, and I will definitely make sure to get myself a tall support pole just in case this tomato goes completely crazy! I have a “Sungold” cherry tomato plant up on my deck in a black plastic tree pot and it’s done VERY well, so I have a sneaking suspicion that this could end up being a really fun project!
I will keep everyone posted!
8)
Vermicompost Experiments-07-14-11
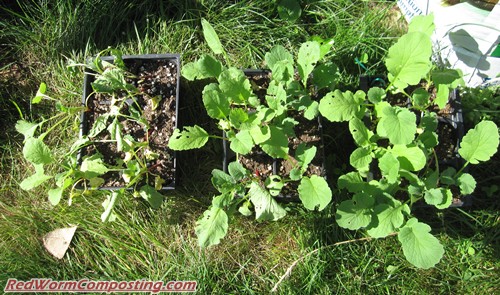
I was planning to throw in the towel with my radish growth experiment today – as someone aptly pointed out in a comment on a previous post, hot summer weather isn’t exactly the ideal time for these seedlings – but then I noticed something really interesting with my neglected plants. The Pro-Mix only treatment (far left in picture above) looked a lot worse than the two vermicompost treatments! To me, this seems to clearly indicate improved drought resistance (when vermicompost is added to mix) – just not sure if it’s due to improved water-holding capacity or more robust root structure (both?).
This is actually not the first time I’ve seen this in one of my experiments. Some of you LONG-TIME RWC readers may recall when I received some complimentary “Worm Power” worm castings a few years back, and ended up trying out various little growth experiments. As is the case with these thirsty radish plants, it ended up being a case of my absent-minded neglect uncovering something interesting (see “Worm Castings and Drought Resistance“). Clearly, more evidence supporting the fact that my foibles should be a cause for celebration, not frustration!
😆
Another interesting thing to note, is that the vermicompost with rock dust and grounds treatment seems to be quite the tasty treat for critters. The seedlings in this treatment have a lot more holes in the leaves than either of the other two. Could this suggest that rock dust might improve the flavor of leafy greens? I dunno – but that’s kinda cool if you ask me!
All in all, the 33% normal vermicompost mix looks the best – with bigger, healthy looking seedlings, in spite of the fact that I just haven’t been keeping up with my watering schedule! Speaking of which, and just in case you are wondering, I did indeed give these poor plants a nice drink of wah wah after taking the picture!
🙂
Moving on to the Crookneck Squash experiment…
This one yielded some interesting results early on, but things have started to level out a bit. It took a little while for any of the plants to germinate initially, but it was the two 33% vermicompost treatments (one with the rock dust etc, the other without) where the plants emerged first – the other treatments (Pro-Mix only, and pure vermicompost) were multiple days behind.
Since then the slower treatments have been playing catch-up, but I still think the two 33% vermicompost treatment plants look healthier. Just so you know, in the image below (which unfortunately isn’t the greatest), top-left is Pro-Mix-only; top-right is 33% vermicompost in Pro-Mix; bottom-left is 33% amended vermicompost in Pro-Mix; bottom-right is 100% vermicompost.
Next, I will likely remove the smaller of the two plants in each pot so as to provide the plants with a bit more room to grow. I will then likely move them to larger pots at some point.
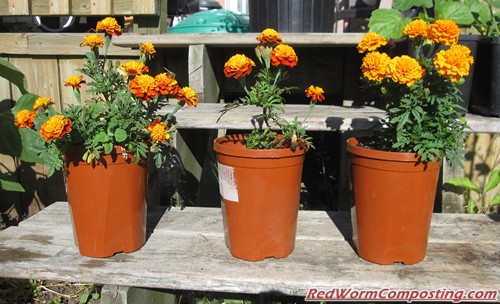
Moving on to the marigold experiment…
While I am not really taking this one too seriously (especially given the fact that I didn’t use the same type of marigold in all the treatments! lol), it’s still fun to see how it’s coming along. Still basically looks the same as last time, but I have a sneaking suspicion that the rock dust and coffee grounds vermicompost treatment is on the comeback trail – and who knows, perhaps it will even beat out the other two eventually!
Anyway – that’s all for this update! Certainly more vermicompost growth updates (and new experiments?) on the way.
8)