
December 2009
50 Cocoon Challenge – Straw

Moistened straw plus 50 Red Worm cocoons – we are ready to roll!
The set-up of my latest 50 Cocoon Challenge (Straw Edition) came together quite nicely for me late last week (earlier than expected) when I hit upon some material – left in the bottom of my “Laundry Line Bean Gardens” – that had quite a few cocoons in it.
Apart from the fact that I am just plain excited to have another 50 Cocoon challenge underway, I am REALLY eager to see what happens in this bin – both in terms of straw rotting, and worm population growth. I have written previously about the fact that Red Worms seem to be very attracted to moistened bales of straw that have been left to site for a while (see “Red Worms Love Rotten Straw!“), but I think the warm/wet environment inside a plastic worm bin will help to make the straw habitat even more appealing!
I am also interested to see if the fact that the cocoons came in from the cold will have an impact on the hatching times. I have a hunch that worm cocoons are a little bit like some seeds in that they can be stimulated to hatch more quickly if they are first chilled for awhile. I know that Red Worm populations bounce back very quickly in the spring as things start to warm up, and I have witnessed what seems to be mass hatching in materials brought in from the cold before, so I wouldn’t be surprised if we see some worms hatching more quickly in this bin than in the one with the shredded cardboard (those cocoons came from indoor systems).
Anyway, not really much else to say here. I am definitely aiming to monitor both of these challenge bins a bit more closely than I have in the past – and will certainly report back with any significant developments as they occur (or more accurately, as they are discovered).
Stay tuned!
8)
Mark’s OSCR – 12-04-09
Hi everybody!
It’s been a while since I submitted an update on my OSCR. A ton of things have happened since I started.
On 11/21/09 I Added 3 pounds of vegetable scraps and 5 pounds of CG and left it uncovered. There have been some major breaches of the newspaper on the harvest chamber cables. What is odd is that about one inch of the finished VC has fallen along with some worms as I expected but, it leaves a 2 inch void in between the cables and the VC.
I suspect that the paper, manure, and leaves have created a layer of bulk that is suspending the VC from falling down into the harvest chamber. I have 6 bins containing moist manure in the harvest chamber to catch the VC, cocoons, and worms.
Tonight the bin has had cold spots – low 60s. The weather outside has been mild and I plugged the heater 3 days ago. I left the food uncovered to try out my gnat/fly experiment, if the temperature doesn’t climb back to at least 66 degrees in the morning; I am going to scrap the experiment and cover with mulched leaves.
My gnat / fly experiment was to attract gnats and flies to see if the horse manure would repel these pests. My other goal was to help Bentley eradicate these insects from the face of the Earth and have them added to the extinct species list.
EDITOR’S NOTE: Hahahahahaha!
Honestly, I have never really had gnats in any of my outdoor bins and still only a few showed up but, a lot of people do have problems with them. I got a few gnats hoping I would fit in with gnat issues. A dozen gnats do not mean an infestation.
Darn my luck!
Please keep sending your question and comments.
Mark

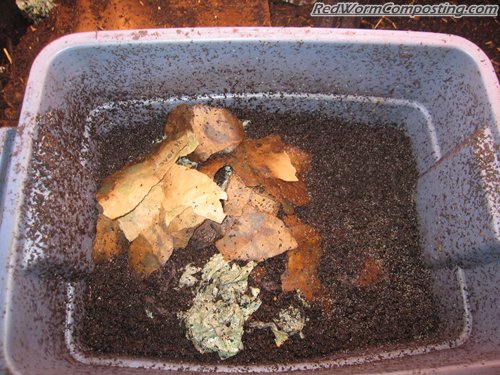
Some vermicompost harvested from the OSCR

‘Mark from Kansas’ is an avid vermicomposter from…well…Kansas, and contributing author here at Red Worm Composting. When he is not tending to his OSCR worm bin, Mark also enjoys spending time with his wife Letty (who also doubles as his trusty vermicomposting assistant) and picking petunias (ok, Bentley just made that last bit up).
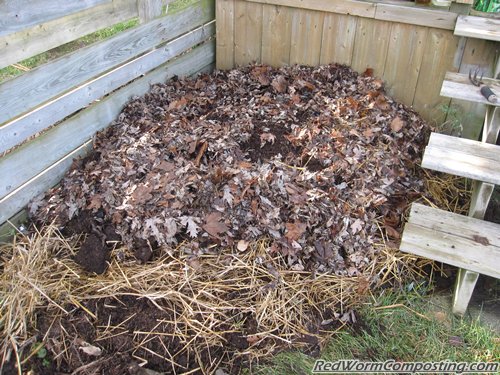
Winter Cat Litter Composting Bed

Heaped up with straw, fall leaves and compostable cat litter waste, this worm bed should be relatively easy to keep warm this winter!
Back at the beginning of November I wrote about my fall clean-up efforts, and promised to provide you with an update on my outdoor cat litter composting experiment. As some of you will recall, I filled up one of my backyard composters with compostable cat litter, along with peat moss and other compostable materials, and then basically left it to sit (once the level was nearing the top of the bin). In my last update (WAY back in August) I reported on my pleasant, and unexpected, discovery of a thriving Red Worm population in the bottom of the bin. I had been holding off from actually stocking the system with worms simply because I assumed the habitat in the bin would still be inhospitable for them. Yet another example of how Red Worms NEVER cease to amaze me! (have another prime example of this coming up in another post, by the way!).
Given the fact that this ‘regular’ backyard composter is totally unprotected, I knew that something would need to be done in order to make sure that the resident worm population survived the winter (although, have I mentioned that Red Worms tend to surprise me from time to time? haha! One winter I had a population survive unprotected in this exact same bin). I settled on the idea of spreading out the contents of the bin on one of my (non-food-crop) garden beds, then simply covering it with a layer of straw. Recently, I have decided to take things one step further.
What follows is a series of photos and captions documenting the process. I will also add some final thoughts afterwards, along with links to previous cat litter composting blog posts.
**WARNING** – Some photos show cat turds – viewer discretion is advised (don’t scroll down if this sort of thing bothers you). Also, be aware that cat litter composting warrants some caution, and should generally only be attempted by those with previous composting experience. Any dog or cat waste composting systems should dedicated to those waste materials alone (i.e. don’t toss them in your ‘regular’ compost bins), and should not be set up near any water sources. Cat litter shouldn’t be handled at all by pregnant women or young children.
Ok, you’ve been warned – you may now proceed!
😉

I was surprised by the success of the cat litter composting in one of my backyard bins this past summer (especially given the fact that a substantial population of worms became established without any assistance from me), but definitely didn’t want to let the contents freeze solid over the winter

Contents of the cat litter composting bin, spread out on one of my garden beds (one not used for food crops, in case you are curious) then moistened.

Covered with a first layer of straw – originally planned as my only layer of winter protection.

Material from my backyard bin – I figured this bed was as good a spot to add some as any. This is actually what got me to start thinking about upgrading the bed to a full-fledged winter composting system.
Before adding more compostable cat litter I wanted to make sure there was a bit of a buffer zone, so I added some fall leaves.

Multiple bags of cat litter waste were then added.

First layer of cat litter was covered with straw, then new litter deposits were added. First I lay down leaves, then brown paper, then the litter waste.

Each of these additional litter deposits was then covered with more leaves

Finally, everything was covered with a thick layer of straw. I will eventually add a couple of tarps, but I want to allow the system to ‘air out’ for a while first.
As alluded to in the last caption, I’ve been somewhat worried about adding tarps over the system too soon – the last thing I want to do is kill off my worms with excess ammonia gas. Most of the litter waste that was added to this bed (apart from the material from the composter, laid down as the first layer) has been sitting in bags, so it certainly hasn’t been given a good opportunity to age and off-gas any ammonia.
What’s really cool is that we ended up getting a huge downpour the evening/night after I set up this bed. This should REALLY help since it will not only moisten everything nicely, but it will also likely help to make the cat litter wastes a little more worm friendly. I am still going to leave the tarps off for now – and for the next few weeks will likely only use them if I know we are going to receive a heavy snowfall.
As far as adding new waste materials goes, I plan to only add a relatively small amount at a time from here on out, and I will make sure to create a bit of a buffer zone (using fall leaves I still have left over) around each deposit. I will also likely add some cat litter waste to the original backyard composter (some excess has already been added there) – since it has been totally cleaned out I won’t need to worry about a new worm population becoming established. It will basically just serve as a holding bin until warmer weather arrives in 3-4 months.
Anyway – it should be really interesting to see how this progresses! One thing is for sure – by the time spring rolls around this bed should be absolutely LOADED with fat Red Worms!
Previous Cat Litter Composting Posts
Cat Litter Vermicomposting
Cat Litter Composting – Update
Cat Litter Composting – 12-02-08
Cat Litter Composting – 01-05-09
Cat Litter Composting – 08-07-09
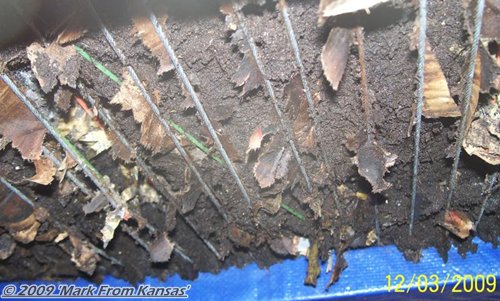
Winter Worm Windrow – 12-03-09

The weather has certainly been getting colder around here as of late, so I thought it would be a good time for an update on my “Winter Worm Composting Windrow” (the testing grounds for this year’s “Winter Composting Extravaganza”). Just to recap (for the benefit of those of you just tuning in) – this is a bed that I set up (with my dad’s help) over top of a stretch of “vermicomposting trench” about two weeks ago. We heaped up lots of fall leaves, mulched grass/leaves, aged horse manure, and pumpkin waste, then covered it with a thick layer of straw (and a tarp over top).
Since writing my last post, I have also added quite a lot of material from my big outdoor wooden worm bin, in an effort to save a lot of worms, and just generally add some more microbial ‘oomph‘ to the windrow.

Emptying out the big backyard bin – before the REAL cold hits!
As I discovered, the big bin holds a LOT of material – so I probably only transferred about half (at most) of it to the winter bed. I have been putting the rest of it to good use in other beds (something I’ll write more about soon) – so it’s certainly not going to be left to freeze.
The material was added to the windrow by first pushing back the upper layers of straw and leaves. The idea here is to have this worm- and microbe-rich material sitting in the core of the bed, rather than on top of everything, where it wouldn’t be insulated or serve much purpose in terms of keeping the bed warm.

Adding a lot of well-processed material (and worms) from wooden worm bin
The material was pretty cold by the time I got around to adding it, but I certainly wasn’t too worried about cooling things off in the windrow – in fact, we are still at a stage where it is advantageous to keep the bed heating to a minimum. One of the lessons I learned during my first couple of winter worm composting attempts (you can access the posts I wrote about them >>HERE<<) is that without the proper planning, and resource rationing, you can end up with a really cold composting system later in the winter if you are not careful. So far, things have been moving along beautifully in the windrow. It has warmed up enough to provide great living conditions for the worms (and other critters), but hasn't overheated as far as I can tell. The level of material seems to have gone down somewhat, but upon closer inspection it is clear that there is still plenty of 'fuel' for the really cold times that lie ahead.

Melted frost, and even dry patches on tarp – an indication of warmth down below

Temperatures in the middle of the windrow seem to be hovering around the 20 C / 68 F mark, with cooler zones along the sides of the bed. The warmest zone I could find in any of the unprotected (but still winterized) beds was probably around 8 C / ~46 F, but temps as low as 2 C / ~36 F were observed as well. It’s amazing what a little extra material and a tarp can do!
8)
As I mentioned in my last post, there is still a LOT more material to be added to this system. My dad and I will be dismantling the big winter bed from last year, and all those straw bales (undoubtedly containing zillions of worms) will be added. The tricky part of course, will be figuring out how to add the materials over time – if I added everything all at once I would end up with a crazy hot composting windrow, and likely a lot of dead worms. I obviously can’t leave the material sitting out in garbage cans in my yard (since any worms living in the straw will likely freeze to death) and there is only so much I can bring inside. What I will likely end up doing is simply adding a bunch of the material to various other beds. Speaking of which, I should mention that I also have plans to convert at least one of my other beds into yet another real winter system (more on that in an upcoming post), so it will certainly come in handy for that.
50 Cocoon Challenge – Shredded Cardboard

I just wanted to let everyone know that I finally got my ’50 Cocoon Challenge’ (Cardboard Edition) bin set up on Monday. I won’t say it was easy to track down 50 cocoons for this bin, but the important thing is that I DID manage to do so, and we are now off to the races!
Again, the idea here is to ONLY feed this bin moistened cardboard, and to once again see how long it takes for worms to hatch and, more importantly, reach adulthood. The reason I say it’s not quite as important to monitor hatching times, is simply due to the fact that all these cocoons are likely at different stages of development – it would have been next to impossible to round up 50 brand new worm cocoons unfortunately.
I am also really interested to see how the population of worms develops over time with only cardboard as a food source. Speaking of which, I should mention that the “cardboard” in this case refers to shredded corrugated, and “drink tray” (aka “egg carton”) cardboard – my two favorite types.
I basically filled the bin about half way with the cardboard, then moistened really well (making sure to mix everything up nicely) before adding the cocoons.
As promised, I will also be starting up another 50 Cocoon Challenge bin with only moistened straw – so look for a post about that sometime in the next week or so!
Should be fun!
8)
Winter Worm Bin Heating – A Novel (and Festive?) Approach

Tis the season to pull out all those dusty boxes of Christmas lights and decorations and start ‘decking the halls’ with the stuff.
🙂
While I DO enjoy the end product (the decorated house), the prospect of actually doing the decorating is something I dread each year. Invariably, it seems (according to someone who shall remain nameless) that our current decorations are not quite up to snuff for this year, and as such, that multiple trips to the store to buy more are warranted. Of course, this approach seems to leave us with {cough} perfectly good {/cough} stuff that is no longer needed.
Among the casualties this year there were a couple of lengths of rope light, no longer welcome out on our back deck, where they had added a dull blue shimmer for the last couple of holiday seasons (OK, I’ll admit – these weren’t the nicest of Christmas lights). When told to “get rid of them”, I (being the pack rat that I am) of course snuck off with them and put them out of harms way.
WHY?!
Well, aside from the fact that I’m a “waste to resource” kinda guy in general, these lights MAY be able to serve a different purpose this year – helping to keep some worm bins warm down in my basement.
This particular application (bottom heat for worm bins) is my idea, but credit for the concept in general definitely goes to David LaFerney, and his fascinating article “Home Made Bottom Heat for Seed Starting (or pet bed)” on his website, “The Door Garden” (a very interesting site in general, by the way).
I stumbled on the article back in the summer, and immediately saw the potential for keeping worm bins warm during colder weather (in an unheated garage, cold basement etc). Of course, it didn’t make all that much sense to write about it then, so I made a mental note to revisit the idea again in the fall.
As is often the case with my “mental notes”, this one ended up crumpled up and hidden in the dark recesses of my noggin, and if it hadn’t been for the recent incident with our unloved rope lights, it might have been fallen into the “void”, never to be thought of again!
😆
The basic concept here is to create a simple framework of channels on top of a bench/table for the string of lights to sit in, and then to put some sort of a surface over top (upon which your worm bins, seedling trays, pet beds etc will sit). David used hard styrofoam for the channel walls and a piece of drywall for the surface – he actually took it one step further than that by adding a sheet of vinyl flooring as well (to make the surface waterproof).
Because the lights only get slightly warm to the touch there is virtually no fire hazard (I’m no fire marshall – this is just based on the opinion I share with David), and since the lights are designed for outdoor use there wouldn’t be a shock hazard either.
As far as I’m concerned, David’s creation is nothing short of brilliant. As he points out himself, commercial bottom-heating pads can cost quite a lot of money, and will only heat a relatively small area. With this approach you can create a much larger surface, and for a lot less money. Since these are very low wattage lights, the cost of running this set up won’t likely be very much (or use up much power) either.
The only downside might be the fact that it’s not controlled via a thermostat of any sort (although I wouldn’t be surprised if the really enterprising DIYers out there could come up with something).
Anyway, I HIGHLY recommend you check out the article on David’s site (linked to above)! He outlines everything in great detail and provides a lot of really helpful photos.
Oh, and don’t forget to come back and share your thoughts here about the potential worm-bin-heating application!
8)
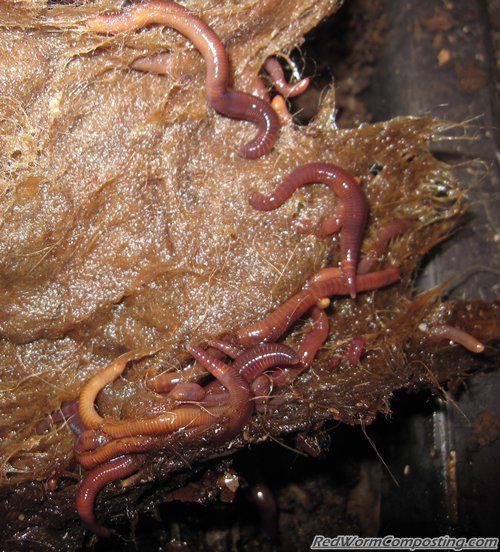
Dryer Lint Worm Bin Wrap-Up
It’s been a couple of months since my last ‘Dryer Lint Worm Bin’ update and I decided today that the experiment has basically run its course, so this will be the “wrap-up” post.
It has been an interesting experiment, although, as is often the case, I feel like I need to do some more experimentation with dryer lint as a worm bin bedding in order to feel comfortable making any firm conclusions.
In general, the population of worms in this tiny bin seems to have done very well. I don’t have much free time these days so I can’t do an actual population assessment, but all looks great based on the number of worms I saw in the material today. This is especially impressive given how little I added to the bin in the way of food, and how anaerobic I allowed it to become.
Speaking of which, it is also hard to say for sure how quickly this bedding material will break down in comparison to typical bedding materials, such as shredded cardboard, simply because there was not enough oxygenation going on throughout most of the bin. What I would like (and am tentatively planning) to do is incorporate some dryer lint into a future worm composting system with much greater air flow. I think the BOM-6000 system I’ll be using for my upcoming “Four Worm Reproduction Experiment” (Part Deux) might be the perfect one to test out.
Even the wet, stinky undecomposed lint seemed to be an attractive habitat for the worms (in the dryer lint bin) so I’m optimistic that this material will work well in a better quality worm composting environment.
I’d be interested to hear back from anyone else who might have tried dryer lint and/or pet hair etc in their worm composting systems, and as per usual, welcome any and all comments about the topic in general.
8)
Previous Dryer Lint Vermicomposting Posts (oldest to newest)
Composting Dryer Lint
Composting Dryer Lint – Update #1
Dryer Lint Worm Bin
Dryer Lint Worm Bin – Update
Dryer Lint Worm Bin – Update #2
Dryer Lint Worm Bin – Update #3
Dryer Lint Worm Bin – Update #4